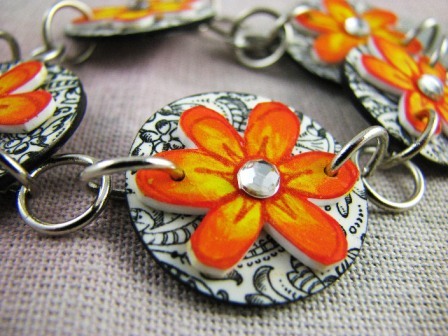
Brightly Colored Bangles
Seven different colors combine to create alternating bands in this friendly plastic jewelry craft project from AMACO. These colorful bangles are a great way to brighten up any outfit.

Materials:
- Friendly Plastic- 7” sticks: Colors of your choice
- Matte knife
- Acrylic ruler
- Cutting mat
- Scissor
- Griddle set at 200-300 degrees
- Non stick baking sheet (Nordic wear) Little gold pans
- Silicone non-stick baking sheet liner, cut to size: 3”x 8 1/2”
- 8” length of 1/8” (4mm) Rubber tubing, sold by the foot at Hobby stores
- Jar or glass approximately 7” around (the size of your wrist)
- Bowl of ice cold water
- Craft blade or utility knife
- Round nose and needle nose jewelry pliers
- Wire cutters
- Needle tool
- Clear elastic jewelry cording
- Jewelry findings: (Etsy.com) brass bead caps, spacer beads,
- Decorative focal bead (any coordinating beads will work)
Steps:
- Using a cutting mat, ruler and blade, cut 1/4” and 1/8” strip from each color of plastic stick. Then cut the strips in half using a scissor.
- Pre heat the griddle. Place the baking sheet onto the griddle. One at a time, in a pleasing color pattern. Place the plastic strips onto the baking sheet. Make sure each strip is stuck in place before adding the next. Try to press each strip tightly against the one before, to prevent any gaps. Continue adding strips until your sheet is at least 7 inches in length.
- Allow the plastic to soften and fuse together. If any gaps do appear, simply tap over them with your finger pressing the softened plastic together. When all the strips have softened and sealed together, remove the baking sheet from the griddle and allow the plastic to cool. Use the needle tool to press under the edges of the cooled plastic and remove it from the pan.
- Place the cooled plastic back on the cutting mat and trim off the uneven edges. Cut the plastic into 1” wide strips.
- Lay the silicone sheet onto the griddle. Position the plastic strip, right side down onto the center of the silicone sheet and allow the plastic to soften. You will notice as the plastic softens it becomes very shiny. It is important that you watch this process closely. As soon as the entire strip is shiny, remove the silicone sheet from the heat and lay it onto your counter or work surface.
- Carefully lay the rubber tubing along the top edge of the softened plastic strip.
- Moisten your fingers and hands with water, to prevent sticking to the plastic, and begin to roll it up and around the tubing. Continue until all of the plastic is wrapped around the tubing. Now you can use your fingers and palms of your hands to roll the cylinder back and forth on the silicone sheet, to secure and seal the overlap. Once you are happy with the look of your cylinder, pick it up by the extended ends of the tubing and wrap it around the jar. You need to move quite quickly before the plastic starts to harden. Quickly run it under the flow of cold water from the faucet or dip it into a bowl of ice cold water. This will quickly harden the outside of the cylinder allowing you to lay it down, to finish the cooling process without the fear of it getting marred.
- Once the cylinder has cooled and the plastic has hardened completely, you can remove the rubber tubing by pulling on each of the exposed ends until the seal within the cylinder has been broken. It takes quite a bit of pulling back and forth on each end until the seal is finally broken. Just be patient. You will know when this has happened, as the tubing will slide out.
- Place the cylinder onto the cutting mat and trim off the uneven ends, using a craft blade or a utility knife. I prefer using the craft blade for this. You do need to put a little muscle behind it in order to cut through the plastic. Just do it carefully. Next, cut the cylinder in half.
- Cut a 12” length of elastic cording. Assemble all the decorative components. Begin by sliding half of the cylinder onto the cording, add a bead cap and the decorative bead you want as the focal piece, now add the other bead cap and then the other half of the cylinder. To finish off the bangle add a bead or spacer bead onto the cord and then tie the two ends together. I like to tie a triple knot and then add a drop of glue for added security.


Thanks for your comment. Don't forget to share!
onecraftymomma4lif e
Jan 29, 2012
Yes please Were do you get the Friendly Plastic I rember buying this when i was younger to make Cameo pins useing a resin face and we would soften the plastic and make a hat and top and add jewels pearls etc I rember always being able to get the plastic strips at my local craft store for about or for I rember having allot of them and i was about or so so i'm sure they where not expencive all the sites i've found via google there about for strips and on Ebay there like for and on top you have to pay shipping i want them at a store so i can see the colors and Froggirl I think that there just saying the colors of your choice and if you want those colors maybe you'll have to test them and i hope i answed your question to where…Read More to get them google it and you'll get a few places that sell it
froggirl2
May 29, 2010
What kind of color sticks are these and whaer do you get them Thanks Miranda
Report Inappropriate Comment
Are you sure you would like to report this comment? It will be flagged for our moderators to take action.
Thank you for taking the time to improve the content on our site.