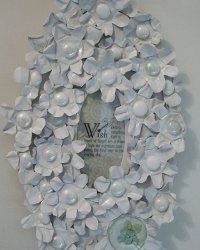
Tea Light Frame
Are you all out of frame craft ideas? Have no fear - we have the perfect project for you. A Tea Light Frame from Tiffany Windsor is a fun, whimsical take on a classic idea. This is a great gift for a friend or family member.

Materials:
- Frame (white or desired color)
- Scissors
- Wooden skewer
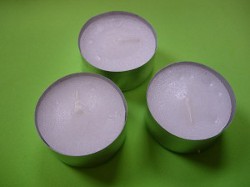
- Tea lights (I used traditional size and oversize tea lights)
- Aleene's Liquid Fusion Glue
- Rustoleum Flat White Spray Paint
- Flat backed marbles
- Quote for center of frame
- Wooden skewer (to hold pieces in place while spray painting)
- Spray gloss (optional)
Instructions:
- Select tea lights. ( On this project, I have used traditional sized tea lights and oversized tea lights that I purchased at Ikea.)
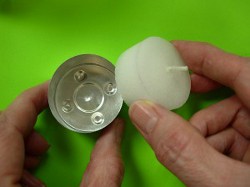
- If the tea light is new, just grab wick and pull out the wick and wax. If the tea light is used, remove the remaining wick and metal. You will also need to remove any left-over wax so that your paint will stick. (I like to use new tea lights so that no wax remains inside. Keep the wax candles - you can burn them in votives.)
- The metal used in tea lights is very thin and easy to cut. Make first cut in side of metal.
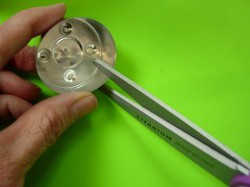
- Space cuts for desired number of petals.
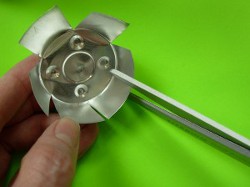
- Place face down on tabletop and press flat with palm of hand.
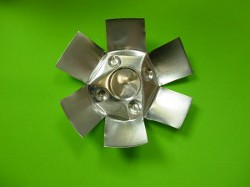
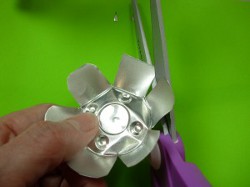
- Use scissors to round edges of petals. You might want to wear protective eyewear during this step because the small sharp corners can fly when you cut them off. Also, use a paper towel, wet wipe or fabric to remove these small pieces into your trash can. In other words, don't use your hands to clear these tiny cut pieces from your tabletop. They are sharp!
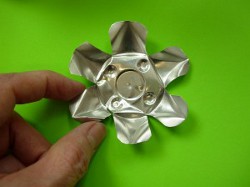
- All the petal corners are rounded.
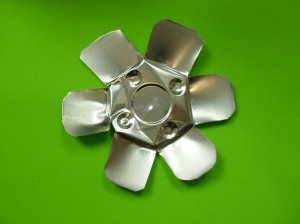
- Now it's time to give your petals some shape. Using two fingers, press and fold the edges of each petal to the center.
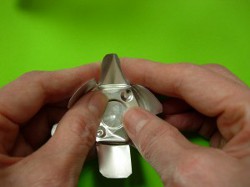
- Then fold back. You can also use a wooden skewer or toothpick to turn the edges of your petals for a different look.
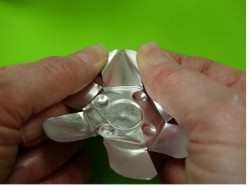
- Repeat on each petal to create a pretty dimensional flower.
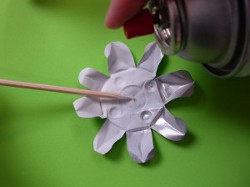
- In well ventilated area, spray each flower. I use a wooden skewer to hold the flower in place while spraying. These flowers are really light-weight and can fly around when you try to spray them so it's easier just to hold them in place. Spray back side first. Let dry. Spray front side. Let dry.
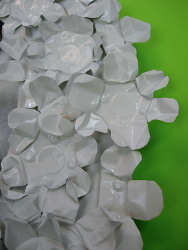
- Lay out on frame to determine desired placement. Snug the flowers together and overlap petals. You may also need to cut some flowers in half to fill in open spaces. Glue each flower in place on frame. Let glue dry.
- After my flowers were glued in place and completely dry, I re-sprayed the entire frame with white again and let dry completely.
- If desired, spray with gloss finish. (Be sure to test compatibility of your gloss finish with your spray paint. My gloss finish wrinkled the paint which was fine with me but if that is not your desired final finish, be sure to test compatibility first!)
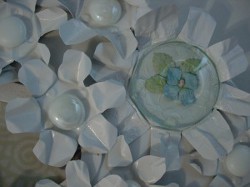
- If desired, glue flat back marbles in center of flowers. You can also use beads or other embellishments and trinkets for your flower centers. I also found a beveled glass circle that fit perfectly inside my large flowers. I pressed a silk flower and leaves underneath the glass and glued in place.
- I stacked a vellum quote over scrapbook paper for the center focus of my frame.

- You can also use these large (or small) flowers individually to create pretty magnets. On this magnet, I stamped a word on hand-colored paper. You can use dabs of glue to hold in place or reverse decoupage the paper to the back of your glass and then glue the glass in place.
For a comprehensive video tutorial of this project, check out How to Make a Floral Frame from Tea Lights.
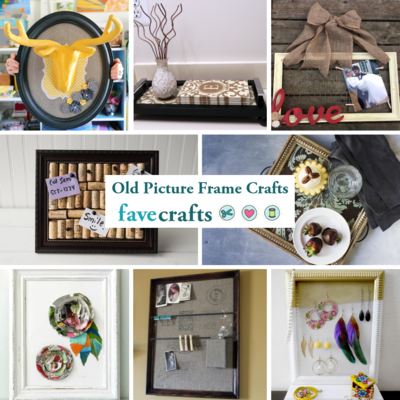
Read Next15 Old Picture Frame Crafts