July 4th Chair Covers
These July 4th chair covers from I Love to Create are the perfect way to make your 4th of July celebration festive. Add this easy, no-sew project to your list of 4th of July crafts to make this year, and watch the fireworks in style.
.jpg)
Materials:
- Aleene’s® Crystal Clear Tacky Spray™
- Aleene's® Fabric Tacky Packs
- Fabric: ½ yard per cover red, blue and ¼ yard white
- Newspapers
- Foil
- Low tack masking tape
- Ribbon, 1” wide red and blue grosgrain
- Acrylic gems, 30mm round crystal
- Freezer paper
- Paper towels
- Iron
- Ruler
- Small paintbrush
- Scissors
- Pencil
- Crayon
- White chalk
Patterns:
Pattern 1
Pattern 2
Pattern 3
Pattern 4
Pattern 5
Steps:
- Iron fabric smooth. Measure and cut a 37” x 16” rectangle for each chair cover desired.
- To finish edges, fold over and iron ¼” then ¼” again on long sides. Iron ¼” on short ends. Measure and fold up another 1-½”.
- Squeeze a small puddle of No Sew Fabric Glue from Tacky Pack on foil. Working in short sections at a time, dip brush into glue and apply a thin even layer along inside of folded edge. Press in place. Complete all edges and let dry.
- Enlarge patterns to size indicated on patterns. Place a sheet of freezer paper with shiny side down onto pattern. Trace design with pencil.
- Place coordinating fabric on ironing board and place freezer paper shiny side down on right side of fabric. Iron in place until freezer paper adheres.
- Use scissors to carefully cut out all designs.
- Cover work area with newspaper to protect surface laying a paper towel in center. Place cutout design fabric side up on paper towel. Following label instructions, spray a thin even layer Tacky Spray to fabric covering entire surface.
- Carefully position glue side in place on right side of chair cover and press in place. Carefully remove freezer paper and press fabric again to secure all edges. Fold excess fabric at sides and ends to back and press in place.
- Repeat step with patterns for white areas and place where shown.
- Use chalk to lightly draw on lettering for words. Working in short sections at a time, squeeze small equally spaced dots of Jewel-It Glue from Tacky Pack. Press crayon on top of gem and press into glue. The crayon will hold gem just long enough for easy placement. Continue with remainder of word and let dry.
- Cut 12” strips from ribbon, creating four for each cover. Apply a bead of Fabric Fusion, from Tacky Pack, onto one end of ribbon pressing in place to inside corners. Hold ribbon with small pieces of low tack masking tape until glue dries.
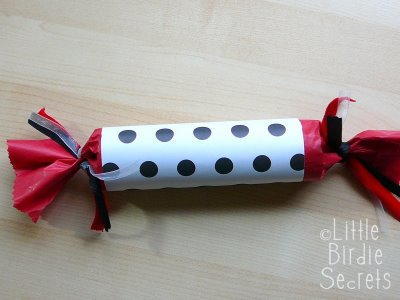
Read NextJuly 4th Party Poppers

![Pill Bottle Crafts: Reuse Pill Bottles [15 Ideas]](http://irepo.primecp.com/2017/06/334076/PILL-BOTTLE-CRAFTS-Header_Category-CategoryPageDefault_ID-2274135.jpg?v=2274135)