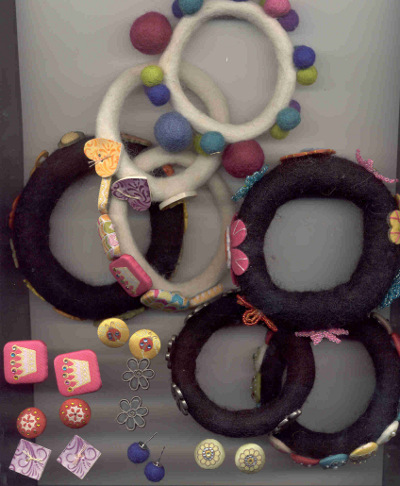
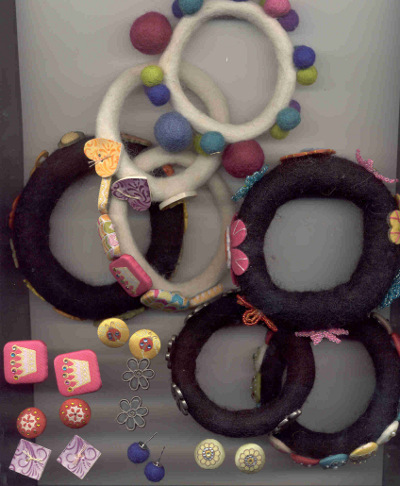
Felt Bracelets Gone Wild
Black and white felt bangles get some pizazz with delightful buttons and decorative brads. Get ready to load up your wrists!
Materials:
- Dimensions Feltworks heavy felt wool bracelet black
- Dimensions Feltworks wool blanks twin set black and white
- K and Company wild saffron metal art
- K and Company beaded flower brads
- K and Company urban rhapsody brads
- K and Company felt flower brads
- Making Memories charmed flower
- Dress It Up fall collection Give Thanks
- Dimensions Feltworks felt bracelet blanks
- Beacon Felt glue or Ad-Tech glue gun and low temp glue sticks
- Wire cutters or shank removal tool
- Emory board or fine sanding paper
- Pliers
- Optional: Post earring findings and jewelry glue
Instructions:
- Remove shanks from buttons with wire cutters or shank removal tool. Hold blades flush with button back and snip. If there are any rough edges left from the shank just sand smooth with emery board or sanding paper. Remove metal prongs from decorative brads with wire cutters or pliers, usually the back prong with snap out with a little tug. If you have to cut the prongs off use your wire cutters and sand any rough edges smooth.
- Consider your placement of embellishments. Use photo as guide or use your own creativity. Look at the spacing between embellishments; you don’t want to run out of room on the bracelet or have embellishments too crowded. Set aside a matching set of embellishments for earrings if you like.
- Adhere embellishments to outside rim of bracelet. If using a liquid glue hold embellishment in place for 30-60 seconds to make sure there is a bond. If using low temp. glue sticks, your bond sets quickly. The reason hot glue gun and glue sticks were not used is because a hot glue bond might not hold up over time if exposed to warm and cold temperatures.
Earrings
Quick earrings can be made to coordinate with your bracelets. Just remove shank or brad prongs as instructed in Step 1. Bond earring post findings with a jewelry glue. Allow to dry 24 hours before wearing.
Learn more about Maria and see her other projects here.
Read NextDIY Felt Flower Pillow
Your Recently Viewed Projects
Thanks for your comment. Don't forget to share!
gilliangrimmett 55 81814
Nov 18, 2010
What a fantastic project. Can you please tell me where I can get the felt bracelet blanks from? I have googled and can'y find any. Thank you
Report Inappropriate Comment
Are you sure you would like to report this comment? It will be flagged for our moderators to take action.
Thank you for taking the time to improve the content on our site.