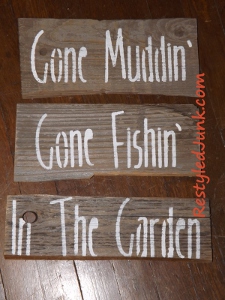
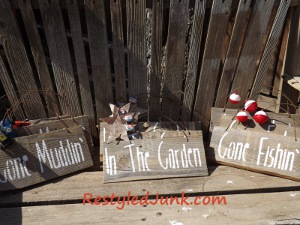
Rustic Man Cave Signs
Whether you're preparing for Father's Day or just want to show how much you care, you can't go wrong when you create your own Rustic man Cave Signs. DIY gifts for dad have never been so much fun to make. Use paint and recycled wood to bring your signs to life. Dad will love decorating his space with these personalized pieces and will feel sentimental whenever he spends time in his special space.

Materials:
- Cricut Expression
- Jubilee cartridge
- Card stock, 12-inch square
- 1-inch-wide painter's tape
- Scissors
- Ruler
- Wood scraps
- Chop saw
- Acrylic white paint
- Stencil brush
- Drill and 3/32-inch bit
- Baling wire
- Wire cutters
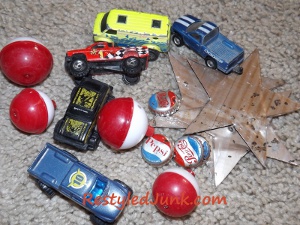
- Small decorative objects
- Craft wire
Instructions:
- Place a 12-inch-square sheet of card stock on your Cricut cutting mat. Insert the Jubilee cartridge, apply the keyboard pad and load the mat. Adjust the Cricut settings with the blade at 5, the speed at 4, the pressure at 5 and the image size at 4 inches.
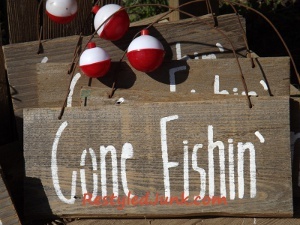
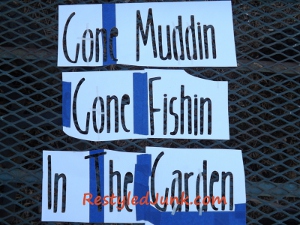
- Type "Gone Fishin", "Gone Mudding" or "In The Garden" using the keyboard pad. Note: There is no apostrophe on this cartridge. It is added later. Press cut. Note: All words or all letters will not fit on one line of the card stock. The Cricut will continue to cut the remainder of selected letters on a new row. Press unload when cutting has completed.
- Do not lift the card stock from the mat. Remove the inside of the letters from the stencil. Some letters have a center island. Do not remove the islands. Cut 1/8-inch-wide strips across the width of 1-inch-wide painter's tape. Create a bridge across the open area of the letters and onto the islands with the tape strips. Two or three strips equally spaced around the islands are sufficient. Remove the entire card stock stencil from the mat.
- Line up each row of words or letters that were cut to create one long stencil. Tape the pieces together using painter's tape.
- Choose the wood scraps for your signs. This project utilizes all the split and broken scraps in your wood pile. You will want pieces at least 4 inches wide. Using a chop saw, cut 12-inch lengths for the "Gone..." signs and 13-inch lengths for the "...Garden" sign.

- Center a stencil on the appropriate board length. Using white acrylic paint and a stencil brush, pounce a light coat of paint over the stenciled letters. Allow the paint to dry and apply another light coat. Remove the stencil. Using a small paintbrush, paint apostrophes on the end of "fishin" and "muddin".
- Using a 3/32-inch drill bit, drill holes approximately 1 inch from the top edge of the sign and 1 1/2 inches in from both ends.
- Cut an 18-inch length from rusty baling wire using wire cutters. Insert the ends of the wire through the holes from the back to the front. Pull the wire through 2 inches. Bend the 2 inch ends upward and the loop that formed on the back of the sign upward. This creates the sign hanger.

- Choose decorative objects to attach to the hangers of each sign. I used bobbers for the fishing sign, miniature cars for the mudding sign and rusty stars with bottle caps for the garden signs. Cut 6-inch lengths of craft wire. Using the craft wire, attach your decorations to the sign hangers.
Read NextRustic DIY Photo Frame