Natural Dye Easter Egg Tutorial
Learn how to dye your Easter eggs with fruits and vegetables using this easy Easter egg tutorial from Void Where Prohibited. Using natural foliage from your backyard you can create unique transfers to imprint on the Easter eggs for spring crafts with true beauty.


Materials:
- White eggs
- Red onion peels
- Yellow onion peels
- Green Tea
- Beets
- White Vinegar
- Tooth picks
- Random leaves and flowers
- Pantyhose
Crafter's Note: If you are willing to look like a dork this should not cost you much. I simply ignored weird looks as I took all of the fallen onion peels from the bin at the store. I happened to need one onion so I bought one for good measure. But I could have walked out with their trash with my head high. I had to buy a beet and two dozen eggs – that’s it. The flowers and leaves were all stuff I collected on the walk home. Everything else I already had.
Steps:
- I chopped up the ingredients as best I could (the beets went into the blender) and started cooking them ahead of time. In each pot I put about three spoons of vinegar to help the color stick to the eggs better.
- I hollowed out the eggs (tedious) and cut the pantyhose into sections a few inches long. I tied off one side and placed the egg and some of the leaves and flowers inside (with flowers or leaves pressed up to the egg), pulled the pantyhose really tight and tied off the other side to make little packets.
- Once I had all the eggs prepared and the ingredients had been cooking for a while, I did my best to fill all of the eggs with water so they would not float so much when I put them in the pots, for better coverage. As the water filling process took much longer than I guessed it would some of the eggs were in the pots for much longer than the others. That is OK, now I have some very dark eggs and some very light eggs.
- When everything was done cooking I flipped over the egg carton and put toothpicks in the bottom to make a handy little drying rack.
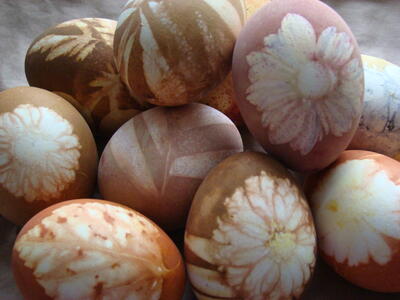
Finished Products:
Yellow Onion

- I would say that this is my favorite color, very deep and rich, even if the eggs were not in the mixture for too long. Very even coverage of color as well.
Red Onion

- A very earthy brown color and like the yellow onions the color took to the egg very quickly and with very uniform coverage.
If you do not have a lot of time to color eggs, I would use the onion peels for quick results.
Green Tea

- The green tea eggs had an interesting effect, two of the eggs took color from the flowers that were pressed on them. Green tea gave me less even coverage but the color was a pretty buttery gold.
Beets

- When I got up this morning the beet eggs had dried into a very pretty speckled pink. I think that the residue had to fully dry for the color to come out. The bottom left egg is what happens if you wash the egg before it is dry (there was a lot of beet residue on the egg and I got lazy and just ran it under water to clean it off)…DON”T WASH THESE! Just flick the beet bits off and put them aside.
Find this project and many Easter crafts in the 30-page Easter Crafts: Blogger Edition 2010 eBook.
Your Recently Viewed Projects

Thanks for your comment. Don't forget to share!
BJ FollmerWeirich
Mar 27, 2012
I need more detailed instructions for the water/die bath for each color. How much water, and how many eggs will it color, how long do I cook the die color water.....etc..
Report Inappropriate Comment
Are you sure you would like to report this comment? It will be flagged for our moderators to take action.
Thank you for taking the time to improve the content on our site.