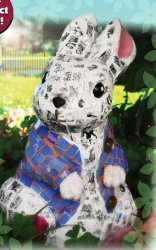
Mosaic Bunny
Create a cute mosaic bunny from Diamond Tech to look just like a vintage Peter Rabbit. This is a fun project to make even though a lot is involved. You can bring it out every year to present to your guests. Use it as a centerpiece too.

Materials:
- 10” pre-cast resin, cement or ceramic bunny figurine
- 2 pkg Vintage Mosaics™ - black toile
- 1 pkg. Jennifer’s Mosaics™ blue stained glass chips
- 1 pkg ¼” glass gem variety mix
- 2 cups Jennifer’s Mosaics white mosaic grout
- Acrylic Paints: Gold and White
- Mosaic Glue
- Small paintbrush
- Rubber gloves
- Old towel
- Sponge, mixing bowl, measuring cup, spoons, newspaper, pencil, toothpick
- Jennifer’s Mosaics Wheeled Glass nippers (optional)
Steps:
Get your area ready
- Cover work area with newspaper to protect work surface.
- Collect all supplies needed for the project. Place them on your surface.
- Be sure bunny is dry, smooth and free of dust and dirt.
- Using the photo as a guide, sketch an outline of a jacket on the bunny’s torso.
Nip Tile
- To break VINTAGE MOSAIC™ tile pieces for mosaic, wrap one piece in towel. Gently tap with hammer against tile. Continue until broken pieces are about 3/4” or less across; remove from towel. You may also choose to use a wheeled glass nipper to nip the tile into small pieces.
Glue
- Starting at the bottom, use a mosaic adhesive to glue the VINTAGE MOSAIC™ pieces to bunny, fitting pieces close together to cover the body of the bunny with the exception of the jacket. If additional tile pieces are required to fit particular spaces, repeat Step 1.
Note: Spaces between the VINTAGE MOSAIC™ pieces will be more pronounced on roundedsurfaces; more grout may show on finished piece than expected.
Nip Glass
- For jacket, nip blue stained glass chips into quarters. Glue chips to the bunny by following the contour of the jacket. Keep adding rows of the blue chips until the jacket is completely filled. You may find you will have to nip the glass further to fit into smaller areas around the paws.
Adding Sparkle To Eyes
- For eyes, use a toothpick to dab a dot of white paint onto a black glass gem. Make two one for each eye. Glue eyes on bunny.
Grouting
- Place 1 cup of terra cotta grout into a mixing bowl and slowly add water, 1 tablespoon at a time. Mix with craft stick or spoon until the grout reaches “fudge-like” consistency. If it is too watery, add more dry grout in small amounts until the consistency is correct.
- Wearing disposable gloves use fingers to work “grout” into cracks between the blue glass pieces of the jacket only. Wait about 15 minutes for grout to set.
- Using damp sponge, gently wipe mosaic surface to smooth grout lines and remove excess grout. Buff surface with dry towel to shine.
- Mix and apply white grout, following in Step 1-4 apply it to the bunny body.
The Finishing Touch
- Four buttons, paint flat side of ¼” clear glass gems gold. When dry, glue on jacket.
Mosaic Tips
- Use vinegar to return PH to your hands should you grout without gloves.
- Use broken china or pottery in lieu of VINTAGE MOSAIC™ pieces.
- For hard to fit tile pieces, hold tile up to the area to be fitted and outline with a marker the portion of the tile that needs to be nipped away.
Your Recently Viewed Projects
Thanks for your comment. Don't forget to share!
Marilyn B
Jun 08, 2017
As mentioned, this project does require time and effort, but the final result is well worth it! I have seen these mosaic statues and they look quite high end, but usually come with at high end price too, or perhaps their colors and look do not work with your decor. I am wondering if you could use broken bits of your own old China porcelain pieces to make it a bit of an upcycle project. Love this idea! Would look wonderful on the patio too!
Report Inappropriate Comment
Are you sure you would like to report this comment? It will be flagged for our moderators to take action.
Thank you for taking the time to improve the content on our site.