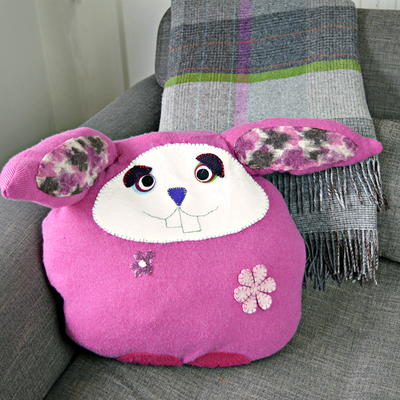
Cuddly Bunny Easter Sewing Project
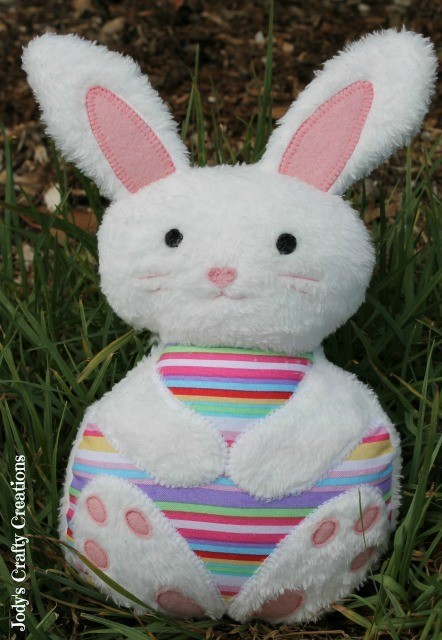
One look at this Cuddly Bunny Easter Sewing Project and you'll never be able to forget it. If you love easy sewing projects, then this is the perfect pattern for you to make this spring. Kids will love this cute and cuddly Easter craft and will want to hang on to it all season long. Beginner sewing projects don't have to be boring. In fact, this project is super fun and exciting for sewers at all skill levels. This Easter bunny makes a great gift and will surely become a keepsake for any little one. The traditional look and unexpected touch of color on the bunny's belly make it a real standout.
Primary TechniqueSewing

SeasonSpring
Sewn byMachine
Materials:
- 8” (20cm) ivory/white fleece fabric (I have used Coral Nursery Fleece)
- 8” x 8” (20cm x 20cm) Striped Cotton Fabric
- 8” x 8” (20cm x 20cm) Pink Felt (Inner ears/Tail/Foot & Toe pads/Nose)
- Small scrap of Black Felt (Eyes)
- Fusible webbing (for applique)
Cutting:
Print the pattern pieces (click HERE for the pattern templates) and cut them out. Then pin onto fabric as stated below.
Fold fabric in half, right sides facing and cut (on double layer of fabric):
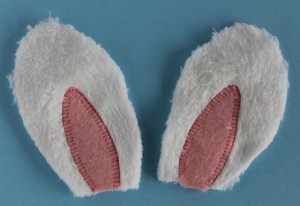
- 2 x Ears
- 1 x Head
On single layer of fleece fabric, cut:
- 1 x Body
Cut a piece of Fleece Fabric:
- 6” x 8 ½” (14cm x 22cm) and iron fusible webbing to the wrong side of it.
Now trace onto the fusible webbing:
- 2 x Arms (Reverse one)
- 2 x Feet (Reverse one)
- Cut these out carefully and remove the paper backing.
From Striped Cotton fabric:
- On single layer of fabric, cut:
- 1 x Body
Cut a piece of Pink felt:
- 5” x 6” (12cm x 15cm) and iron fusible webbing to the wrong side of it.
Now trace onto the fusible webbing:
- 2 x Inner Ears (Reverse one)
- 1 x Tail
- 2 x Foot Pads
- 6 x Toe Pads
Cut these out carefully and remove the paper backing.
Instructions:
Applique
I have used my sewing machine on a Blanket Stitch to applique the Inner Ears, Tail, Arms and Feet in place. I have then used a small straight stitch to sew the foot pads and toe pads in place. If you prefer you can hand stitch these features into place using 2 strands of embroidery thread using a blanket stitch and a straight stitch. When ironing pieces in place please make sure you use a piece of cotton fabric between the iron and your work so you don’t mark/burn/melt your fabric.
Ears
Take two of your ear pieces (make sure you have one that curves to the left and one that curves to the right) and iron your inner ear onto the right sides of these – matching the straight edge on the bottom (remember to use cotton fabric to protect your work when ironing). Blanket stitch these in place.
Tail
Take your fleece Body piece and lay this on the table right sides up. Place the Tail into position (right sides up) referring to the body pattern template for placement.
Iron this into place and then blanket stitch around it.
Body
Take your striped cotton fabric Body piece and lay this on the table right sides up. Place your arms and feet into position (right sides up) referring to the Body pattern template for placement.
When happy with the position, iron these in place and then blanket stitch around each one.
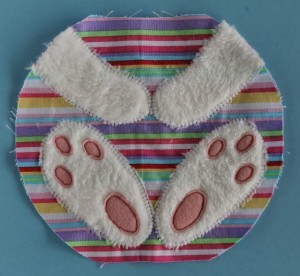
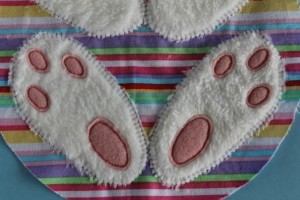
Place your Foot Pads and Toe Pads into position on the feet (referring to the Body pattern template) and iron them in place. Use a small straight stitch (I used 1 ½ on my machine) on your machine to stitch close to the edge around all of these pieces, going around them all twice.
Assembly:
Ears
Place Ear (with inner ear) on top of one Ear back piece (right sides together), pin and sew around the ear leaving straight bottom edge open. Repeat for the other ear piece. Now clip curves and turn right sides out and iron flat (remember to use cotton fabric to protect your work when ironing).
Ears to Head
Place one head piece onto your table right side up and then place your completed ears on top matching the raw edge of the ear with the top edge of the head. Refer to the Head pattern template for position. Make sure the inner ear is facing right side down and that when sewn into place the ears point out the correct way. Pin and then sew these into place using a ¼” seam.
Head to Body
Now take this Head piece (with ears attached) and place it right sides together on top of the Body front (with arms and feet appliqued) and match the neck seams. Make sure the centre dots match up and then ease the curve of the head onto the neck seam and pin into place. Sew together using a ¼” seam.
Now do the same with the back Head piece and back Body piece. So you should now have one completed body front (with ears) and one completed body back.
Sewing it all together
Tuck in the ears and then lay your body front on top of your body back and match up the seams and the centre points. Carefully pin it all the way around making sure your don’t catch the ears in the other seams. Sew it all the way around leaving the turning gap on the bottom open. Check all your seams first – and then clip curves and carefully turn right sides out through the turning gap. It will make it easier if you pull out the ears first.
Stuffing
Firmly stuff the completed bunny through the gap in the bottom, using small pieces of stuffing at a time. Stuff the head first and then the body. Hand stitch the gap closed using a ladder stitch – filling with a little more stuffing as you go. Go over the gap with the ladder stitch twice for extra strength.
Face
Cut out 2 eyes (using pattern template) from black felt.
Cut out 1 nose (using pattern template) from pink felt.
Using the pattern template and photos as a guide, place eyes and nose onto the face and pin them in place.
Blanket stitch (by hand) the eyes and nose into position using 2 strands of matching embroidery thread.
Read NextYarn DIY Easter Baskets