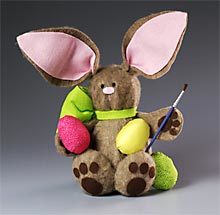
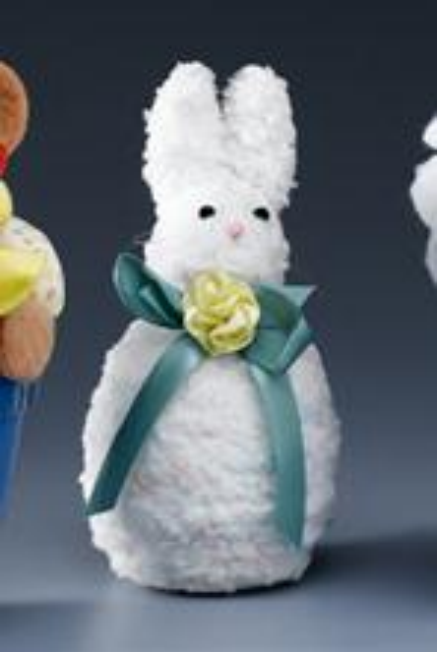
Chenille Bunny
Sticky, double-sided adhesive sheets and fuzzy yarn make quick work of this cuddly little bunny. Foam shapes are easy to embellish – for kids and adults.

Materials:
- STYROFOAM™ Brand Foam:
- Eggs: 4"; two 2-1/2"
- Fluffy pastel yarn, one skein
- Pom poms: 1-1/2" white; 1/4" pink
- Satin ribbon flower
- Satin ribbon, 1/2" x 1/2 yd.
- Black beads, 1/4", two
- Fishing line (optional)
- Serrated knife
- Candle stub or paraffin
- Wooden skewer
- Pencil
- Ruler
- Scissors
- Straight pins
- Double-sided adhesive strips or sheet
- Low-temp glue gun and glue sticks
- Thick, white craft glue
Steps:
- Wax serrated knife with candle stub or paraffin; cut thin slice from wide end of 4" foam egg so it will sit flat. Cut thin slices from narrow end of 4" egg and wide end of one 2-1/2" egg; twist flat sides together until snug; glue head to body.
- Cut remaining foam egg in half lengthwise; cut one half in half lengthwise for ears. Cut thin slice from wide end of each ear at slight angle to fit curve of head. Twist ears against head until snug; glue ears to body.
- Cut six 3/4" x 3-1/2" pieces from double-sided adhesive. Adhere strips to bunny body from neck to base, spaced evenly around body. Pin at top, center, and bottom for extra hold.
- Glue and pin one end of yarn to back bottom edge of body. Wrap yarn around body, keeping rows close together for complete coverage. At neck, reverse direction and wrap second layer of yarn back down toward base. Keep yarn rows close together but wrapped a little more loosely for fluffier texture, if desired. Glue and pin yarn end to bottom of bunny.
- Cut small adhesive pieces and attach to head; cover nose area especially well. Pin tape for extra hold.
- Glue and pin one end of yarn to back of neck. Wrap yarn around head up to ears in same way as body. At base of ears, wind yarn to front of bunny between ears. Cover area on top of head by winding yarn around base of ears repeatedly. Glue yarn end to secure.
- Cut small adhesive pieces and attach to front flat side of each ear. Wrap ears with yarn in same way as body. If desired, cover bottom of bunny with yarn in same way as top of head, wrapping yarn in spiral to completely cover foam.
- Refer to photo to glue bead eyes and pink pom pom nose to face. Glue white pom pom tail to body.
- Tie satin ribbon around neck. Glue flower to center of bow. If desired, cut three 4" lengths from fishing line for whiskers. Glue center of each line just below nose and pin to secure; when dry, trim to desired length.
®™ Trademark of The Dow Chemical Company ("Dow") or an affiliated company of Dow. For more project ideas, please see styrofoamstyle.com.
Your Recently Viewed Projects
Thanks for your comment. Don't forget to share!
FaveCrafts Editor JL
Mar 12, 2012
Hi Donna, If you follow this link, you will find a thumbnail photo of this project. http://www.favecrafts.com/?task=search&search_term=Chenille+Bunny Thanks!
donnagthomas01 485 7785
Mar 10, 2012
Where's a photo? Who would make a craft not having any idea of what the finished project should look like? Who would waste the time or the money?
Report Inappropriate Comment
Are you sure you would like to report this comment? It will be flagged for our moderators to take action.
Thank you for taking the time to improve the content on our site.