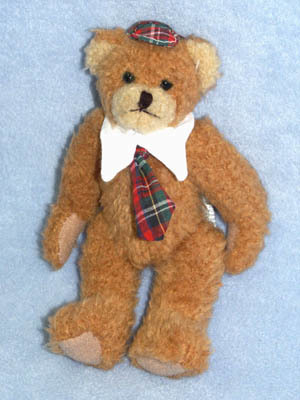
Making a Face for Teddy
Learn how to make a nose and mouth for your teddy bear. Making a Face For Teddy will help him come to life. Once you complete the first one, you won't want to stop making them. You might think that simple sewing ideas are hard to find, but this project shows that you only need a few supplies to get started. Once you start, you'll never want to stop. This is a great way to personalize a gift for a new baby or toddler. Work on this teddy bear craft before you head to a show or party - you won't regret it.

Materials:
- Needle (chenille needle works best)
- Perle cotton
- Felt
- Glue
Instructions:
- Select a piece of felt the same color as the perle cotton to be used. Cut it a little smaller than the desired shape of the nose. Trim fur from nose area. With light glue, adhere felt piece to trimmed area making sure it is straight. Set aside until glue is dry. You can also use a teddy bear nose template, which is self-adhesive.
- Use a cotton darner or doll needle with single thickness perle cotton. Perle cotton will pull through easier using a chenille needle. Tie a knot at the end of the perle cotton and run the needle under the felt to hide the knot exiting at the top center of the nose. To keep stitch size and tension even, do not embroider one side of nose at a time. Instead, alternate sides as you stitch, keeping your stitches parallel and don't crisscross. Follow the felt or template as a pattern to embroider a satin stitch nose. Exit at a corner of the mouth.
- Run thread to other side of the mouth, enter fabric and bring thread out again about 1/4" below the bottom of the center of the nose.
- Catch bottom (mouth) thread and pull up (don't catch fabric) tightly until you like the shape and enter again just under the nose.
- Fasten end of thread by taking a couple stitches hidden by the fur and clip thread.
- By experimenting with the placement of the left and right corners of the mouth, you will find you can create many different expressions. If you make the left and right corners wide apart with the center stitch lower, and leave the pearl cotton loose, this will create a nice smile. You may need to hand tack the perle cotton to keep the smile in place.
Note:
- For best nose embroidery results, pack the stuffing to make a very hard muzzle.
Your Recently Viewed Projects
Thanks for your comment. Don't forget to share!
BeckySue
Apr 08, 2016
Okay, so I tried this. It takes some practice, but I think I've got a pretty good handle on it now to be able to actually make one for a crocheted teddy bear for my grandbaby!
Weberme
Feb 22, 2017
I had to read it a few times but I think I got it too. I have not crocheted in some time and never attempted a teddy bear yet but they are so cute. I was thinking that this also will come in handy with an old Teddy bear that lost its face with age. You could bring it back to life again or even change the face expression. Have you made one yet? This would be great if there was a video along with tutorial.
Report Inappropriate Comment
Are you sure you would like to report this comment? It will be flagged for our moderators to take action.
Thank you for taking the time to improve the content on our site.