Two In One Front Door Wreath

Rain or shine, you can't go wrong with front door decorating ideas. Welcome guests to your home with a Two In One Front Door Wreath. Create one large wreath and one small wreath for this project. Join them together for an amazing finished project. Pair a willow wreath and a grapevine wreath to create an unexpected but eye-catching design. This is a great summer craft idea but can be left up all year round. Wreath craft ideas are much more creative than their store-bought counterparts. Also, they don't cost a lot to make, so you won't break the bank. Find out how easy it is to give your home an upgrade with this fun craft tutorial.
Primary TechniqueFlorals/Wreaths

Materials:
- Larger willow wreath
- Smaller grapevine wreath
- 2 bunches silk leaves
- 3 bunches of silk leaves (two with larger flowers and one with smaller flowers)
- Wire cutter and 1/4 lb (113 g) weight floral wire
- Glue gun and stapler
- Bow and wooden monogrammed letter
- Scissors
- Thread
Instructions:
Larger Willow Wreath:
- Place the first type of silk leaves around the wreath in a circular fashion with the leaves going the same direction. As you are placing the leaves gently insert them into the willow wreath.
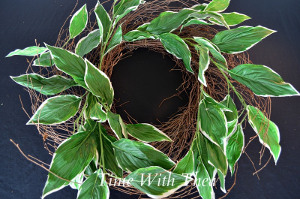
- Now place the second type of leaves over top in the same circular fashion with the leaves going in the same direction. Gently insert these into the willow wreath as well.
- Place your smaller flowers on top of the two sets of leaves. These will be placed facing towards the outside of the willow wreath. Gently tuck these into the willow wreath.

- Using the wire cutter pre-cut about ten pieces of wire about 6 inches (15 cm) long. Use this wire to secure the leaves and flowers onto the willow wreath in different locations around the wreath. Bring the wire from the back of the wreath to the front of wreath. This little trick works because you will not see the wire once the second grapevine wreath is placed on top. Trim the extra wire.
- Flatten and further secure the leaves to the willow wreath using a glue gun. Normally the leaves I work with are easy to glue but I found with this wreath I needed to staple the leaves in a few places together too. This isn’t my first choice because the staples might be visible but the three or four staples I used are fairly well hidden.
Smaller Grapevine Wreath:
- Place the silk flowers on top of the wreath leaving a space for the ribbon and monogrammed letter. Gently insert the floral stems into the grapevine wreath. I chose to randomly place the two different flowers on this wreath. You may have to trim the stems a bit if they are sticking out too much at the back of the wreath.

- Using the wire cutter pre-cut about 8 pieces of floral wire about 6 inches (15 cm) long. Use this wire to secure the flowers onto the grapevine wreath. This time bring the wire from the front of the wreath and secure it in the back of the wreath. Since you are working at the front of the wreath try to tuck this wire in behind the flowers and leaves if possible so the wire is not visible. Trim the extra wire.
- Further secure the flowers by gluing the flowers’ leaves in a few places around the grapevine wreath.
Attaching The Two Wreaths:
- Place the smaller grapevine wreath on top of the larger willow wreath in the center. Pre-cut four wire lengths about 8 inches (20 cm) long. These will be extra long but it will be easier to work with. The excess wire will be trimmed afterwards. Secure the two wreaths together by working from the front to the back of the wreath again trying to hide the wire behind the leaves or flowers so it isn’t visible.

Bow And Letter Initial:
- For this wreath I made a large bow using white sheer wired ribbon and burlap ribbon. Both ribbons were 2 ½ inches (6 cm) wide). If you want to learn how to make a bow like this I wrote another detailed photo tutorial titled How To Make A Big Bow Photo Tutorial that will really help you out.
- I attached the black monogrammed letter on top of the bow with a few stitches in three different places to the burlap ribbon using black thread. You will only see the thread if you look very carefully.

Read NextColorful Coffee Filter Wreath