Rose E'er Blooming Wreath
This beautiful and elegant Rose E'er Blooming Wreath from Consumer Crafts is so simple to make, yet looks like a pro made it! This is a beautiful wreath that you can easily have on display throughout the winter. You could even hang it for Valentine's Day or make it more festive by adding some green leaves to the paper roses. Decorative paper crafts are a creative and inexpensive way to add color and texture to your home decor.

Materials:
- Core’dinations 12″ x 12″ Paper in Barn Siding
- 10” Straw Wreath
- Poly Satin Ribbon in Ivory
- 6″ White Sparkle Tulle
- Hot Glue Gun & Glue
- Spray Adhesive
- Martha Stewart Fine Crystal Glitter
Instructions:
-
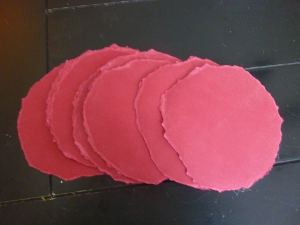
I used my paper trimmer to cut the 12″ x 12″ sheets into four equal 6″ x 6″ squares. I then made a template of a circle on each one (I traced around a CD, but it doesn’t need to be exact by any means). I then tore out the circles by hand. Because the paper has a color core, it gives a great antique look when torn. For an even more antiqued look, sand the circle to distress it and reveal more of the Core’dinations ColorCore center.
-
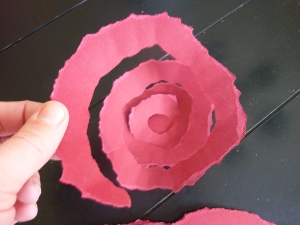
To turn these imperfect circles into flowers you want to start at the outer edge and carefully rip them into a spiral. It is helpful to keep the size of the spiral consistent, so you might want to pencil in the spiral shape before you start tearing.
-
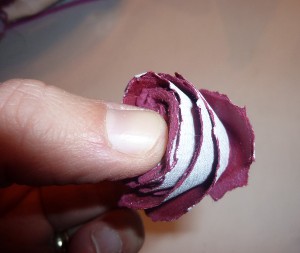
Next you can start rolling the roses. Start rolling the flower beginning with the outside edge. Roll as tightly as possible, keeping the bottom edge aligned at all times. You can either roll the white or the deep red side toward the inside. I did both and mixed them up.
-
When the flower is rolled completely tight, carefully pinch together, then let it go and it will spring into shape.
-
You can experiment with how much you want it to open up and manipulate it to how you like. When you get the rose to its desired size, hot glue the base together.
-
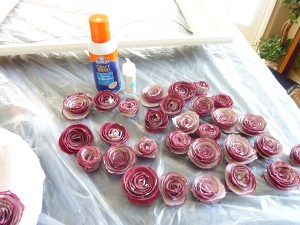
Once you have all of your roses assembled, line them up on a piece of newspaper or a drop cloth and lightly spray with the spray adhesive. While the roses are still tacky with the adhesive, sprinkle them with the Martha Stewart Glitter. Obviously the glitter is not necessary, but even if you don’t glitter them, you will want to give them a little spray just to keep the roses in place.
-
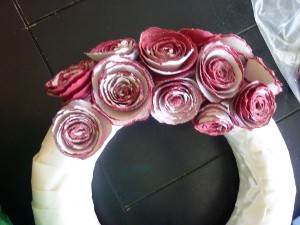
Next, while your roses dry (about 15 mins) wrap your straw wreath with the satin ribbon. I like the one I used by Darice, because it is not slippery – it is more of a floral ribbon. Hot glue the ribbon into place. Warning- the wreath will shed some, don’t be alarmed. The ribbon will keep it from continuing to shed.
-
Start to assemble your roses onto the wreath. This part is like a puzzle. I just kept fitting them in and once I found a spot I liked, I hot glued it in.
-
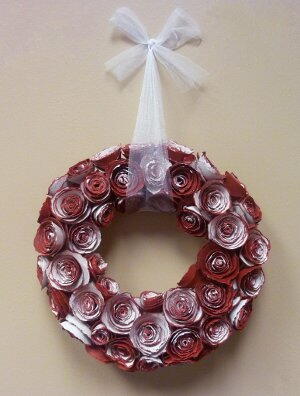
Continue to place roses until you have the desired fullness. You will be surprised by the weight of the overall wreath (that’s a lot of heavy cardstock!). Overall I used about 75 roses on a 10” wreath. I added a white tulle bow to hang and finish it off beautifully!
- Voila! This wreath is not only perfect for Valentine’s Day but versatile enough to stay up all year-round!
Read NextCountry DIY Fabric Wreath Tutorial
Your Recently Viewed Projects
Thanks for your comment. Don't forget to share!
ronmetevier 951120 7
Oct 09, 2013
You never mentioned how many sheets of this paper you used nor what is the weight...is it card stock or just scrapbook paper, or something else?? Anne M.
SoFlomom
Nov 05, 2012
I saw this wreath at a dr's office & it really was beautiful! I even took pictures cos I thought of making one myself! Glad I found the how-tos here!
Melissa Ryan
Nov 01, 2012
@Naizeroo I think it's beautiful, too! I'd love to make one to have out on display all winter long! Plus, since it's made mostly of paper, it's budget friendly and light to hang.
Report Inappropriate Comment
Are you sure you would like to report this comment? It will be flagged for our moderators to take action.
Thank you for taking the time to improve the content on our site.