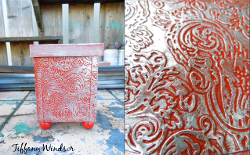
Faux Embossed Brown Bag Box
Who says storage boxes have to look boring? Create a Faux Embossed Brown Bag Box from Tiffany Windsor that allows you to get organized and jazz up your home decor. Crafts with paper grocery bags are eco-friendly and thrifty, so there's no post-project guilt.
Materials:
- Aleene’s Original Tacky Glue
- Aleene’s Spray Acrylic Sealer – Gloss
- Brown kraft paper (available in rolls at hardware store) or brown grocery bags
- Squeegee (plastic gift card or cardboard)
- Wood box with lid
- Wood beads
- Die cutting machine and embossing folder
- Acrylic paint (I used Red Iron Oxide)
- Rub ‘n Buff – Silver Leaf
- Soft cloth (or paper towel)
Instructions:
-
Cut several layers of kraft paper or grocery bags slightly larger than box side. Apply glue with squeegee in a thin even coat. Glue all layers together. (On this box I used 3 layers of kraft paper.) Repeat to create one piece for each side and top and additional piece to be cut for corners. Let glue dry completely.
-
To emboss layered paper, place into embossing folder and run through die cut machine. Repeat for each piece.
-
Cut embossed paper to exact size to fit box sides and top. Glue in place with same squeegee technique. Continue to press on paper, especially along the edges until glue grips and holds firmly to box.
-
Cut strips of embossed paper to fit over sides of box. (I cut my strips 1″ wide.) Crease down center of strips so that they will easily fold over the corners. Apply glue with squeegee technique and glue in place over each corner.
-
Glue feet onto bottom of box. Let all glue dry completely.
-
Paint entire box inside and out. Let dry.
-
Spray with sealer. Let dry.
- Squeeze a dab of Rub ‘n Buff onto scrap paper. Dip tip of finger into paste. Rub smoothly onto scrap paper and then gently rub finger over embossed painted paper on box. Start with a light application – you can always add more layers of silver finish. Use a clean soft cloth to gently buff.
Read NextTin Can DIY Organizer
Your Recently Viewed Projects

Thanks for your comment. Don't forget to share!
quanahs 5032097
Mar 07, 2016
This is cute and clever. I can imagine using this technique to upcycle a lot of things found in my office, including my pen holders, a wastebasket, a tray for the endless pile of paper etc. It would be fun to make a matching set of storage for the kitchen too, perhaps out of coffee cans or other cans with lids. Thanks for the inspiration.
Report Inappropriate Comment
Are you sure you would like to report this comment? It will be flagged for our moderators to take action.
Thank you for taking the time to improve the content on our site.