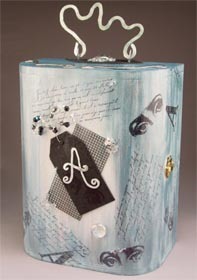
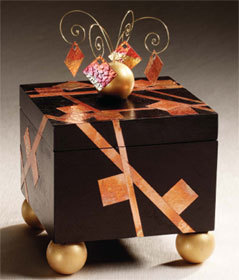
Copper Personal Box
Decorate a personal box from AMACO with metal embossing, acrylic paint and fun wire.

Materials:
- AMACO® ArtEmboss® Pure Metal Sheets —Copper, Light
- Walnut Hollow Ball Foot Personal Box
- Therm o Web; Peel and Stick Doublesided Tape Sheet
- Plaid Folkart Acrylic Paint — 479 Pure Black, 676 Metallic Inca Gold
- Wood Sealer
- Satin Varnish
- Fiskars Cutting Matt
- Ruler
- Rotary Cutter
- Hand Punch 3/16" Square
- Scissors
- Fun Wire™ — Pearlized Gold, 24 Gauge
- Round Nose Jewelry Pliers
- 1/4" to 1/2" Flat Paint Brush
- Brayer
- Foam Sheet
- Rubber Mallet
- Glue Gun and Glue Sticks
- Embossing Heat Gun
- Drill and 1/16" Drill Bit
- Fine Sandpaper
- Tack Cloth
Steps:
- Prepare Box For Painting - Remove hinges from box and set aside. Drill hole in center of ball on box lid. Lightly sand box inside and out. Wipe dust with tack cloth. Apply a coat of wood sealer to all surfaces. Let dry. Lightly sand box again, and wipe with tack cloth.
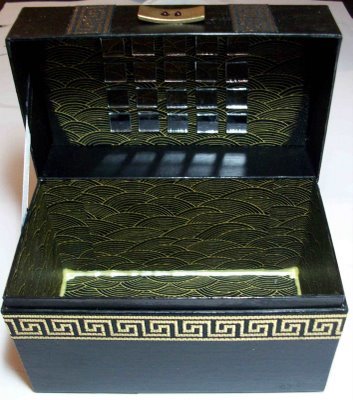
- Paint - Paint top, bottom and inside black. Paint the ball feet and the ball on top gold.
- Cutting The Metal - On the cutting matt, use the ruler and rotary cutter to cut the ArtEmboss® Light Copper to 6" x 9".
- Texture The Metal - Apply beads of hot glue to one side of the rubber mallet. Let dry. Place the metal onto the foam sheet and hammer over the entire surface with the textured side of the mallet. Brayer over the metal to flatten.
- Heat The Metal To Change The Color - Place the metal onto a baking sheet. With an embossing gun, heat the metal and watch as it begins to change color. Move the embossing gun across the surface of the metal to create interesting patterns of color. Let cool.
- Strips and Squares - Cut tape sheet to 6" x 9". Apply tape sheet to the back of metal. Brayer over to secure the bond. Place metal on cutting matt. Using the ruler and rotary cutter, cut the metal into; four 1/8" strips, four 1/4" strips, four 3/8" strips and three 1" strips. Cut the 1" strips into 1" squares. Set aside eight squares. Apply the metal strips and remaining squares to the entire box in a random pattern as shown. Make cuts in the strips where they cross the opening from the top to the bottom. Brayer over the metal to secure the bond.
- Finish - Apply varnish over the entire box in a criss-cross pattern to create more texture. Let dry. Reattach hinges.
- Embellishment - Cut two 16" lengths of Fun Wire™ Pearlized Gold, fold in half and twist together. Insert the twisted portion of the wire into the hole drilled in the ball on the top of the box. Glue if necessary. Using round nose pliers, bend each wire into a spiral. With the remaining eight squares, adhere two together back-to-back, creating four squares. Punch a corner of each with the square punch, and lace onto each of the wire spirals.
Read NextDresser Drawer Frames


Thanks for your comment. Don't forget to share!
Report Inappropriate Comment
Are you sure you would like to report this comment? It will be flagged for our moderators to take action.
Thank you for taking the time to improve the content on our site.