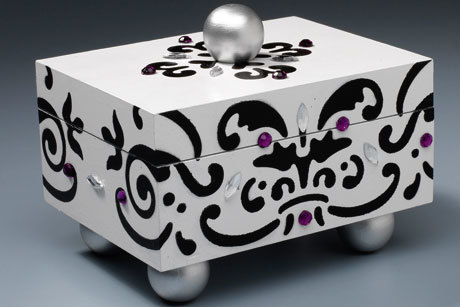
Trinket Box
By Lori Bergmann from Krylon
This pretty little trinket box would make a wonderful gift for that special girl or friend in your life, and you can make it in just a few hours with a simple stencil design!
Supplies:
- Krylon Indoor/Outdoor Primer - White (#51315)
- Krylon General Purpose Metallic - Silver (#1406)
- Krylon Indoor/Outdoor Paint - White (#51501)
- Krylon Indoor/Outdoor Paint - Black (#51601)
- Krylon Easy-Tack™ Repositionable Adhesive - Clear (#7020)
- Stencil of choice
- Basswood Box And Ball Knobs By Walnut Hollow
- Rhinestones
- Aleene’s Glass & Bead Slick Surfaces Adhesive
- Aleene’s Clear Gel Tacky Glue
- Medium Grit Sandpaper
- Soft Cloth or Paper Towels
- Plain Newsprint or White Paper
- Painter’s Tape
Steps:
- Spray five wooden ball knobs with Silver Metallic paint, and set aside to use later.
- Use sandpaper on sides and edges of the box to smooth any rough spots. Clean off dust with a soft cloth or damp paper towel.
- Spray entire box (including inside edges) with primer paint and let dry.
- Spray entire box with at least two coats of Glossy White paint and let dry.
- Apply Repositionable Adhesive to back of stencil and press firmly to the front side of the closed box. Cover rest of box with newsprint or paper and painter’s tape to mask off areas you do not want painted. Spray over stencil with Glossy Black paint, then carefully remove stencil and let dry.
- Repeat Step #5 on the back side of the box, then let dry completely before repeating process again on the two smaller sides of the box.
- Apply coordinating stencil design to the top of the box and let dry.
- Attach painted silver knobs to box with Clear Tacky Gel and let dry.
- Attach colored rhinestones to box with Glass & Bead Slick Surfaces Adhesive. Let dry.
Tips:
- Do not use printed newspaper or dyed paper as a masking material, as the colors may bleed onto the box when painting.
- For a finished look inside, glue a piece of pretty patterned paper on the inside of the lid and satin fabric along the top of the inside lower portion.
For more project ideas, please visit www.krylon.com/projects.
Read NextDaisy Pom Pom Rug DIY