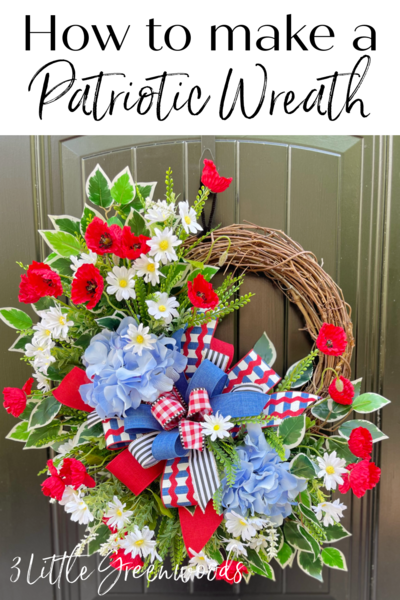
Papercrafted Cube Snowman
This little snowman will really stand out amongst his rounder peers, but that's what makes him so unique! Using foam cubes as a base, this easy papercraft project will welcome guests inside this holiday season, even if the weather outside is frightful!

Materials:
- STYROFOAM™ Brand Foam:
- Block, 18" x 4" x 4"
- Cubes: 5"; 3"
- Orange acrylic paint
- White embossed scrapbooking paper, three 12" x 12" sheets
- Coordinating decorative papers: stripe; polka dot; pink solid; black solid
- Wooden dowels, 1/8" x 6", two
- Pom poms, two each: 1/4" light pink; 1" dark pink tinsel
- Dark pink chenille stem
- Nine assorted buttons, 1/2"
- Two wiggle eyes, 3/8"
- Serrated knife
- Candle stub or paraffin
- Pencil
- Ruler
- Wooden chopstick
- Paintbrush, Round
- Disposable palette
- Water basin
- Paper towels
- Hole punch, 3/8"
- Scissors
- Straight pins
- Craft knife with sharp blade
- Low temperature glue gun and glue sticks
- White, thick craft glue
Steps:
- Wax serrated knife with candle stub or paraffin; cut 4" cube from foam block. Set aside remainder of foam block for future project.
- Cut the following strips from white embossed paper to cover foam cubes: one 3 1/2" x 12"; two 4 1/2" x 8 1/4"; two 5 1/2" x 10-1/4". In addition, cut one 2 3/4", one 3 3/4", and one 4 3/4" square from white embossed paper; set aside.
- Overlap two short ends of 4 1/2"-wide strips 1/4" to create one 4 1/2" x 16 1/4" strip; glue overlapped ends to secure. Repeat with 5 1/2" strips, creating one 5 1/2" x 20 1/4" strip; glue ends to secure. Score and fold each paper strip 1/2" from top of long edge to make sharp crease.
- Beginning and ending in center of one side of each cube to prevent visible seams, wrap appropriate paper strip around four sides of each foam cube, allowing paper to extend 1/2" above top edge of cube; do not glue yet. Use fingers to crimp paper at cube corners; remove paper and crisply fold at crimp marks.
- Glue and pin paper strip around cube sides, overlapping ends. Clip paper corners above foam and fold excess down to top of each cube; glue and pin to secure. Glue paper squares to tops of cubes. Use glue gun to glue cubes together as shown; align all seams at back of snowman.
- Cut two 1" x 6" strips from striped paper; glue paper around dowels. Glue light pink pom poms to dowel ends. Use craft knife to poke small hole into each side of body; glue dowel ends into cube for arms.
- Cut two 3/4" x 12" strips from striped paper for scarf, noting stripe position. Wrap and glue one piece around snowman's neck; cut second strip in half. To curl scarf tails, gently pull paper strips over side of pencil. Glue tails to neck as shown. Cut 3/4" fringe into scarf ends.
- Paint chopstick tip orange; let dry. Use craft knife to poke small hole into center of face; glue nose into hole.
- Refer to photo to glue wiggle eyes to face. For cheeks, punch two circles from pink paper; glue to face. Cut narrow "C" shape from black paper for mouth; glue in place.
- Cut 1/2" x 10" strip from polka dot paper and glue down center front of snowman. Glue buttons to paper. Trim and bend chenille stem to fit over head; glue ends into head and tinsel pom poms over ends for earmuffs.
®™ Trademark of The Dow Chemical Company ("Dow") or an affiliated company of Dow.
For more project ideas, please see styrofoamstyle.com.
Read NextPottery Barn Inspired Diy Vase