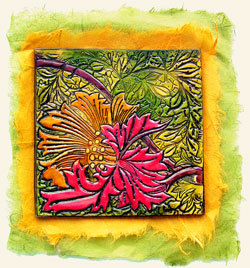
Handmade Ceramic Art Tile
Create stunning art pieces with this artistic painted ceramic tile craft from Jacquard Products. This individual craft project is bound to please and makes a beautiful decoration for any part of the home.

Materials:
- Piñata Inks - I've used Tangerine, Sunshine Yellow, Lime Green and Senorita Magenta
- Premo! Sculpey clay—2 oz of Ecru (or White)
- Brushes—a Jacquard medium writing brush for the Piñatas and a small foam brush for the Neopaque
- Paper work surfaces, such as water color paper or index cards
- Neopaque Black
- Large stamp—mine is a Magenta stamp and the leaf is Rubber Stampede
- Piñata Cleanup Solution—squeeze a small amount into a paper cup or washable craft container
- Small spray bottle of water, paper towels
Steps:
- Knead your clay for a moment and then roll your clay in a flat sheet—wide open on a clay-dedicated pasta machine or about 1/8" thickness. Place the sheet of clay on a paper worksurface.
- Lightly spray your stamp with water and press it firmly into the clay sheet. Since my workspace has a cement floor, I put the paper containing the clay on the floor, put the stamp on top and step on it! Remove the stamp and you should have a well-embossed image.
- Trim the edges of the clay to the image and we are ready to paint!
- I prefer to touch the brush to the tip of the ink bottle to load it with paint. I even mix my colors on the brush in the same manner. Once I have some ink on the brush, I usually do a quick swipe on the work surface (as you can tell by all the lines of color!) Do NOT hold the bottle directly over your image or you may accidentally drop some ink on it! Begin painting in your design. Remember, we are only concerned with the top surfaces of the design. Note: I wear gloves to keep the Piñata from staining my fingers!
- I usually don’t clean my brush between colors that are related—like the orange, magenta and yellow—but I do clean it between those colors and the greens. Clean the brush like you would an brush and then swipe it on your work surface to remove any excess cleanup solution before reloading the brush with color.
- You will notice that I mix the Sunshine Yellow quite often into my Lime Green to yield different greens in the background.
- Once your painting is complete, clean your brush and prepare to bake the clay. Preheat your oven to 275° F. Place the clay piece on another index card or sheet of unlined paper. Place this paper on your baking tray and place into the preheated oven for 20-25 minutes. Remove and let cool.
- Now we will add the dark details to the piece. Make sure you are working on a large sheet of paper because this can get messy! Paint the entire surface with the Black Neopaque.
- Quickly swipe the top surfaces of the piece with a dampened paper towel to remove the paint from the inked details.
- I like to paint the edges of the clay also. Allow the paint to dry and you are ready to mount your new stamped detail!
Your Recently Viewed Projects
Thanks for your comment. Don't forget to share!
Report Inappropriate Comment
Are you sure you would like to report this comment? It will be flagged for our moderators to take action.
Thank you for taking the time to improve the content on our site.