Glowing Balloons Night Light DIY Bedroom Decor
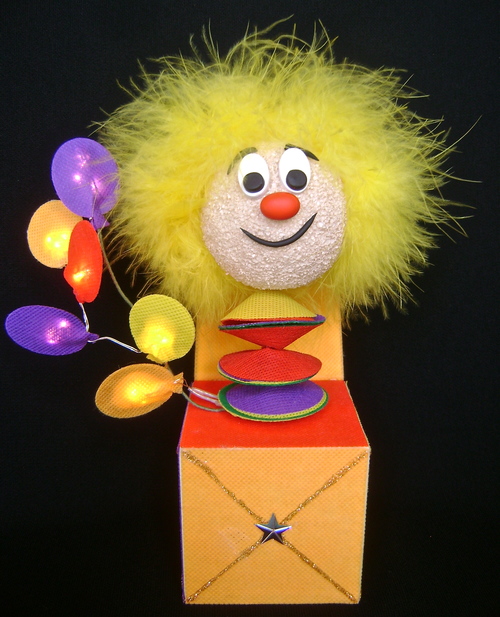
DIY bedroom decor should always stick out, and this project is a real stunner. This Glowing Balloons Night Light DIY Bedroom Decor includes balloons with lights inside run by a battery pack. Plus, it's a fun item for a child's nightstand. The project was inspired by the colorful collection of fabric samples provided by Fairfield and a great variety of glues. You'll find joy and excitement while working on this project, you may never want to stop. Bedroom decorating ideas have never looked this unique and fun. If your little one is afraid of the dark of just wants to add an unexpected touch to his or her space, this is a great DIY idea.
Primary TechniqueGeneral Crafts

Materials List
-
Fairfield Oly Fun fabric
- Tulip Beads In A Bottle
- Elmers Extreme glue stick
-
Aleenes Turbo Tacky Glue from I Love to Create
-
Floral Craft Styrofoam 2 ball
-
Clover Wonder Clips
-
Battery operated 18 light string
-
3 unpainted wood photo cube
-
Hot glue gun (on low setting)
-
Testors Aztek 9444 Peach and 9440 White Paint
-
Aztec Airbrush
-
Sculpey Red, Black and White Premo clay
-
Boa Craft fur
-
Metallic silver stars
-
Floral stem
-
Pencil
-
Drill
-
Cardstock
-
Wood pick
Instructions
-
Align the battery pack to the back of the photo cube and place a pencil mark just above the battery case.
-
Make another mark about .50 to the left of the wire photo holder in the top of the cube. Drill holes in the two marks large enough to pass the light string through.
-
Drill or saw an opening in the bottom of the cube large enough to accommodate a couple of your fingers for threading the light string into the cube top.
-
Cut six 3 squares in a variety of Oly Fun fabric colors. (All the fabric pieces can be cut on a Cameo stencil cutting machine.) Glue one square onto the back of the cube with Elmers Xtreme glue stick. Apply the glue to the wood and smooth on the fabric. Poke a hole in the fabric to match the drilled hole. Pass the light string through the fabric and out the hole at the top of the cube.
-
Hot glue the battery pack to the back of the cube. Pull the light string to eliminate any slack in the wire.
-
Apply a gold X on three of the fabric squares with Beads In A Bottle. When dry, attach silver stars in the center with hot glue. Attach the gold X squares squares to the front and two sides of the cube with the glue stick. Glue a plain square to the bottom of the cube. Make a cut halfway through the remaining square and slip it around the light string and photo wire on the cube top. Bring the slice together and glue in place.
-
Create the back flap by cutting two fabric and two card stock pieces to measure 3 x 4.25. Use the glue stick to sandwich the card stock pieces inside the fabric pieces. Glue the layers to the back of the cube just above the battery pack. Use Wonder Clips to hold the layers together until they dry. Bend the flap back at an angle. Hot glue silver stars in each corner.
-
Cut six pairs of ballon shapes in a variety of fabric colors to measure about 1.25. Apply Aleenes Turbo Tacky Glue to the perimeter of the balloons and put the matching color on top. Leave the center bottoms open 1/4.
-
Gather the 18 bulbs on the light string into six groups of three. Bend each into a small package to fit inside the fabric balloons. Hot glue the ballon center bottoms to prevent the wires from pulling out. Push a floral stem into the hole in the top of the cube. Slip the other end into a balloon and bend it to support the light string and other balloons.
-
Cut 14 discs measuring 2 round in a variety of colors. Cut a hole in the center of each and a slit from the outside edge to the hole. Use the glue stick to match together two different colors until you have seven discs.
-
Slip each disc around the photo cube wire. Overlap the ends until the disc curves upward or down and hot glue the ends together. Repeat with all seven discs stacking them on the wire.
-
Stick a wood pick in a Floral Craft styrofoam ball. Airbrush the ball a flesh color by mixing Peach and White paint.
-
Roll out bits of Premo Red, black and White clay to create eyebrows, mouth, eyes and a nose. Stick a toothpick in the nose. Bake the clay for 30 minutes in a 275 degree oven. Allow to cool.
-
Shorten the tooth pick to about .50. Place hot glue on the end and stick it in the middle of the painted ball. Hot glue the other clay pieces to the face.
-
Apply hot glue to the sides and center top of the face and press craft boa fur to the ball. Attach the ball to the wire coil of the photo cube by making a gash in the bottom of the ball, applying hot glue to the coil, and and pushing the foam onto the coil.
Read NextUpcycled Thread Spool Garland