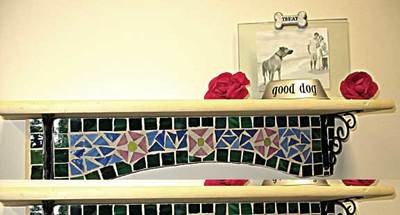
Floral Mosaic Shelf
This quaint, floral shelf from Diamond Tech will make your home feel warm and inviting. A perfect sanctuary for your favorite memorabilia, this mosaic shelf also makes a great housewarming gift.

Materials:
- Wooden Shelf (UPC 093573141805 Provo Craft)
- Jennifer’s Mosaics, Pink Glass Chips
- Jennifer’s Mosaics, Assortment Glass Chips
- 2 package Jennifer’s Mosaics, Dark Green Glass Chips
- Jennifer’s Mosaics, Light Blue Glass Chips
- 8 oz. Bone Sanded Grout
- Mosaic Glue
- Latex Glove
- Safety Glasses
- Mixing Spoon
- Pen
- Carbon Paper
- Soft Cloth or Scrubby
- Plastic or Disposable Bowl
- Wheeled Glass Nippers
- Pattern
Instructions:
-
Lightly wipe wooden shelf with a soft cloth or paper towel to remove surface dust or dirt. Use a foam brush to paint shelf with white paint. For a more antiqued look, use a cloth and lightly wipe surface of shelf before paint dries. When satisfied with the look, allow paint to dry.
-
When dry, transfer the design onto the bottom portion of wooden shelf, by taping carbon transfer paper and pattern in place, tracing over the pattern with a pen.
-
Remove the pattern and carbon paper.
-
Wearing safety glasses create the centers of the flowers by nipping yellow stained glass chips into circles. To do so, use a wheeled glass nipper and nibble away tiny sections of the yellow stained glass square, in turn following a curve. If it helps, use a marker and draw a guideline on the back of the tile to follow. When happy with the shape, apply a thin layer of glue to back of each glass chip and press firmly into place.
-
Create flower petals by carefully nipping pink stained glass chips at a diagonal across the center, creating two triangles. Nip the right triangles in half again, creating even smaller triangles. Arrange pink glass triangles evenly around the yellow flower centers and glue into place.
-
Place whole green stained glass chips along outside of shelf to create a border. Chips may need to be nipped for best fit. Make sure none of the glass pieces touch. Lift each glass piece and apply a thin layer of glue to back. Firmly press each piece onto shelve surface.
-
Fill in remaining background area with blue glass chips nipped into triangular shapes. Arranged randomly to fill the background of the shelf.
-
Following the manufacturer’s instructions, make one cup of bone grout.
-
Wearing latex glove, spread grout on to the flowered shelf surface making sure that grout is pressed into all the nooks and crannies between the glass pieces. Wait about 15 minutes for grout to set.
-
Gently wipe away excess grout using a scrubby, taking care not to pull away grout from between glass pieces. It is very important to remove any grout on tile surfaces before grout is completely dry.
-
Use a soft cloth to buff glass to a clean shine. Allow 24 hours for mosaic piece to dry thoroughly.