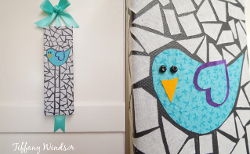
Fabric Bird Mosaic
You'll want to sing a sweet tune when you see how easy it is to create a Fabric Bird Mosaic from Tiffany Windsor. Easy fabric crafts are perfect for anyone who's short on time or new to the world of crafting. Transfer the image onto a canvas or wear it on a t-shirt. Feel free to put a bird on it - the possibilities are endless when it comes to this adorable DIY idea.
Materials:
- Aleene’s Fabric Fusion Peel & Stick Sheets
- Aleene’s Original Tacky Glue
- Canvas – shape of your choice
- Acrylic paint – black
- Paint brush
- Cotton bandana – white
- Cotton fabrics – print and colors of your choice – one color for body and wing layer, one color for beak, one color for wing layer)
- Non-stick scissors
- Bird pattern of your choice (I drew mine freehand with a comma for the body, hearts for the wings and triangle for the beak)
- Chalk or pencil (to draw bird leg lines)
- Ruler
- Push pin or straight pin
- Small black beads (for eyes)
- Optional: Ribbon – for hanger
Instructions:
-
Paint canvas front, sides and back with black acrylic paint. Let dry completely.
-
Apply one sheet of Aleene’s Fabric Fusion Peel & Stick to back of white fabric. Cut fabric even with outside edge of sheet. Turn sheet over and smooth fabric with fingers to be sure that it is adhered over entire sheet and along all edges. (Depending on the size of your canvas, you will need to prepare several pieces of white fabric this way.)
-
Apply one sheet of Aleene’s Fabric Fusion Peel & Stick to back of bird body fabric and smooth fabric onto adhesive. Trace bird body onto back side (paper side) of fabric. Cut along pattern line. Remove paper backing and press in place on canvas. Smooth with finger to adhere all edges.
-
Draw leg lines with chalk. This will help to give you a pattern line to remind you to avoid placing fabric over this area. (Remember to erase these lines when gluing is complete.)
-
Cut white fabric into triangle and various shapes representative of glass tiles. (You can use project photo as a guide for suggested shapes.)
-
Remove paper backing from first piece of white fabric. (I use a pin to help separate the release paper from the fabric.) Place glued side down onto canvas. Repeat to cover background and sides with white fabric pieces. Be sure to leave gaps between the pieces to replicate grout.
-
Cut and layer fabric hearts for wings and glue in place. Cut and glue beak in place.
-
Apply Aleene’s Tacky Glue to beads and glue in place for eyes.
- If desired, glue ribbon runner to back of canvas.
For a comprehensive video tutorial of this project, check out How to Make a Fabric Mosaic on Canvas.
Read NextFarmhouse Book Stack Craft