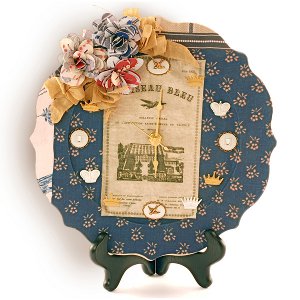
Dreaming of Paris Clock
Make time to day dream of Paris with this Dreaming of Paris Clock from Jolee's Boutique. Making a clock is easy and fun, and it's a great way to add some decor to any room in your house. This easy project would make a great housewarming gift.
Materials:
- Adhesive Fabric Sheets from Jolee's
- Red PaperPad from Jolee's
- Layered Mother of Pearl Jewels
- Mini Crown Repeats Stickers
- Carnation Dimensional Flower Punch
- Straight Edge Trimmer
- XACTO Knife
- Scissors
- Tweezers
- HERMA Dotto Permanent Dot Adhesive
- 9" decorative wooden plate
- Hanger or plate stand
- Sandpaper: fine
- Ruler and pencil
- Drill
- Clock kit with hands, battery housing
- Battery for clock kit
- Rayon seam binding: white
- Pigment ink: light brown
- Misting bottle
- Craft glue
Instructions:
- Lightly sand any rough areas of the decorative wooden plate. If you are going to hang you clock, add your hanger to the back of the plate now.
- In this step, we'll be drilling a hole in the center of the plate to accommodate the stem of the clock mechanism. On the back of the plate, measure to find the center and mark a dot with a pencil. Measure the diameter of the clock stem to determine what size drill bit you need. Protecting your work surface, carefully drill the hole where you marked the center point. Test it to make sure the clock stem will pass through it. Sand away any splinters.
- Trim your choice of an adhesive fabric sheet to 10" x 10". On the back, trace the outline of the wooden plate. Cut on drawn outline.
- Peel away a portion of the adhesive backing paper; position the adhesive portion on the plate aligning the fabric to the plate’s shape. Carefully peel the backing as you work, aligning the edges and pressing the fabric to the plate as you go, smoothing out any bubbles or wrinkles.
- Use retractable knife to slice through the fabric where it covers the drilled opening. Push a pencil through the opening from front to back, clearing the hole for the clock stem.
- Insert the clock mechanism through the hole from the back, attaching the hands on the front according to clock kit instructions.
- Create three paper flowers from assorted paper colors using the process as follows for each: Punch the carnation design along the 12" length of the paper. Repeat from a second coordinating paper so you have two punched strips. Apply adhesive to the straight edge of one strip and adhere the second strip to it offsetting the design. For a fuller flower, this offset technique is recommended.
- Tightly roll the strips using tweezers to rotate the paper, and making sure the “petals” don't all line up. Glue the end to secure it, then bend the petals back to open the flower.
- Ink two 12" lengths of white seam binding with light brown pigment ink. Mist with water and crumple each into ball (you might want to use latex gloves for this part). Allow your balls of ribbon to dry, maintaining the wrinkles.
- When dry, form two loose bows. Determine how you wish to position the bows and flowers, then glue each in place in the upper left of the clock face.
- Apply crown stickers and mother of pearl embellishments to indicate hour positions on the clock face. Insert the battery in the clock.
Read NextUpcycled Shelf From a Cabinet Door