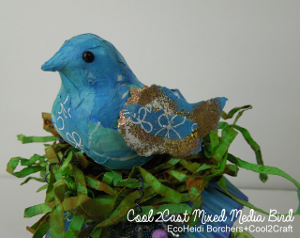
Decoupage Tissue Bird
Put a bird on all of your favorite DIY designs with her from this crafty tutorial. A Decoupage Tissue Bird is surprisingly easy to make and looks like a family heirloom. Be sure to add glitter so your winged creation really makes a statement.
Materials:
- Cool2Cast bird
- Handpainted tissue paper
- Handpainted card stock
- Rubber stamp (design of your choice)
- WOW! Embossing Powders and glitters
- Heat gun
- Embossing ink
- Aleene’s Decoupage – Matte
- Paint brush
- Aleene’s Tacky Glue
- Flat back beads (black – for eyes)
Instructions:
-
Stamp design onto painted tissue paper and sprinkle with white embossing powder. Shake off excess powder. Use heat gun to melt powder. Let cool.
-
Sprinkle embossing powder and glitter onto painted cardstock in shape of wing. Using heat gun, heat powder from underneath card. (Applying the heat from underneath will keep it from being blown off the card.) Let cool. Repeat to create second wing.
-
Rip card into wing shape.
-
Tear handpainted tissue and embossed tissue into small pieces.
-
Using decoupage medium, cover entire bird with tissue. (If desired, glue piece of embossed tissue onto wings.) Let dry.
-
Glue wings in place with Aleene’s Tacky Glue. Let dry.
- Glue beads in place for eyes. Let dry.
Your Recently Viewed Projects


Thanks for your comment. Don't forget to share!
Report Inappropriate Comment
Are you sure you would like to report this comment? It will be flagged for our moderators to take action.
Thank you for taking the time to improve the content on our site.