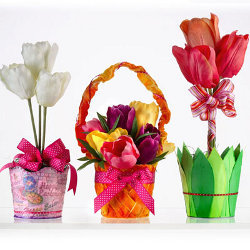
Decoupage Spring Flower Pots
Create a decoupage spring flower pot to decorate your home with lively spring colors! This easy to make craft project from I Love to Create makes a great gift.

Materials:
- Tulip® One-Step Fashion Dye™
- Orange
- Yellow
- Tulip® 3D Fashion Paint
- 65420 Sour Apple Sparkles
- 65422 Cotton Candy Sparkles
- FLSK7-4 Sugar Plum 4oz only
- Collage Pauge Instant Decoupage™
- Aleene's® Fast Grab Tacky Glue®
- Ribbon, Wide Striped and Thin Dotted
- Words from magazine cutouts, internet or computer fonts.
- Pencil
- Plastic Garbage Bag
- Wire Cutters
- Wire for Handle
- Cardboard
- Paintbrush
- Cardstock, 3 Shades of Green
- Wire
- Ribbon: 1” and 1/8” pink and white Polka Dot
- Plastic Bucket
- Tissue paper, light pink
- Silk Tulips (enough for 3 pots)
- 2 Plastic Squeeze Bottles
- Excelsior, green
- Plastic Wrap
- Silk Velvet Fabric
- Foam ball to fit pot (3)
- Scissors
- Masking Tape, Low Tack
- Tin pot (3)
Pattern
Instructions:
Decoupage Pot
- Cut out Easter or Spring words from magazines, internet, or computer fonts.
- Working in sections, use brush to apply Collage Pauge to surface of pot and back of paper. Immediately, press onto pot. Brush another coat of Collage Pauge over top. Cover remainder of pot. Let dry.
- Cut a piece of pink tissue to fit around pot plus 3 extra inches. Apply Collage Pauge over words. Press on tissue. Carefully brush another coat over top. Fold excess tissue to inside of pot and decoupage in place.
- Detail with Sparkles Paint. Add Cotton Candy dots around top edge and a Sugar Plum line around bottom rim. Let dry.
- Glue thin ribbon around bottom of pot.
- Use Fast Grab to glue foam ball inside pot. Insert three white tulips at different heights into center of foam.
- Add excelsior to cover foam.
- Tie ribbon at bottom of stems.
Tie Dye Woven Velvet Pot
- Fill a bucket with water. Wearing gloves, stir in soda ash until dissolved. Soak fabric for 20 minutes. Remove and squeeze out excess moisture. Do not rinse. The fixer solution can be reused.
- Fill a bottle with Yellow and one with Orange dye, following package instructions. Any left over dye can be reused.
- Cover work surface with plastic garbage bag. Scrunch velvet. Squeeze on yellow dye, leaving some white areas. Fill in remaining areas with orange.
- Cover project with plastic wrap and let set 4 – 8 hours. Fill washer with hot water on a large load, adding a small amount of laundry soap. Wash then dry in dryer with a few old towels or rags.
- Cut strips of velvet about an inch wide. Place strips going horizontal on cardboard and tape one end down. Weave remaining strips to desired length to fit around pot. Glue all ends together using Fast Grab Glue. Let dry. Glue around pot.
- Cut a piece of wire to desired length for handle of pot.
- Glue a strip of remaining velvet around wire. Glue ends to inside of pot.
- Fill pot with foam. Trim ends of flowers. Press into foam. Add filler to cover foam.
- Wrap thin ribbon around handle, gluing ends inside pot. Wrap wide ribbon around pot. Tie in bow. Glue in place.
Green Leaf Pot
- Trace leaf pattern on green cardstock. Trace enough to fit around pot. Cut out.
- Quickly coat back of leaves and side of tin pot, with Collage Pauge using a soft brush. NOTE: Work a section at a time as Collage Pauge dries fast. Press leaves in place. Apply a coat of decoupage over top. Continue around entire pot. Let dry.
- Outline and detail leaves with Sour Apple dimensional fabric paint. Let dry.
- Fill pot with foam ball. Cut stems of flowers to desired length. Press into foam. Place Excelsior around base of flowers. Wrap stems with wide ribbon, tying a bow. Trim ends. Glue thin ribbon around pot.
- Accent Tulips and wide ribbon with dimensional fabric paint.
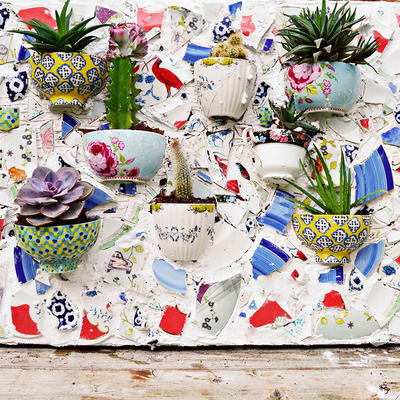
Read NextUpcycled Mosaic Wall Planter
Your Recently Viewed Projects
Thanks for your comment. Don't forget to share!
Marilyn B
Mar 08, 2017
Wow, thank you so much for such detailed instructions which will make it so easy to replicate these lovely pots! I love the colors and designs and using pretty colored pictures and photos from magazines makes it a fun project to hunt for just the right shades to make your project unique and so special! Glue some sparkley sequins here and there or add a ribbon for extra glam!
Report Inappropriate Comment
Are you sure you would like to report this comment? It will be flagged for our moderators to take action.
Thank you for taking the time to improve the content on our site.