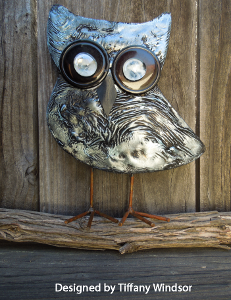
Burned Glue Owl Decor
Create a one-of-a-kind craft project using an old-school technique when you make your own Burned Glue Owl Decor. You might think it's hard to make glue crafts at home but it's actually unbelievably easy. Start with a simple wooden figure - that's all it takes.

Materials:
- Aleene’s Original Tacky Glue
- Wood owl (purchased at Michaels)
- Black acrylic paint
- Paint brush
- Card stock (for beak)
- Scissors
- Emergency (or plumber’s) candle
- Matches
- Paper towel
- Antiquing medium (Rub ‘n Buff or Lumiere paints work great)
- Large flat buttons (black)
- Flat back marbles (clear or color of your choice)
Instructions:
-
Cut triangle shape from card stock for beak. Paint black. Let dry. Fold down center to create dimension. Set aside.
-
Paint entire wood owl. Let dry.
-
Liberally spread Aleene’s Original Tacky Glue onto front of wood owl with finger. Glue should be thick enough that you do not see the black painted surface underneath.
-
Light candle. Hold candle in one hand and owl in other hand. Position glue side right above candle flame. Keep moving owl over candle flame until entire surface is blackened from the heat of the flame. (Be certain that you protect work surface because candle wax will drip during this technique.) The heat from the flame will blacken the glue and create a skin on the glue. If any cracks develop in the glue, continue to hold above the flame and blacken that area. You should have a thick skin on the glue with wet glue underneath the skin.
-
Use paper towel to lightly wipe away the soot and gently push wrinkles and ridges into the glue skin. Because the glue underneath the skin is still wet, it should be easy to create this texture. (If you are unable to create texture, it means that your application of glue was too thin. You can go back and add a second (thicker) coat of glue and repeat the burning process.)
-
Continue to use the paper towel to wipe away any remaining soot. Let glue dry completely.
-
Dip finger into antiquing medium. Use paper towel to remove excess antiquing and then run finger lightly over the ridges in the glue. The antiquing medium will highlight the ridges. Apply as lightly or intense as desired. Let dry.
- Glue buttons in place for eyes. Glue marbles in place over buttons. Glue beak in place. Let dry.
Notes:
- This burning technique does produce soot. Work in well ventilated area and take necessary precautions.
Read NextUpcycled Shelf From a Cabinet Door