Starburst Cozy
Keep your portable devices protected with this easy Starburst Cozy pattern. The great thing about this pattern is that you can make it to fit a phone, MP3 player, tablet, eReader, and much more. This crochet cozy is super colorful and fun and makes a great gift for teens and adults alike.

Materials:
1 ball each of A, B, C, D and E will make 11 Small Covers
1 ball each of A, B, C, D and E will make 3 Large Covers
- 1 ball Lily® Sugar ’n Cream® (70.9 g/2.5 oz; 109 m/120 yds) yarn in Hot Pink (A)
- 1 ball Lily® Sugar ’n Cream® (70.9 g/2.5 oz; 109 m/120 yds) yarn in Red (B)
- 1 ball Lily® Sugar ’n Cream® (70.9 g/2.5 oz; 109 m/120 yds) yarn in Tangerine (C)
- 1 ball Lily® Sugar ’n Cream® (70.9 g/2.5 oz; 109 m/120 yds) yarn in Hot Green (D)
- 1 ball Lily® Sugar ’n Cream® (70.9 g/2.5 oz; 109 m/120 yds) yarn in Hot Blue (E)
- Size 3.5 mm (U.S. D or 4) crochet hook or size needed to obtain gauge
- 1 button
Gauge: 16 sc and 17 rows = 4” [10 cm].
Diagram:
Instructions:
Small Version: To fit device approx 2½” x 4½” [6 x 11.5 cm].
Large Version: To fit device approx 7½” x 9½” [19 x 24 cm] .
Small Version:
Note: Ch 2 at beg of rnds does not count as st.
- With A, ch 15.
- 1st rnd: 1 hdc in 3rd ch from hook. 1 hdc in each of next 11 ch. 3 hdc in last ch. Working across opposite side of foundation ch, 1 hdc in each of next 11 ch. 1 hdc in last ch. Join with sl st to first hdc. 27 sts. Fasten off.
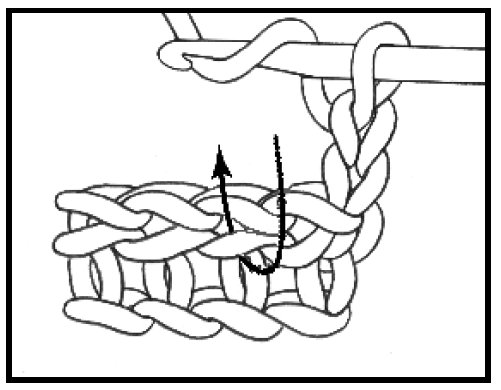
- Note: Proceed as follows for rem rnds: Work hdc in horizontal bar created at back of work between stitches of previous rnd (bar is below loops normally worked- see diagram above). This leaves ‘ridge’ of top chain across each rnd.
- 2nd rnd: Join B with sl st in horizontal bar at back of last hdc of previous rnd. Ch 2. 1 hdc in same sp. *1 hdc in horizontal bar at back of next hdc. Rep from * around. Join with sl st to first hdc. Fasten off.
- 3rd rnd: With C, as 2nd rnd.
- 4th rnd: With D, as 2nd rnd.
- 5th rnd: With E, as 2nd rnd.
- 6th rnd: With A, as 2nd rnd.
- Rep 2nd to 6th rnds twice more. Do not fasten off.
- Cont as follows for button loop: With A, sl st across each st to center back of last rnd. Ch 24 (button loop). Join with sl st in center back. Fasten off.
- Sew button to front to correspond to button loop.
Large Version:
Note: This pattern will naturally slant to the bias as you work. It will not affect finished item.
- Ch 2 at beg of rnds does not count as st.
- With A, ch 84. Join in ring with sl st to first ch, taking care not to twist ch.
- 1st rnd: Ch 2. 1 hdc in first ch. 1 hdc in each of next 2 ch. *Yoh and draw up a loop in next ch. Draw up a loop in each of next 2 ch. Yoh and draw through all 5 loops on hook – hdc3tog made. 1 hdc in each of next 5 ch. 3 hdc in next ch. 1 hdc in each of next 5 ch. Rep from * to last 11 ch. Hdc3tog. 1 hdc in each of next 5 ch. 3 hdc in next ch. 1 hdc in each of last 2 ch. Join with sl st to first hdc. Fasten off.
- Note: Proceed as follows for rem rnds: Work hdc in horizontal bar created at back of work between stitches of previous rnd (bar is below loops normally worked- see diagram on page 1). This leaves a ‘ridge’ of top chains across each rnd.
- 2nd rnd: Join B with sl st in horizontal bar at back of last hdc of previous rnd. Ch 2. 1 hdc in same sp. Working in horizontal bars created at back of work between stitches of previous rnd, 1 hdc in each of next 2 bars. *Hdc3tog. 1 hdc in each of next 5 bars. 3 hdc in next bar. 1 hdc in each of next 5 bars. Rep from * to last 10 sts. Hdc3tog. 1 hdc in each of next 5 bars. 3 hdc in next bar. 1 hdc in each of last 2 hdc. Join with sl st to first hdc. Fasten off.
- 3rd rnd: With C, as 2nd rnd.
- 4th rnd: With D, as 2nd rnd.
- 5th rnd: With E, as 2nd rnd.
- 6th rnd: With A, as 2nd rnd.
- Rep 2nd to 6th rnds for Stripe Pat until work from beg (measured point to point) measures approx 9” [23 cm] ending on a 3rd rnd of Stripe Pat.
- Next rnd: Join D with sl st in horizontal bar at back of center hdc of last 3 hdc group of previous rnd. Ch 1. 1 sc in same sp. Working in horizontal bars created at back of work between sts of previous rnd, 1 sc in next bar. 1 dc in each of next 3 bars. *[(Yoh) twice and draw up a loop in next bar. (Yoh and draw through 2 loops on hook) twice] 3 times. Yoh and draw through all loops on hook – tr3tog made. 1 dc in each of next 3 bars. 1 hdc in next bar. 1 sc in each of next 3 bars. 1 hdc in next bar. 1 dc in each of next 3 bars. Rep from * to last 8 sts. Tr3tog. 1 dc in each of next 3 bars. 1 hdc in next bar. 1 sc in last bar. Join with sl st to first sc. Do not fasten off.
- Button loop: With C, sl st across to center back of last rnd.
- Ch 36 (button loop). Join with sl st in center back. Fasten off.
- Sew button to front to correspond to button loop.
- Bottom edging: Working into rem loops of foundation ch, join E with sl st in any rem loop of center ch of hdc3tog from 1st rnd. Ch 1. 1 sc in same sp. 1 sc in next ch. 1 hdc in next ch. 1 dc in each of next 3 ch. *Tr3tog over next 3 ch. 1 dc in each of next 3 ch. 1 hdc in next ch. 1 sc in each of next 3 ch. 1 hdc in next ch. 1 dc in each of next 3 ch. Rep from * to last 8 ch. Tr3tog over next 3 ch. 1 dc in each of next 3 ch. 1 hdc in next ch. 1 sc in last ch. Join with sl st to first sc. Fasten off.
- Join bottom edging: Turn work inside out and line up bottom edging. Working through both thicknesses, join E with sl st in corner. Ch 1. 1 sc in same sp. 1 sc in each st across to opposite corner. Fasten off.
Read NextUptown Plaid Tote Bag


Thanks for your comment. Don't forget to share!
Member 9274707
Jul 04, 2014
In number 3, it refers to "diagram above." Am I missing something? I don't see any diagram.
Melissa Ryan
Jul 07, 2014
Hello--Thank you for your comment. Apologizes for forgetting to upload the diagram. Hope that didn't cause too much confusion! It's been added to the pattern now so you should be all good to go. Thanks again and have a wonderful day!--FaveCrafts Editors
Report Inappropriate Comment
Are you sure you would like to report this comment? It will be flagged for our moderators to take action.
Thank you for taking the time to improve the content on our site.