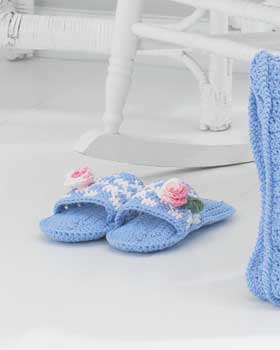
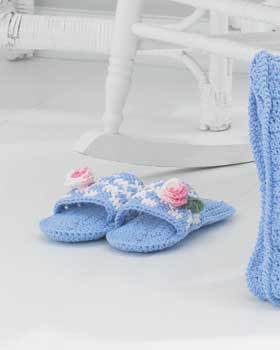
Rose Slippers
Crochet a pair of comfortable slip-on mule slippers with pretty rose embellishment from Lily Sugar n' Cream. Quilt batting provides the cushioning in these easy crochet slippers.
Materials: Sizes S (M, L)
- Yarn: Lily® Sugar’n Cream (Solids: 70.9 g/2.5 oz)
Main color (MC) (Blue): 2 (2-2) balls
Contrast A (White): 1 (1-1) ball
Contrast C (Green): 1 (1-1) ball
Lily Sugar ’n Cream Ombres (56.7 g/2 oz)
Contrast B (Pink): 1 (1-1) ball
- Crochet Hook: Size 3.75 mm (U.S. F or 5) crochet hook or size needed to obtain gauge
- Small amount of ½ inch [1 cm] thick quilt batting
Sizes: Ladies’ shoe sizes S (5-6), M (7-8) and L (9-10).
Gauge: 15 dc and 7 rows = 4 ins [10 cm].
Instructions:
The instructions are written for smallest size. If changes are necessary for larger sizes the instructions will be written thus ( ).
Note: When changing colors, work to last 2 loops on hook of last st, then draw new color through rem 2 loops and proceed. When color is not in use, hold it across previous row and work over it.
SOLE (make 4)
With MC, ch 24 (26-28).
1st rnd: (RS). 1 dc in 4th ch from hook. 1 dc in each of next 19 (21-23) ch. 5 dc in last ch. Working into rem loop on opposite side of foundation ch, 1 dc in each of next 19 (21-23) ch. 3 dc in last ch. Join with sl st to top of ch 3.
2nd rnd: Ch 3. 1 dc in same sp as last sl st. 2 dc in next dc. 1 dc in each of next 19 (21-23) dc. 2 dc in each of next 5 dc. 1 dc in each of next 19 (21-23) dc. 2 dc in each of last 3 dc. Join with sl st to top of ch 3.
3rd rnd: Ch 3. 1 dc in same sp as last sl st. 2 dc in each of next 3 dc. 1 dc in each of next 4 dc. 1 hdc in each of next 4 dc. 1 sc in each of next 7 (9-11) dc. 1 hdc in each of next 4 dc. 2 hdc in each of next 10 dc. 1 hdc in each of next 4 dc. 1 sc in each of next 7 (9-11) dc. 1 hdc in each of next 4 dc. 1 dc in each of next 4 dc. 2 dc in each of next 6 dc. Join with sl st to top of ch 3. Fasten off (toe end).
Cut quilt batting in same shape as sole (approx ½ inch [1 cm] narrower all around). Place quilt batting on WS of 1 sole. With WS of 2 soles facing each other and quilt batting between, join MC with sl st through all thicknesses at any st. Ch 1. Work 1 rnd of sc around, working through all thicknesses. Join with sl st to first sc. Fasten off.
UPPER (make 2)
With MC, ch 23.
1st row: (RS). 1 dc in 4th ch from hook. 1 dc in next ch. *With A, 1 dc in each of next 3 ch. With MC, 1 dc in each of next 3 ch. Rep from * to end of ch, joining A in last dc. 21 dc. Turn.
3rd row: With MC, ch 3. Miss first dc. 1 dc in each of next 2 dc. *With A, 1 dc in each of next 3 dc. With MC, 1 dc in each of next 3 dc. Rep from * to end of row, joining A in last dc. Turn.
Last 2 rows form check pat.
Work 2 more rows in check pat. Fasten off.
Edging: With RS of work facing, join MC with sl st to top of turning ch of last row. Ch 1. 1 sc in same sp. 1 sc in each st to end of row. Fasten off.
With RS of work facing, join MC with sl st to first rem loop of foundation ch. Ch 1. 1 sc in same sp. 1 sc in each rem loop to end of row. Fasten off.
Sew sides of Upper in position to Sole as illustrated.
ROSE (make 2)
With B, ch 16.
1st row: (RS). 2 dc in 4th ch from hook. 3 dc in each ch to end of ch. Fasten off.
Coil rose to form rosebud and sew to Upper as shown in picture.
LEAF (make 2)
With C, ch 8.
1st row: (RS). 1 sc in 2nd ch from hook. 1 hdc in next ch. 1 dc in each of next 3 ch. 1 hdc in next ch. 1 sc in last ch. Fasten off.
Sew 1 Leaf to side of each Rose as shown in picture.
Read NextTulip Shopper Bag
Your Recently Viewed Projects
Thanks for your comment. Don't forget to share!
jas56 3629466
Nov 30, 2013
I made one sole only to find it didn't fit the whole foot, made another one is the larger size, and it's still too small.
SophieDophie
Aug 01, 2011
This is a great pattern. The only problem was, I didn't have any batting and didn't want to invest in any because I'd have no use for the remaining batting. What I did was this; I bought Dr Scholls foam insoles and used them instead. The result was fabulous. I made a pair for my sister in pink & white, and a pair for my brother-in-law in black & white. I think the in-soles work even better than batting, and are easier to insert, and will last longer. Plus...when the slipper wears out, they have insoles to use in their shoes! Am I clever or what?
Ragathnor
Jun 30, 2011
These instructions are very unclear. I'd crochet more if I could understand the instructions. Using abbreviations, jargon and leaving out steps MIGHT be excused back in the day of paper publishing and wanting to save money by not printing so many characters, but on the internet, this is a none-issue. I can't tell you the number of unfinished or weird looking mis-shapen projects I have laying around. I also have sleeves, jacket backs and parts of other articles that for the life of me I couldn't figure out. I'd invent my own system of construction and then realize that's what the instructions were trying to say, but in 10 or less words. Just venting. Raganthor
Sharen
Jan 27, 2011
I love this site. I get all kinds of ideas for my kids and grandkids and they just love the things I make them. SKERN
jbrungardt
Jun 07, 2010
I am confused about the assembly of the sole section. ''"Place quilt batting on WS of 1 sole. With WS of 2 soles facing each other and quilt batting between, join MC with sl st through all thicknesses at any st"... So at some point do you then turn it right side out? Or should it be RS instead of WS? I am new to crochet, so sorry if this is a stupid question. THANKS
ngause 2062075
Feb 01, 2013
no idea if anyone answered, but you are putting the wrong sides together with batting between and sewing. the right sides are outward when you put them like this. (it is not like sewing a dress where right sides are together then sewed and turned). this is sewed together with it in correct position to be part of the slipper. hope this helps
crocheterinfl
Jun 06, 2010
This is a great pattern, however, I think it can get confusing with the construction steps. Therefore, there should be more pictures showing these details. Just a thought....
Naomy
Feb 16, 2010
"working on the rem loop" when you start the foundation row you only work in one side of the chain or the V form, so now you sl st to the remaining loop of the foundation row. The other side of the foundation row or chain or V. How ever you name it. Hope this helps.
Member 8552556
Feb 14, 2010
To Crafter 4318397 After you have completed the first side of your initial chain, and made the 5 dc in the last chain, you need to work up the other side of the beginning chain. The remaining loop refers to the other side of the chain from which you made the first row. You are working an oval shape here, not going back and forth in rows. Hope this helps!
The Editor of Fave Craftscom and AllF reeCrochetcom
Dec 09, 2009
I am not sure on this. You will need to contact the manufacturer at httpwww.sugarncream.comcontact.php Thanks! -The Team at FaveCrafts
Crafter 0010775
Dec 09, 2009
On instructions for the UPPER it starts out with 1st row, then goes to 3rd row, no mention of 2nd row.
Report Inappropriate Comment
Are you sure you would like to report this comment? It will be flagged for our moderators to take action.
Thank you for taking the time to improve the content on our site.