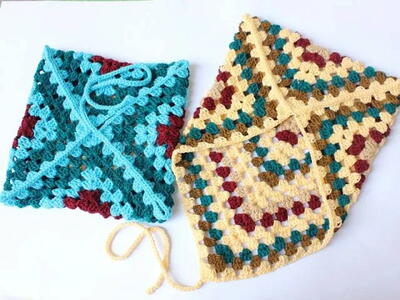
Net Stitch Camisole
Done in hexagonal net stitch, this mesh camisole is meant to be layered over another solid color garment. The sides of the camisole are laced together with ribbon and the bottom hem is finished with a lacy trio of scallops. This cami make for an intermediate crochet pattern.

MATERIALS: Small (Medium, Large)
- Yarn: Caron International's Simply Soft (100% acrylic; 6 oz/170 g, 315 yds/288 m): #9701 White, 2 (2, 2) skeins
- Crochet hook: one size US H/8 (5mm), or size to obtain gauge
- Stitch markers
- yarn needle
- 2 yards ribbon, in white or contrast color, 3/4" – 1" wide
FINISHED MEASUREMENTS: Small (Medium, Large)
Bust 36 (40, 44)", Length 21 1/2 (21 1/2, 23)", including straps
GAUGE
In Hexagonal Net stitch, 9 sts and 5 rows = 4"/10 cm
SPECIAL TERMS
Picot: Ch 3, slip st in top of dc.
STITCHES USED
Chain (ch); Double crochet (dc); Single crochet (sc)
NOTES
1. Cami is sized for layering and has a certain amount of flexibility due to the stitch pattern.
2. Front and Back are joined at underarm; sides are laced together with ribbon.
3. Stitch pattern looks the same on both sides; indications for RS, when beginning upper edging, is for clarification of what will now be the RS of the piece.
BACK and FRONT (both alike)
Loosely chain 82 (94, 106).
Row 1: Beginning in tenth ch from hook (counts dc, ch-space), dc in tenth ch, * ch 4, skip 3 ch, dc in next ch; repeat from * across, end dc in last ch, turn—19 (22, 25) ch-4 spaces, 20 (23, 26) dc.
Row 2: Ch 8 (counts as dc, ch 4), * dc in ch-4 space, ch 4; repeat from * across, end dc in turning ch-space, turn.
Repeat Row 2 for Hexagonal Net st until piece measures 9 (9, 10)" from beginning.
Upper Edging: (RS) Ch 1, sc in first dc, work 3 sc in first ch-4 space, [sc in next dc, work 3 sc in next ch-4 space] 3 (4, 5) times; * ch 2, dc in next ch-4 space, ch 4 (strap space), dc in next ch-4 space, ch 2 *; repeat [ to ] 7 (8, 9) times; repeat * to * once for second strap space; repeat [ to ] to last ch-space, end last repeat, work 3 sc in turning ch.
Fasten off.
LOWER EDGING
With RS facing, attach yarn with a slip st to corner ch-space.
Row 1: Ch 6 (counts as ch-space), * sc in next ch-space of base ch, ch 4; repeat from * across, end sc in last corner space, turn—18 (21, 24) ch-4 spaces.
Row 2: Ch 5, * sc in ch-4 space, work 8 dc in next ch-4 space, sc in next ch-4 space, ch 4; repeat from * across, end sc in last ch-space, ch 5, sc in same ch-space, turn—6 (7, 8) 8-dc fans.
Row 3: Ch 4, sc in ch-5 space, * work [dc, picot] in next 7 dc, dc in next dc, sc in ch-4 space; repeat from * across, end sc in last ch-space, ch 4, sc in same space, turn.
Row 4: Ch 4, dc in sc, ch 4, * skip 2 picots, sc in third picot, ch 4, skip 1 picot, sc in next picot, ch 4, skip 2 picots, dc in sc, ch 4; repeat from * across, end sc in last ch-4 space, turn.
Row 5: Ch 8, skip first ch-4 space, * sc in ch-4 space, work 8 dc in next ch-4 space, sc in ch-4 space, ch 4; repeat from * across, end ch 8, sc in last ch-4 space, turn.
Row 6: Ch 4, sc in ch-8 space, * work [dc, picot] in next 7 dc, dc in next dc, sc in ch-4 space; repeat from * across, end sc in last ch-space, ch 4, sc in same space, turn.
Rows 7 – 9: Repeat Rows 4 – 6.
Fasten off.
FINISHING
With WS's together, join side seams approximately 2" from underarms down toward lower edge, leaving remaining seam open.
Straps
Row 1: Join yarn with a slip st to ch-4 strap-space on Back; ch 35 (35, 41), join to ch-4 strap-space on Front with a sc; work a second sc in ch-4 space, turn.
Row 2: Sc in first ch of strap, * skip next ch, ch 1, sc in next ch; repeat from * to end (Back).
Fasten off.
Repeat for opposite strap.
Weave in ends.
Lacing
Cut two strands of ribbon, approximately 36" long. Lace sides together from underarm seam to beginning of lower edging; tie securely.
Read NextSunburst Granny Square
Your Recently Viewed Projects


Thanks for your comment. Don't forget to share!
lwest
Aug 03, 2017
Hello, I am working on this cute project now, on my vacation, but I am lost right at the beginning of the BACK and FRONT instructions. I am making the Small size, so I counted exactly 82 ch stitches before row 1 and followed instructions exactly for row 1 (tripple-checked!), but at the end of the first row ended up with 1 less ch-4 space and one less dc (I do know that when you start row 2, the ch stitches count as dc, ch-space, according to the parenthetical remark). Otherwise all looks great, like perhaps I could just continue, but I'm worried that it will mess up the lower edging pattern on the bottom of the cami. So, what gives? If anyone came across this, please let me know. Thank you kindly!
flowergirl
May 30, 2017
This cami is adorable. I love the lacy sides. I am still a beginner and this pattern is a little complicated for me so I'll have to learn how some of these stitches are done before I can attempt this pattern.
cartoys1234 228474 8
Mar 16, 2015
How can this be enlarged to a 3x?
FaveCrafts Editor JL
Mar 17, 2015
Hi there, Unfortunately this is the largest image we have. If you would like additional help or resources, please contact Caron Yarns directly via their website. Thanks! - Julia from FaveCrafts
gracefullikeagazel le
Sep 27, 2014
Where am I placing the stitch markers? At the strap spaces?
ann 0643604
May 04, 2014
I have a lot of trouble. I am 44" in bust size, so I'm making the large size. With 106 Chain the front piece will be 33"... It is waaaay to big. I'm using needle 5.0 and yarn in same size as used above. What is wrong??
FaveCrafts Editor JL
May 05, 2014
Hi Ann, For specific pattern-related questions we suggest contacting the designer via their company profile. We also suggest posting your question on our Facebook wall - perhaps others have fun into this problem as well. Thanks!
cwilliams 5509481
Mar 27, 2014
Hello, I'm having trouble understanding the first row for the lower edging. What is it meant by "sc in next ch-space of base chain?" HELP
Melissa Ryan
Mar 27, 2014
This means you're going to single crochet into the next chain space of the original chain you started with. So you're going to attach yarn to the project and work a single crochet into the next chain space. If you're still having trouble, you can try contacting Caron Yarns for further instructions or maybe even a video of the project. Hope that helps!
dnlknight 5761541
Jun 09, 2013
I've made this numerous times. I don't like the ribbon idea so I just sew the sides down to the lower edging.
vhosk49643 7565088
Mar 11, 2014
Hi, I am hoping you get this question fairly quickly. I was going along smoothly and nicely until I hit row three of the lower edging. I have searched EVERYWHERE trying to understand WHAT IS MEANT BY: work [dc, picot] Are they just saying to build the picot into the existing dc stitch OR are they saying to put a dc AND a picot in the same double crochet?? Please help.
alba marina
May 17, 2012
I would like to have the graphics of this camisole...do you have them? is it possible to obtain them?..I will appreciate it...thanks
Daydreamer
May 16, 2012
I made this top as a gift for my sister in hot pink and it turned out really cute. I used my own homemade ties on the side though instead of the ribbon. The ribbon was too stiff feeling to me. My sister loved it.
alba marina
May 17, 2012
did you made it?...do you have the graphics to guide me? if you have them can you send them to my mail albamalfonzo@hotmail.con?..really I will appreciate it...
barbaralee 1545877
Aug 30, 2011
i'm having trouble with row 2? it says ch 8 (counts as dc, ch 4) but i dont understand this? do I chain 8 instead of chain 4? why do we chain 8 and not 4?
dnlknight 5761541
Jun 09, 2013
You are chaining 8 because it's forming the beginning of the next row!
clcaul 3234811
Jul 11, 2011
My underarm seam area does not look like yours. It comes straight across though the instructions say to start the seam 2" down. What am I doing wrong? Thank you!
Member 1440107
Apr 21, 2011
is it possible to get a clarification on the number of rows/or inches for this item? Should the pattern be stretched our or relaxed, when determing the 9". i would appreciate any help you could supply.
Report Inappropriate Comment
Are you sure you would like to report this comment? It will be flagged for our moderators to take action.
Thank you for taking the time to improve the content on our site.