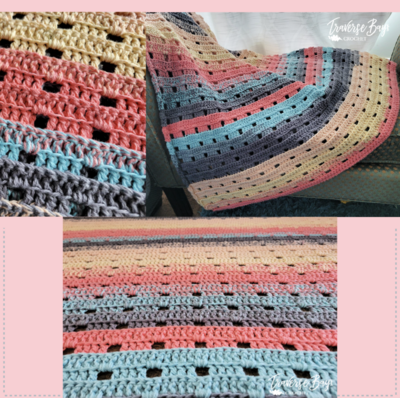
Denim Colors Granny Square Throw and Pillow
Create a matching granny square throw and pillow in the soft blue colors of denim with this granny square crochet pattern from Bernat Yarns. This is a lovely, warm throw for any room.

Materials:
- Yarn: Bernat® Denimstyle (3.5 oz/100 g)
Throw (Pillow)
Main Color (MC): (White) 4 (1) ball(s)
Contrast A: (Blue) 6 (1) ball(s)
Contrast B: (Dark Blue) 5 (1) ball(s)
- Crochet Hook: Size 5 mm (U.S. H or 8) crochet hook or size needed to obtain gauge.
- 14 ins [35.5 cm] square pillow form.
- Motif Chart
Gauge:
Small Motif = 4½ ins [11.5 cm] square.
Large Motif = 9 ins [23 cm] square
Measurement:
Throw: 45 x 63 ins [114.5 x 159.5 cm]
Pillow: 14 x 14 ins [35.5 x 35.5 cm]
Instructions:
Throw
Small Motif I (make 32)
With A, ch 4. Join with sl st to form a ring.
1st rnd: Ch 3 (counts as dc). 2 dc in ring. (Ch 2. 3 dc) 3 times in ring. Ch 2. Join with sl st to top of ch 3. Fasten off.
2nd rnd: Join MC with sl st to any ch 2 sp. Ch 3 (counts as dc). (2 dc. Ch 2. 3 dc) in same sp as last sl st. *Ch 1. (3 dc. Ch 2. 3 dc) in next ch 2 sp. Rep from * twice more. Ch 1. Join with sl st to top of ch 3. Fasten off.
3rd rnd: Join B with sl st to any ch 2 sp. Ch 3 (counts as dc). (2 dc. Ch 2. 3 dc) in same sp as last sl st. Ch 1. 3 dc in next ch 1 sp. Ch 1. *(3 dc. Ch 2. 3 dc) in next ch 2 sp. Ch 1. 3 dc in next ch 1 sp. Ch 1. Rep from * twice more. Join with sl st to top of ch 3. Fasten off.
4th rnd: Join A with sl st to any ch 2 sp. Ch 3 (counts as dc). (2 dc. Ch 2. 3 dc) in same sp as last sl st. (Ch 1. 3 dc in next ch 1 sp) twice. *Ch 1. (3 dc. Ch 2. 3 dc) in next ch 2 sp. (Ch 1. 3 dc in next ch 1 sp) twice. Rep from * twice more. Ch 1. Join with sl st to top of ch 3. Fasten off.
Small Motif II (make 24)
Work as given for Motif I, substituting MC for A in 1st rnd, B for MC in 2nd rnd, A for B in 3rd rnd and MC for A in 4th rnd.
Small Motif III (make 12)
Work as given forMotif I, substituting B for A in 1st rnd, A for B in 3rd rnd, and B for A in 4th rnd.
Sew 4 small motifs tog to form large motif. There are 8 large Motifs I, 6 large Motifs II and 3 large Motifs III.
Large Motif IV (make 18)
With A, ch 4. Join with sl st to form a ring.
1st rnd: Work as given for 1st rnd of Small Motif I
2nd rnd: With B, work as given for 2nd rnd of Small Motif I.
3rd rnd: With MC, work as given for 3rd rnd of Small Motif I.
4th rnd:With A, work as given for 4th rnd of Small Motif I.
5th rnd: Join B with sl st to any ch 2 sp. Ch 3 (counts as dc). (2 dc. Ch 2. 3 dc) in same sp as last sl st. (Ch 1. 3 dc in next ch 1 sp) 3 times. *Ch 1. (3 dc. Ch 2. 3 dc) in next ch 2 sp. (Ch 1. 3 dc in next ch 1 sp) 3 times. Rep from * twice more. Ch 1. Join with sl st to top of ch 3. Fasten off.
6th rnd: Join MC with sl st to any ch 2 sp. Ch 3 (counts as dc). (2 dc. Ch 2. 3 dc) in same sp as last sl st. (Ch 1. 3 dc in next ch 1 sp) 4 times. *Ch 1. (3 dc. Ch 2. 3 dc) in next ch 2 sp. (Ch 1. 3 dc in next ch 1 sp) 4 times. Rep from * twice more. Ch 1. Join with sl st to top of ch 3. Fasten off.
7th rnd: Join A with sl st to any ch 2 sp. Ch 3 (counts as dc). (2 dc. Ch 2. 3 dc) in same sp as last sl st. (Ch 1. 3 dc in next ch 1 sp) 5 times. *Ch 1. (3 dc. Ch 2. 3 dc) in next ch 2 sp. (Ch 1. 3 dc in next ch 1 sp) 5 times. Rep from * twice more. Ch 1. Join with sl st to top of ch 3. Fasten off.
8th rnd: Join B with sl st to any ch 2 sp. Ch 3 (counts as dc). (2 dc. Ch 2. 3 dc) in same sp as last sl st. (Ch 1. 3 dc in next ch 1 sp) 6 times. *Ch 1. (3 dc. Ch 2. 3 dc) in next ch 2 sp. (Ch 1. 3 dc in next ch 1 sp) 6 times. Rep from * twice more. Ch 1. Join with sl st to top of ch 3. Fasten off.
FINISHING
Join Large Motif I, II III and IV as shown on Diagram.
Edging: Join A with sl st to any corner ch 2 sp. Ch 1. 1 sc in same sp as last sl st.
1 sc in each dc around, working 3 sc in corners. Join with sl st to first sc. Fasten off.
Tassel: (make 4). Cut a piece of cardboard 4½ ins [11 cm] wide.
Wind A around cardboard 30 times. Break yarn leaving a long end and thread end through a needle.
Slip needle through all loops and tie tightly. Remove cardboard and wind yarn tightly around loops ¾ inch [2 cm] below fold. Fasten securely. Cut through rem loops and trim ends evenly. Sew tassels at each corner of Throw.
Pillow
(Front and Back make alike)
Work 1st to 8th rnds as given for Large Motif IV.
9th rnd: Join MC with sl st to any corner. Ch 3 (counts as dc). (2 dc. Ch 2. 3 dc) in same corner. (Ch 1. 3 dc in next ch 1 sp) 7 times. *Ch 1. (3 dc. Ch 2. 3 dc) in next ch 2 sp. (Ch 1. 3 dc in next ch 1 sp) 7 times. Rep from * twice more. Ch 1. Join with sl st to top of ch 3. Fasten off.
10th rnd: Join A with sl st to any corner. Ch 3 (counts as dc). (2 dc. Ch 2. 3 dc) in same corner. (Ch 1. 3 dc in next ch 1 sp) 8 times. *Ch 1. (3 dc. Ch 2. 3 dc) in next ch 2 sp. (Ch 1. 3 dc in next ch 1 sp) 8 times. Rep from * twice more. Ch 1. Join with sl st to top of ch 3. Fasten off.
11th rnd: Join B with sl st to any corner. Ch 3 (counts as dc). (2 dc. Ch 2. 3 dc) in same corner. (Ch 1. 3 dc in next ch 1 sp) 9 times. *Ch 1. (3 dc. Ch 2. 3 dc) in next ch 2 sp. (Ch 1. 3 dc in next ch 1 sp) 9 times.
Rep from * twice more. Ch 1. Join with sl st to top of ch 3. Fasten off.
FINISHING
Block each piece to 14 ins [35.5 cm] square.
With WS of Front and Back tog, working through both thicknesses, join A with sl st to any corner. Ch 1. 1 sc in same sp as last sl st. 1 sc in each dc along sides and corners. When 3 sides are completed, insert pillow form and crochet opening closed, as before. Join with sl st to first sc. Fasten off.
Tassel: (make 4). Work as given for Throw. Sew tassels at each corner of Pillow.
Read NextLearn to Crochet the Waffle Stitch
Your Recently Viewed Projects

Thanks for your comment. Don't forget to share!
Bdee
Nov 04, 2023
I cant find what kind of yarn they use Bernat denimstyle doesnt look like the yarn as its a mixed one. Which do I use? 3 ply or chunky?
abylow 3027859
Feb 26, 2019
i love the demin colours.would be so beautiful on a navy blue sofa.
sylviaday15 595693 7
Aug 10, 2017
I cannot find the instructions for large motif I, II and III. Please can anyone help?
lcarr
Aug 13, 2017
Taken from the pattern (under small motif iii), Sew 4 small motifs tog to form large motif. There are 8 large Motifs I, 6 large Motifs II and 3 large Motifs III. You could use all the same small motifs in a large one, or mix them up. I hope that helps.
princess6860504
Jun 01, 2017
So very pretty in these tonal denim blues. This is the perfect project for those of us who want more of a challenge that just a back and forth row by row afghan. The combinations of the colors and then taking the extra time to join all the motifs together make this a highly satisfying project you will be proud to show off.
chrisk
Mar 05, 2016
So much fun, and a quick switch out of colors makes this adaptable to just any use, even the amounts are clearly stated.A good go to pattern
drowe2 9330254
Mar 30, 2012
I am very interested in doing this afgan in the same colors but cannot find the colors. Can you tell me what they were and where you got them?
Member 7356784
Sep 26, 2014
I found this. Hope it helps http://ourtownusa.net/yarnyard/denimsty.htm
FaveCrafts Editor JL
Sep 26, 2014
Hi there, You can also find it at Walmart or Joann's. Amazon and eBay also stock this yarn. Thanks and happy crocheting! - Julia from FaveCrafts
NRich1
Jun 20, 2010
For those who want to make the picture larger too see the details, you can press Ctrl and the plus key at the same time. You don't have to use the shift for the plus key (it's the "equals" key, too). This will make the pic larger each time you press the two keys. Also, I've found that a lot of the time, you can go to the site for the recommended yarn, in this case, Bernat. The home sites usually have the pattern in a PDF formula. You may have to create a login, but that's a way you can save the patterns. I've also highlighted the entire pattern, used the right mouse button to copy, then open a new word document, and then paste (right mouse button, click paste) in to the document.
Carolinck
Apr 09, 2010
I would like if the patterns would be available also in PDF, so I could put it in my files... I don't always like to have to turn on the computer to make crochet, most part of times I print them.
Member 14523
Dec 21, 2009
Click on motif chart in the materials list. That gives you the diagram for joining motifs. =)
Member 6958057
Dec 19, 2009
Where is the diagram for this pattern as stated in the above directions for finishing?
Report Inappropriate Comment
Are you sure you would like to report this comment? It will be flagged for our moderators to take action.
Thank you for taking the time to improve the content on our site.