Crochet Princess Wand and Tiara
With these free crochet patterns you can have your daughter looking like a princess in no time. Easy to complete and adorable to wear, they are a great addition to any dress-up play dates!

Materials:
- Caron International's Simply Soft Party (96% Acrylic/4% Metallic, 153 yd/140m, 3 oz/85g): 1 skein
- Colorway #1: #0002 Fuchsia Sparkle; Colorway #2: #0006 Purple Sparkle; Colorway #3: #0001 Snow Sparkle
- One size US G-8 (5.5mm) crochet hook,
- (for Wand, ties and last row of top of Tiara); and US H-8 (5mm) (for body of Tiara), or sizes to obtain gauge.
- For Tiara: Safety pins or small stitch holder, 3 iridescent beads (ensure hole in beads is large enough for yarn needle to pass through), yarn needle.
- For Wand: One dowel—12"/30.5cm long, low-temperature hot glue gun, glue sticks, iridescent beads (any number, size and color of beads may be used. One 1/2"/1cm diameter bead is recommended for bottom of wand stem; ensure hole in beads is large enough for yarn needle to pass through), yarn needle.
Stitches Used:
- Chain (ch), double crochet (dc), half double crochet (hdc), single crochet (sc), slip stitch (sl st), treble crochet (tr),
- Special Stitch: Picot: Ch 5, sl st in top of last tr made.
- Special Technique: Adjustable-ring method— Wrap yarn into a ring, ensuring that tail falls behind working yarn. Between finger and thumb, grip ring and tail firmly. Insert hook through center of ring, yo (with working yarn) and draw up a lp. Yo and draw through lp on hook (first ch made). Work sts of first rnd into ring. After first rnd of sts is worked, pull gently, but firmly, on tail to tighten ring.
Pattern:
TIES
With smaller hook and 1 strand of yarn coming from outside of ball, make an adjustable ring.
Tie #1: [Ch 7, sc in ring] 5 times (flower made), ch 125.
Place final lp on a safety pin.
Do not fasten off.
Tie #2: With 1 strand of yarn coming from inside of ball, work same as Tie #1, do not place final lp on holder.
Join ends of ties: Place final lp of Tie #1 and Tie #2 together on larger hook.
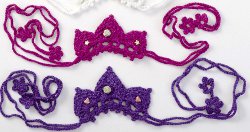
TIARA
With larger hook, holding 2 strands of yarn together (the 2 strands coming from the 2 ties).
Headband:
Ch 8, dc in 8th ch from hook (first box made), [turn, ch 5, sk next 2 ch of previous box, dc in next ch] 7 times—8 boxes.
Top of Tiara (RS): Do not turn, working across long side of headband, ch 1, sk first box, 7 dc in next box, sc in next box, 3 dc in next box, 3 tr in next dc, 3 dc in next box, sc in next box, 7 dc in next box, sc in last box, turn.
Remove one lp from hook, place lp on a safety pin.
Keep the other lp on hook.
Next Row (WS): With larger hook and 1 strand of yarn, working in front loops only (to create ridge on RS), ch 1, sl st in first sc, *sc in next dc, hdc in next dc, 2 dc in next dc, tr in next dc, ch 5, sl st in last tr made (picot made), 2 dc in next dc, hdc in next dc, sc in next dc*; ch 1, sl st in next sc, ch 1; sc in next dc, hdc in next dc, dc in next 2 sts, (2 tr, picot, 2 tr) in next tr, dc in next 2 sts, hdc in next dc, sc in next dc, ch 1, sl st in next sc; rep from * to * once more; sl st in next ch-1 sp; working across short, side edge of headband, sl st in next 3 ch. Do not fasten off.
TIES AND LOWER EDGING
Tie #3: Change to smaller hook, ch 129, sl st in 4th ch from hook to create a ring at end of ch, [ch 7, sc in ring] 5 times.
Fasten off. Lower Edging: With RS of tiara facing, place lp on safety pin back onto larger hook.
Working across short side edge of headband, sl st in next 3 ch, move Ties #1 and #2 out of the way; ch 1, [work 3 sc in next box, picot] 7 times, 3 sc in next box.
Do not fasten off. Tie #4: Work same as Tie #3.
FINISHING
Beads (optional) should not be used on tiaras for young children.
Cut a 10"/25.5cm length of yarn and split the length into 2 strands, each strand should be thin enough to sew the beads to the tiara.
Sew one bead to RS of each point of tiara (optional).
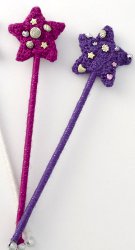
WAND
Stitches Used:
- Chain (ch), half double crochet (hdc), single crochet (sc), slip stitch (sl st)
- Special Technique: Adjustable-ring method— Wrap yarn into a ring, ensuring that tail falls behind working yarn. Between finger and thumb, grip ring and tail firmly. Insert hook through center of ring, yo (with working yarn) and draw up a lp. Yo and draw through lp on hook (first ch made). Work sts of first rnd into ring. After first rnd of sts is worked, pull gently, but firmly, on tail to tighten ring.
- Notes: Beads are optional and should not be used on wands for young children. Star is crocheted with size G-6 (4mm) hook to create a dense fabric. To make sturdy star, take care to work with a tight tension.
STEM
Thread yarn into yarn needle.
Take needle through a 1/2"/1cm diameter bead.
Draw yarn end through about 2"/5cm and glue end along side of one end of dowel.
Glue bead to end of dowel. Wrap yarn around dowel, placing each wrap against previous wrap and glue in place as you wrap, until dowel is completely covered.
Cut the end of the yarn and glue end to top of dowel.
STAR (make 2)
Center Circle—Leaving a long beginning tail (for sewing beads to star), make an adjustable ring.
Rnd 1: Work 10 sc in ring; do not join and do not turn—10 sc.
Rnd 2: Working in back loops only, 2 sc in each sc around—20 sc.
First Point—Row 1: Ch 1, working in back loops only, hdc in next 4 sc, turn. Row 2: Ch 2, sk first hdc, hdc in next 3 hdc, turn. Row 3: Ch 2, sk first hdc, hdc in next 2 hdc, turn. Row 4: Ch 2, sk first hdc, hdc in next hdc, turn. Row 5: Ch 1, sl st in first hdc, sl st evenly down side of point to top of Row 1.
Second Point—Row 1: Working in back loops only, hdc in next 4 sc of center circle. Rows 2–5: Rep Rows 2–5 of first point.
Third and Fourth Points—Work same as Second Point.
Fifth Point—Row 1: Working in back loops only, hdc in next 4 sc of center circle; sl st in top of beginning ch of Row 1 of first point, turn. Rows 2–4: Rep Rows 2–4 of first point. Row 5: Ch 1, turn, sl st in first hdc. Fasten off, leaving a long tail for sewing two stars together around outer edges.
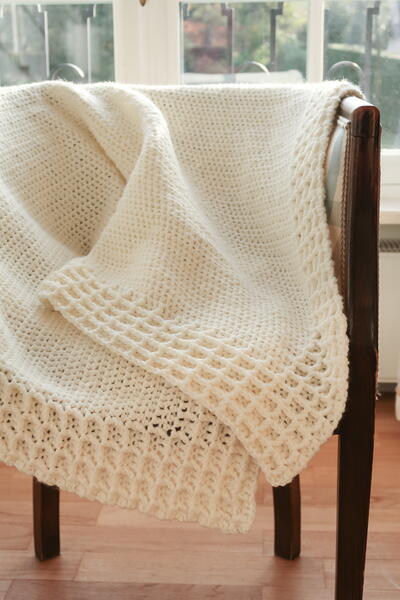
Read NextCluster Pattern Afghan Block


Thanks for your comment. Don't forget to share!
Morehouse17
Sep 30, 2017
Show me any little girl that does not love to play Princess and I will show you a little girl that never placed a tiara on her head. This set is too cute. After reading the pattern, I see that the design should work up easily. I have to make these for my next door neighbors granddaughter.
Delphine Bryant
Mar 22, 2017
I just love free easy crochet patterns. The Tiara is the cutest thing and the matching wand is adorable. At this time my Granddaughter is too young for the tiara and wand but by next spring, they will be just right. I'll have time to make a couple or three.
Report Inappropriate Comment
Are you sure you would like to report this comment? It will be flagged for our moderators to take action.
Thank you for taking the time to improve the content on our site.