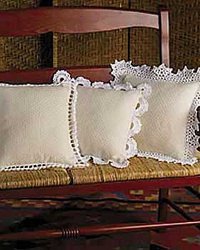
Crochet Pillow Edgings
Decorate any pillow in the house with this nice crochet pillow edging pattern from Bernat Yarns. This makes for a nice decorative accent to any pillow. Pattern is an intermediate pattern.

Materials:
- Bernat Handicrafter Crochet Cotton (14 oz / 400 g )
- Picot Edging (A) 154 yds [140 m]
- Tassel Edging (B) 106 yds [97 m]
- Ruffle Edging (C) 118 yds [108 m]
- Lace Edging (D) 112 yds [103 m]
MEASUREMENTS
Finished Size For Picot Edging (A), Tassel Edging (B) and Ruffle Edging (C): To fit 14 in [35.5 cm] square pillow form.
Finished Size For Lace Edging (D): To fit 10 in [25.5 cm] square pillow form.
Size 1.75 mm (U.S. 2) crochet hook or size needed to obtain gauge.
GAUGE: 32 sc = 4 ins [10 cm]
STITCH GLOSSARY
Dc2tog over next 4 sts or ch-2 sp = Yoh. Insert hook in same st, yoh and draw up loop. Yoh and draw through 2 loops on hook. Miss next 2 ch or ch- 2 sp. Yoh. Insert hook in next st. Yoh and draw up loop. Yoh and draw through 2 loops on hook. Yoh and draw through all 3 loops on hook.
Picot = Ch 5, 1 sc in first ch.
Puff St = *Yoh. Insert hook in first ch of ch-5. Yoh and draw up loop (3 loops on hook). Rep from * 4 times more. Yoh. Draw through all 11 loops on hook. Ch 1 to close puff.
PICOT PILLOW EDGING (A)
Ch 461.
Base rnd: 1 sc in 2nd ch from hook. 1 sc in each of next 113 ch. 3 sc in next ch (corner made). *1 sc in each of next 114 ch. 3 sc in next ch (corner made). Rep from * twice more. Ss in first sc, being careful not to twist your work. 468 sts.
1st rnd: Ch 3 (counts as 1 dc). (Ch 1. Miss next sc. 1 dc in next sc) 56 times. Ch 1. Miss next sc. (1 dc. Ch 3. 1 dc) in next sc. *(Ch 1. Miss next sc. 1 dc in next sc) 57 times. Ch 1. Miss next sc. (1 dc. Ch 3. 1 dc) in next sc. Rep from * twice more. Ch 1. Ss in top of beg ch-3.
2nd rnd: Ch 3. *(Ch 1. Miss next ch. 1 dc in next dc) to next corner ch-3. Miss next ch. (1 dc. Ch 3. 1 dc) in next ch (corner made). Rep from * 3 times more. Ch 1. Miss next ch. 1 dc in next dc. Ch 1. Ss in top of beg ch-3.
3rd rnd: Work as given for 2nd rnd, but ending with (Ch 1. Miss next ch. 1 dc in next dc) to end. Ch 1. Ss in top of beg ch-3.
4th to 6th rnds: As 3rd rnd. Fasten off at end of 6th rnd.
7th rnd: Join yarn with ss in any corner ch-3 sp. 1 sc in same sp. (Ch 5. 1 sc in same sc) 3 times. Ch 3. Miss next (dc, ch-1). 1 sc in next dc. *Ch 3. Miss next (ch-1, dc, ch-1). 1 sc in next dc. (Ch 5. 1 sc in same st) 3 times. Ch 3. Miss next (ch-1, dc, ch-1). 1 sc in next dc.** Rep from * to ** 16 times more. Ch 3. Miss next (ch-1, dc). 1 sc in ch-3 sp. (Ch 5. 1 sc in same st) 3 times. Ch 3. Miss next (dc, ch-1). 1 sc in next dc.* Rep from * to * twice more, then rep from * to ** 19 times more. Ch 3. Ss in first sc. Fasten off.
TASSEL PILLOW EDGING (B)
Ch 461.
Base rnd: 1 sc in 2nd ch from hook. 1 sc in each of next 113 ch. 3 sc in next ch (corner made). *1 sc in each of next 114 ch. 3 sc in next ch (corner made). Rep from * twice more. Ss in first sc, being careful not to twist your work. 468 sts.
1st rnd: Ch 1. 1 sc in same st. 1 sc in each of next 114 sts. 3 sc in next st. *1 sc in each of next 116 sts. 3 sc in next st. Rep from * twice more. 1 sc in next st. Ss in first sc. 476 sts.
2nd rnd: Ss over next st. Ch 4 (counts as 1 tr). (Ch 3. Skip next 3 sts. 1 tr in next st) 28 times. Ch 3. Skip next 3 sts. (1 tr. Ch 7. 1 tr) in next st. *(Ch 3. Skip next 3 sts. 1 tr in next st) 29 times. Ch 3. Skip next 3 sts. (1 tr. Ch 7. 1 tr) in next st.* Rep from * to * twice more. Ch 3. Ss in top of beg ch-4.
3rd rnd: Ch 1. 1 sc in same st. Ch 5. Puff St. 1 sc in next tr. (Ch 5. Puff St. 1 sc in next tr) 28 times. *(Ch 5. Puff St. 1 sc in 4th ch of corner ch-7 sp) twice. (Ch 5. Puff St. 1 sc in next tr) 32 times.* Rep from * to * twice more. (Ch 5. Puff St. 1 sc in 4th ch of corner ch-7 sp) twice. Ch 5. Puff St. Ss in first sc. Fasten off.
RUFFLE PILLOW EDGING (C)
Ch 449.
Base rnd: 1 sc in 2nd ch from hook. 1 sc in each of next 110 ch. 3 sc in next ch (corner made). *1 sc in each of next 111 ch. 3 sc in next ch (corner made). Rep from * twice more. Ss in first sc, being careful not to twist your work. 457 sts.
1st rnd: Working through front loops only, ss in each of next 14 sts. (Ch 8. Miss next 6 sts. Ss in each of next 13 sts) 5 times. Ch 8. Miss next 4 sts. *Ss in each of next 13 sts. (Ch 8. Miss next 6 sts. Ss in each of next 13 sts) 5 times. Ch 8. Miss next 4 sts. Rep from * twice more. Ss in 2nd ss from beg of rnd.
2nd row: Working through both loops, ss in each of next 11 sts. 14 dc in ch-8 sp. Miss next 2 sts of first rnd. Ss in next st. Turn.
3rd row: Ss in each st to first dc from 2nd row. Ch 3 (counts as 1 dc). Ch 1. (1 dc in next st. Ch 1) 12 times. 1 dc in next st. Miss next 2 sts of first rnd. Ss in each of next 3 sts. Turn.
4th row: (Ch 5. 1 sc in next ch-1 sp) 13 times. Miss next 2 sts of first rnd. Ss in next st. 1 Scallop made. **Working across first rnd. Ss in each of next 5 sts. 14 dc in next ch-8 sp. Miss next 2 sts of first rnd. Ss in next st. Turn.
Rep 3rd and 4th rows once.**
Rep from ** to ** until a Scallop has been worked in each ch-8 sp around. Fasten off.
LACE PILLOW EDGING (D)
Ch 304. Join in rnd.
Foundation rnd: Ch 1. 1 sc in same sp as ss. 1 sc in each of next 74 ch. 3 sc in next ch (corner). (1 sc in each of next 75 ch. 3 sc in next ch) 3 times. Join with ss to first sc.
1st rnd: Ch 3. Miss first 3 sc. 1 dc in next sc (counts as dc2tog). (Ch 2. Dc2tog over next 4 sts working first st in just worked st) 24 times. [(Ch 2. 1 dc) 3 times all in corner sc. (Ch 2. Dc2tog over next 4 sts working first st in just worked st) 26 times] 3 times. (Ch 2. 1 dc) 3 times all in just worked st (corner sc). Dc2tog over next 4 sts working first st in just worked st. Ss to top of ch 3.
2nd rnd: Ch 3. 1 dc in next dc2tog (counts as dc2tog). (Ch 2. Dc2tog over next 4 sts working first st in just worked st) 25 times. [(Ch 2. 1 dc) 3 times all in just worked st. (Ch 2. Dc2tog over next 4 sts working first st in just worked st) 29 times] 3 times. (Ch 2. 1 dc) 3 times all in just worked st. Ch 2. (Dc2tog over next 4 sts working first st in just worked st. Ch 2) 3 times. Ss to top of ch 3.
3rd rnd: Ss into next ch 2 sp. Ch 1. 1 sc in same sp as last ss. Ch 2. Miss next ch 2 sp. *[(2 dc. Ch 3. 2 dc) all in next ch 2 sp. Ch 2] twice. Miss next ch 2 sp. (1 sc in next ch 2 sp. Ch 3) 3 times. 1 sc in next ch 2 sp. Ch 2. Rep from * around ending with miss next ch 2 sp. (1 sc in next ch 2 sp. Ch 3) 3 times. Ss to first sc.
4th rnd: Ss in each st to next ch 3 sp. Ch 3 (counts as dc). (1 dc. Ch 3. 2 dc) all in same ch 3 sp. *Ch 1. (2 dc. Ch 3. 2 dc) all in next ch 2 sp. Ch 1. (2 dc. Ch 3. 2 dc) all in next ch 3 sp. Ch 2. Miss next ch 2 sp. (1 sc in next ch 3 sp. Ch 3) twice. 1 sc in next ch 3 sp. Ch 2. Miss next ch 3 sp. (2 dc. Ch 3. 2 dc) all in next ch 3 sp. Rep from * around ending with (2 dc. Ch 3. 2 dc) all in next ch 2 sp. (2 dc. Ch 3. 2 dc) all in next ch 3 sp. Miss next ch 2 sp. (1 sc in next ch 3 sp. Ch 3) twice. Ss in first sc.
5th rnd: Ss in each st to next ch 3 sp. Ch 3 (counts as dc). (2 dc. Picot. 3 dc) all in same ch 3 sp. [Ch 1. 1 sc in next ch 1 sp. Ch 1. (3 dc. Picot. 3 dc) all in next ch 3 sp] twice. Ch 1. Miss next ch 2 sp. 1 sc in next ch 3 sp. Ch 3. 1 sc in next ch 3 sp. Ch 1. Miss next ch 2 sp. (3 dc. Picot. 3 dc) all in next ch 3 sp. Rep from * around ending with [Ch 1. 1 sc in next ch 1 sp. Ch 1. (3 dc. Picot. 3 dc) all in next ch 3 sp] twice. Ch 1. Miss next ch 2 sp. 1 sc in next ch 3 sp. Ch 3. 1 sc in next ch 3 sp. Ch 1. Ss to top of ch 3. Fasten off.
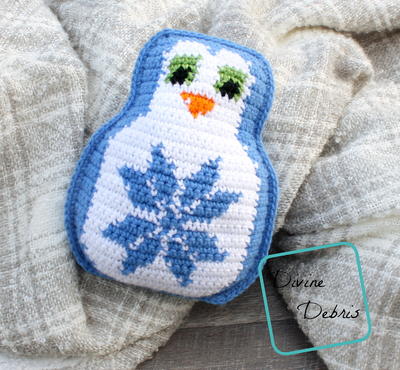
Read NextCrochet Penguin Jingle Bell Ornament
Your Recently Viewed Projects
Thanks for your comment. Don't forget to share!
nancylong1996 5722 781
Apr 24, 2013
I love crocheting on pillows. I have several pair of pillowcases that have crocheting on the edges...reminds me of my grandparents house as a child!
PJ 51
Apr 19, 2012
I too want to know how the edgings are attached to the pillow. Sewing them on seems time-consuming.
sassynana04 861570 0
Apr 19, 2012
Having never done this beautiful way of crocheting, I'm wondering how you get the lace attached to the pillow edges. Is the lace crocheted alone and then sewn onto the pillow. Any help would be appreciated.
Report Inappropriate Comment
Are you sure you would like to report this comment? It will be flagged for our moderators to take action.
Thank you for taking the time to improve the content on our site.