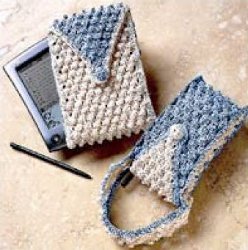
Cell Phone Case
If you're tired of having your cell phone scratched up because it's just sitting in your purse then this crochet pattern from DMC Threads is great for you. Crochet this cell phone case to protect your phone.

Materials:
- DMC Baroque Crochet Cotton (Art. 159) - 1 ball Ecru (MC) and 1 ball 800 Sky Blue (CC) or choose from any of the Baroque colors.
- Approximately 20 small straight pins
- Crochet Hook Size 8 (1.25mm)
Finished Size 3-1/2" wide x 4-3/4" high x 3/4" deep
Gauge 10 sts and 6 pattern rows = approximately 1"
Abbreviations beg = Beginning
ch = Chain
dc = Double Crochet
dtr = Double Treble
lp(s) = Loops
rem = Remaining
rep = Repeat
sc = Single Crochet
sl st = Slip Stitch
sk = Skip
sp = Space
st(s) = Stitch(es)
yo = Yarn Over
5dc-pc = 5-dc Popcorn
MC = Main Color
CC = Contrasting Color
Instructions Body of Case:
Foundation Row: With MC, ch 36, turn. Begin in 2nd lp from hook, work sc in back
lp of each ch. Turn. (35 sts)
Row 1: Ch 3 (counts as first st), * 5dc-pc in second st, dc in next st, ch 1, skip next st of row below, dc in next st. Repeat from * until last 2 sts, sk next st, work
5dc-pc, dc in last st of row below. Turn. ( 35 sts).
Row 2: Ch 1; work 35 sc across row, ending with a sc in top of turning ch of row below. Turn.
Row 3: Ch 4 (counts as first st and ch-1 sp). Skip next st, * dc, 5dc-pc, dc into
next 3 sts of row below, ch 1, sk next st. Rep from * to end of row, ending with dc in last st of row below. Turn.
Row 4: Rep Row 2, ending with 2 sc in top of turning ch of row below.
Rows 5-62: Rep Rows 1 to 4 ending with a Row 2. Note: Mark Rows 31 and 32 for gusset. Fasten off. Do not turn.
Flap:
Row 1: For turning row of flap, attach CC to beg of Row 2 just completed.
Working in front lps only, work 35 sc across row .
Rows 2 and 3: Work Rows 1 and 2 of pattern. (35 stitches)
Flap Decrease Rows:
Row 4: To dec 2 sts at end of row, work pattern Row 3 until 3 sts rem, yo, pull a lp through next st of row below, yo, pull a lp through first 2 lps on hook, skip next st, yo twice, pull a lp through last st of row, (yo, pull a lp through first 2 lps on hook) twice, yo, pull a lp through 3 rem lps on hook. Turn. (31 sts.)
Row 5: Ch 1, work sc across row. Note: To dec 2 sts at beg of each row, do not work turning ch.
Rows 6-27: Rep rows 4 and 5. Turn. (3 sts)
Button Loop:
Ch 4, skip next st, and dtr in last st. Fasten off.
First Gusset:
With wrong side facing, attach CC to base of Row 31 on one side of body. Work 3 sc evenly spaced across side edge, ending with last st in base of Row 32. Turn.
Gusset Row 1: Ch 4 (counts as dc and ch-1 sp), dc in last sc of row below. Turn.
Gusset Row 2: Ch 1, sc in each st of row below (working one sc into dc and 2 sc into turning ch of row below). Turn.
Gusset Row 3: Ch 3, 5dc-pc into next st, dc into last st. Turn.
Gusset Row 4: Ch 1, sc in each st of row below (working sc into dc, 5dc-pc, and turning ch of row below).
Gusset Rows 5-34: Repeat Rows 1-4, ending with Row 2. Fasten off .
Second Gusset:
With wrong side facing, attach CC to base of Row 31 on other side of body. Work
3 sc evenly spaced across side edge, ending with last st in base of Row 32. Turn.
Gusset Rows 1-34: Work same as First Gusset.
Finishing:
Fold front of body so beg edge matches bottom of flap, and pin sides of gussets to front and back body edges. Attach MC to lower-right corner of back. Holding body and gusset edges together, join side edges by working sc evenly spaced through both layers, being careful to match exactly corresponding rows. At top of first gusset, continue working evenly spaced sc along side of single layer of flap, 10 to 12 sc around button lp, and continue sc up second side of flap.
Continue joining gusset to left-back panel, 3 sc across bottom edge of gusset, up left front side (continuing to join front and gusset edges), across front edge (bottom of foundation row), down right front side (continuing to join front and gusset edges), ending with 3 sc across the bottom edge of second gusset. Join edging row with a sl st in first sc, ch 1, do not turn. Work a second row of sc into sc of row just completed, ending with a sl st in first sc. Fasten off. Weave in ends.
Button:
With CC, leaving 8” tail, make a slip knot, ch 5, and join with sl st to form ring; ch 3, 23 dc into ring, working sts over tail. Join with sl st in first dc.
Ch 1, * yo and pull a lp through next 2 sts, yo, pull lp through all 3 lps on hook; repeat from * until all sts have been worked. Fasten off, leaving 6" tail. Thread tail into tapestry needle, and baste together the sts remaining on last row; simultaneously, tightly pull beg tail to close the beg ring, stuff remaining beg tail into center of button. Fold flap over, mark button position on front side. Leaving thread on needle, use remaining end to sew button to front just under button loop.
Fasten off. Weave in thread ends.
Your Recently Viewed Projects
Thanks for your comment. Don't forget to share!
lcarr
Apr 03, 2017
I dont know if they even make cell phones this small anymore, but I imagine that the pattern can be adjusted for larger phones if you are willing to do some math and frogging (if necessary). I like the texture of the stitches used. The handle is a cute addition.
Member 5254926
Dec 10, 2013
I am so making this! I am always looking for new things to crotchet! Jessica
Member 8195154
Sep 08, 2010
I like this. Do they make crochet yards that are denim? (I haven't crocheted in almost 35 years!)
KatsPurr
Mar 20, 2010
Should the directions for Gusset Row 4 read (near the end) "working sc into dc, and 5dc-pc INTO turning ch of row below"? ... rather than "Gusset Row 4 Ch 1, sc in each st of row below (working sc into dc, 5dc-pc, AND turning ch of row below)."
KaysGlass
Mar 17, 2010
To Crafter 8091120 - Craft Box To use the craft box, you need to register and be logged in. Then, find the pattern you want to save and click "Add" above the pattern to the right. Once you log in each time, you can go straight to your My Craftbox and see you selections. Nice feature. Hope this helps.
minntea
Mar 11, 2010
For MR on how to do a 5-dc-pc (double crochet popcorn stitch). Hopefully the following link to a youtube video on how to do the popcorn stitch will help httpwww.youtube.comwatch?v=Tg58yUidv5M Best of luck! --KL
new to you
Mar 09, 2010
Would love to do this one but new to crochet. Do not understand the 5dc-pc. What is the pc, and what is the 5-dc popcorn? Thanks a bunch. MR
Member 8091120
Mar 02, 2010
Would like to use the craft box but I'm not sure on how to get started.
susieq57w
Feb 20, 2010
To Crafter 2239518 Hi, you can find crochet abbreviations here httpwww.lionbrand.comcgi-binfaq-search.cgi?dictionaryOfAbbreviations=1store=stores The lionbrand.com site has lots of info for beginner crocheters plus great free patterns. You can find lots of video help on youtube.com. Hope this help you some! Happy crocheting!
Crafter 2239518
Jan 18, 2010
WOULD LIKE TO KNOW IF THERE IS ANY VIDEO INSTRUCTIONS TO ANY OF THE PATTERNS. JUST A BEGINNER AND HAVING A HARD TIME FOLLOWING THE ABBREVIATIONS. PLEASE HELP IF YOU CAN. THANK YOU IN ADVANCE.
Annie and my artif acts
Jan 18, 2010
Fantastic easy pattern for the beginner or the experienced crocheter! Endless color opportunities, and instead of the button, you could use a decorative bead that works with the style of the person who is due to use this. Great gift for teenagers, tweenagers, and actually all ages, as we all have at least a little junk in our bigger purses. My hubby always asks me how many "bricks" I'm carrying when I ask him to hold my purse for a second, and it's not even that big..lol. Nice pattern!
Report Inappropriate Comment
Are you sure you would like to report this comment? It will be flagged for our moderators to take action.
Thank you for taking the time to improve the content on our site.