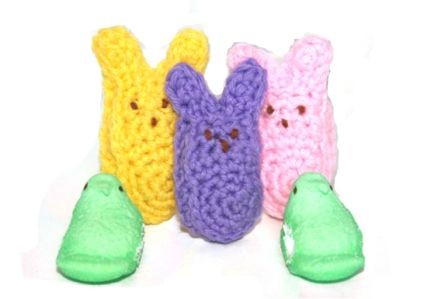
Small Crochet Bunny Peeps
Fill your Easter baskets with a cute little crochet bunny peeps compliments of Alicia Kachmar of Create! You need a small amount of worsted weight yarn and an F hook. For a large peep, check out this Easter crochet pattern. If you are looking to add crocheted flair to your Easter décor, make these free crochet patterns for bunnies immediately. Perfectly simple to work up and looking lovely in just about any pretty pastel yarn color, these cute little stash busters could easily be crocheted for an Easter basket surprise or pinned to your jacket. The possibilities are endless for these bitty bunnies.

Materials:
- Crochet F hook
- Any worsted weight yarn in bunny color and brown (I use Red Heart 100% acrylic)
- Needlepoint needle
- Polyester fiber filling
Abbreviations:
Ch: chain
Sc: single crochet
Sl: slip
Hdc: half double crochet
Dec: (decrease) pull up a loop in next 2 sc, yarn over (YO) and draw all 3 loops on the hook
Instructions:
Ch 2; 6 sc in second ch from hook; join (6 sc)
Ch 1; 2 sc in same stitch and in each sc around; join (12 sc)
This forms the bottom circle of the body. The top half is worked by moving across and turning at the end of each row.
Ch 1 (do not turn; right side is facing you) sc into next stitch, 2sc into next, sc, sc. (5 sc)
Ch 1 turn; Sc across row. (5 sc)
Ch 1 turn; Sc, dec, sc, sc. (4 sc)
Ch 1 turn; Sc across row. (4 sc)
Turn the work so that the right side is facing you without making a Ch 1 turn.
Ch 5 (ear); sc, hdc, hdc, hdc, sl stitch into next sc on the top of the body (head)
Ch 5; sc, hdc, hdc, hdc, skip the next sc and sl stitch into the last sc. Finish off.
This is the “front” of the bunny. With a brown yarn and needlepoint needle, make two eyes and a nose. There’s no exact way to do this, but I made each by coming up with the thread and going down vertically in another spot very close by. It took me a couple tries to get it right. You could also use beads to make more uniform eyes and nose.
Repeat the above instructions for the “back” of the bunny, except do not finish off. Place the wrong sides together:
For the body, single crochet into the inner loops to give the bunny some depth. When you’re working the part of the bodies that aren’t the circles, there are no inner or outer loops; single crochet here.
For the ears, slip stitch together.
Stuff the body, but not the ears, when he is about 2/3 stitched together. Finish off.
Your Recently Viewed Projects
Thanks for your comment. Don't forget to share!
organicgirl57 1590 876
Apr 07, 2014
Perhaps the issues regarding the directions lie within the "print" tab. I have printed instructions for several projects over the past few days, which have all had rounds or rows that did not print, just a blank space. I did not have this issue with this pattern when I copied it and saved as a pdf file and then printed. It makes all the difference!!
theduffers
Apr 22, 2011
These are adorable! It took a little time to get the "hang" of the directions, but they worked out great. The more I made, the better they looked! Thank you so much!
joaniem
Mar 31, 2010
The instructions leave a lot to be desired. Steps have been left out or not explained correctly. I had to make changes so it would come out correctly. Must know how to crochet to do this. Joan M.
tstitchesandcrafts
Mar 09, 2010
Just what I needed! Thank You! Thank You! Thank You! I needed a extra FUN gift to give to my nieces with there Easter gifts. These bunnies are perfect! The girls will love them! To Ann (posted first comment) I would rate this project a step above easy for someone that has just started crocheting. Check out www.youtube.com for how to Slip Stitch "sew" crochet together. More than likely they will have a video to help you out. Tina =)
lann
Feb 11, 2010
First, what level of Crochet is this? Do you ever put how to sew stitches? I have never done this before. Ann
Report Inappropriate Comment
Are you sure you would like to report this comment? It will be flagged for our moderators to take action.
Thank you for taking the time to improve the content on our site.