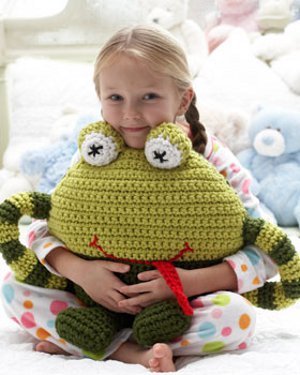
Frog Prince Pillow
The little princess in your life will love cuddling up with this Frog Prince Pillow. Made with soft yarns and a simple crochet stitch, this pattern is great for beginners and those looking for a quick crochet project to make this weekend. This sweet pillow is charming and adorable and makes a wonderful gift for fairy tale lovers and dreamers of all ages.

Materials:
- 3 balls Bernat® Softee® Chunky™ (100 g/3.5 oz; 99 m/108 yds) in Eucalyptus
- 2 balls Bernat® Softee® Chunky™ (100 g/3.5 oz; 99 m/108 yds) in Grass
- 1 ball Bernat® Softee® Chunky™ (100 g/3.5 oz; 99 m/108 yds) in White
- 1 ball Bernat® Softee® Chunky™ (100 g/3.5 oz; 99 m/108 yds) in Berry Red
- Size 8 mm (U.S. L/11) crochet hook or size needed to obtain gauge
- Two pieces of fabric 18" [45.5 cm] square for pillow form
- Small amount of black yarn for eye embroidery
- Stuffing
Gauge: 8 sc and 9 rows = 4" [10 cm].
Instructions:
Note: When joining colors, work to last 2 loops on hook of first color. Draw new color through last 2 loops and proceed.
Pillow Front
-
With MC, ch 13.
-
1st row: 1 sc in 2nd ch from hook. 1 sc in each ch to end of chain. Turn. 12 sc.
-
2nd to 7th rows: Ch 1. 2 sc in first sc. 1 sc in each sc to last sc. 2 sc in last sc. Turn. 24 sc at end of 7th row.
-
8th, 10th, 12th and 14th rows: Ch 1. 1 sc in each st to end of row. Turn.
-
9th, 11th, 13th and 15th rows: As 2nd row. Join A at end of 15th row. 32 sc.
-
16th to 22nd rows: With A, as 8th row.
-
23rd, 25th, 27th and 29th rows: Ch 1. Sc2tog. 1 sc in each sc to last 2 sc. Sc2tog. Turn. 24 sc at end of 29th row.
-
24th, 26th, 28th and 30th rows: As 8th row.
- 31st to 36th rows: As 23rd row. 12 sc at end of 36th row. Fasten off.
Pillow Back
- With MC, work as for Pillow Front, omitting all references to color changes.
Eyes (make 2)
-
With B, ch 2.
-
1st rnd: 6 sc in 2nd ch from hook. Join with sl st to first sc.
-
2nd rnd: Ch 1. 2 sc in each sc around. Join with sl st to first sc. 12 sc.
-
3rd rnd: Ch 1. (1 sc in next sc. 2 sc in next sc) 6 times. Join with sl st to first sc. 18 sc.
-
4th rnd: Ch 1. (1 sc in each of next 2 sc. 2 sc in next sc) 6 times. Join A with sl st to first sc. 24 sc.
-
Beg working in rows: 1st row: With A, ch 1. (1 sc in each of next 3 sc. 2 sc in next sc) 4 times. Turn. Leave rem sts unworked.
-
Cont on 20 sc as follows: 2nd row: Ch 1. (1 sc in each of next 4 sc. 2 sc in next sc) 4 times. Turn. 24 sc.
-
3rd row: Ch 1. (1 sc in each of next 3 sc. Sc2tog) 4 times. Turn. 20 sts rem.
-
4th row: Ch 1. (1 sc in each of next 2 sc. Sc2tog) 4 times. Turn. 16 sts rem.
-
5th row: Ch 1. (1 sc in next sc. Sc2tog) 4 times. Turn. 12 sts rem.
-
6th row: Ch 1. (Sc2tog) 6 times. Fasten off.
- Stuff lightly.
Tongue (make 1)
-
With C, ch 8.
-
1st row: 1 sc in 2nd ch from hook. 1 sc in each ch to end of chain. Turn. 7 sc.
- 2nd row: Ch 1. 1 sc in each of next 7 sc. Ch 3. Dc2tog along ends of 1st and 2nd rows. Ch 3. Sl st in same sp as last st. Fasten off.
Arms (make 2)
Stripe Pat
- With MC, work 3 rnds.
- With A, work 3 rnds.
- These 6 rnds form Stripe Pat.
-
With MC, ch 10. Join with sl st in first ch to form a ring.
-
1st rnd: Ch 1. 1 sc in each ch around. Join with sl st to first sc. 10 sc.
-
2nd rnd: Ch 1. 1 sc in each sc around. Join with sl st to first sc.
-
Keeping cont of Stripe Pat, rep 2nd rnd until work from beg measures 11" [28 cm]. Fasten off.
- Stuff lightly.
Legs (make 2)
-
With MC, ch 7.
-
1st rnd: 1 sc in 2nd ch from hook. 1 sc in each of next 4 ch. 3 sc in last ch.
-
Working into opposite side of foundation ch, 1 sc in each of next 4 ch. 2 sc in last ch. Join with sl st to first sc. 14 sc.
-
2nd rnd: Ch 1. 2 sc in first sc. 1 sc in each of next 4 sc. 2 sc in each of next 3 sc. 1 sc in each of next 4 sc. 2 sc in each of next 2 sc. Join with sl st to first sc. 20 sc.
-
3rd rnd: Ch 1. 1 sc in each sc around. Join with sl st to first sc.
-
4th rnd: Ch 1. 1 sc in each of next 6 sc. (Sc2tog) 3 times. 1 sc in each of next 8 sc. Join with sl st to first sc. 17 sts.
-
5th rnd: Ch 1. 1 sc in each of next 5 sc. Sc2tog. 1 sc in next st. Sc2tog. 1 sc in each of next 7 sc. Join with sl st to first sc. 15 sts.
-
6th rnd: Ch 1. 1 sc in each of next 4 sc. Sc2tog. 1 sc in next sc. Sc2tog. 1 sc in each of next 4 sc. Sc2tog. Join with sl st to first sc. 12 sts.
-
7th rnd: Ch 1. 1 sc in each of next 3 sc. Sc2tog. 1 sc in next sc. Sc2tog. 1 sc in each of next 4 sts. Join with sl st to first sc. 10 sts.
-
Stuff foot.
-
8th to 12th rnds: Ch 1. 1 sc in each st around. Join with sl st to first sc.
- Fasten off after last rnd.
Finishing
-
Pillow form: Cut two 17" [43 cm] diameter circles from fabric pieces. With RS of circle pieces tog and using a 1/2" [1 cm] seam allowance, sew pieces tog by hand or machine, leaving a 4" [10 cm] opening. Stuff pillow form. Sew opening closed.
-
Sew Front and Back tog, leaving large enough opening to slide pillow form in. Insert pillow form. Sew rem opening closed.
- With C, embroider mouth using straight st. Sew Eyes, Tongue, Arms and Legs into position as shown in picture. With small amount of black yarn, embroider Eyes using straight st.
Your Recently Viewed Projects
Thanks for your comment. Don't forget to share!
Report Inappropriate Comment
Are you sure you would like to report this comment? It will be flagged for our moderators to take action.
Thank you for taking the time to improve the content on our site.