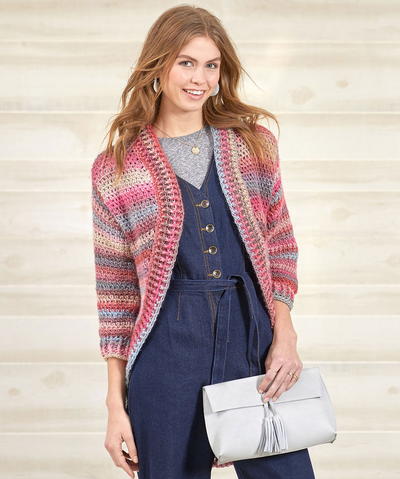
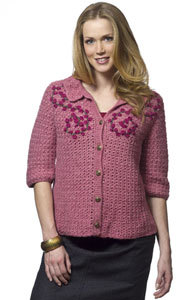
Pink Rose Cardigan
Refresh any outfit with a pink rose cardigan. This is an intermediate crochet pattern. Slip stitch surface crochet is used for a neat technique. The rosettes make the perfect cardigan.

SIZES: Small (Medium, Large, 1X, 2X)
FINISHED MEASUREMENTS:
Chest/Bust 37 1/2 (41 1/4, 44 1/2, 48 1/2, 52)"/95 (105, 113, 123, 132) cm
Length 21 1/2 (22, 22 1/2, 23, 23 1/2)"/54.5 (56, 57, 58.5, 59.5) cm
MATERIALS
- Caron International's Simply Soft Heather
- (100% acrylic; 5 oz/141.8 g, 250 yds/228 m skein): #9501 Autumn Heather (MC), 5 (6, 7, 8, 8) balls
- Caron International's Simply Soft
- (100% acrylic; 6 oz/170 g, 315 yds/288 m skein): #9730 Autumn Red (A), 1 ball, #9707 Dark Sage (B), 1 ball
- One each size US I/9 and J/10 (5.5 and 6 mm) crochet hooks or size to obtain gauge
- Yarn needle
- Six - 3/4" buttons
GAUGE
In Stitch Pattern B, using larger hook, 13 sts and 16 rows = 4"/10 cm
SPECIAL TECHNIQUES
Slip Stitch Surface Crochet: Hold yarn at WS of work.
Insert hook and draw loop through, * insert hook in next st and draw loop up and through loop on hook; repeat from * as desired. To finish off, cut yarn leaving 6" tail. Insert hook and draw tail up and through loop on hook; insert hook from WS and draw tail back through. Weave in end.
Note: Use quilters chalk, or other removable marker to lightly draw Scrolls on Fronts; then work Slip st over the lines.
Rosettes
Begin as for a Lazy Daisy st (see diagram), do NOT pull needle through – leave the needle point over the loop. Wrap yarn around needle twice more (3 strands total forming loop); complete as for Lazy Daisy st, going over all 3 strands at top of loop (C) to anchor them, then at lower end of loop (A).
STITCHES USED
Chain (ch)
Double crochet (dc)
Half double crochet (hdc)
Single crochet (sc)
Slip stitch
Stitch Pattern A (multiple of (3 sts + 3)
Row 1: Ch 4 (counts sc, ch 2), sc in next ch-2 space, (sc, ch 3, sc) in each ch-3 space across, end (sc, ch 2, hdc) in last space, turn.
Repeat Row 1 for St patt A.
Stitch Pattern B (multiple of (2 sts + 1) + 1 for base chain
Row 1: Ch 1, [sc, dc] in each sc (skip the dc) across to last sc, sc in last sc, turn.
Repeat Row 1 for St patt B.
NOTE
Garment is worked in one piece to underarms, then Back and Fronts are worked separately to shoulders.
BODY
Using smaller hook and MC, chain 183 (201, 219, 237, 255).
Row 1 (RS): Sc in sixth ch from hook (first 5 chains count as last space when working first row of St patt), * skip next 2 ch, (sc, ch 3, sc) in next ch; repeat from * across to last 3 ch, skip next ch, sc in next ch, ch 2, hdc in last ch, turn—60 (66, 72, 78, 84) spaces.
(RS) Beg St patt A; work even until piece measures 13" from beg, end with a WS row, turn.
Change to larger hook.
Set-up Row 1: (RS) Ch 1, work 2 sc in each of next 30 (33, 36, 39, 42) spaces, work 3 sc in next space, then 2 sc in each of next 29 (32, 35, 38, 41) spaces, turn—121 (133, 145, 157, 169) sc.
Set-up Row 2: Ch 1, work [sc, dc] in first sc, skip next sc, * work [sc, dc] in next sc, skip next sc; repeat from * across, end sc in last sc, turn.
Beg St patt B; work even for 3 rows, end with WS row, turn.
RIGHT FRONT
Dividing Row (RS): Continuing in St patt B for remainder of garment, ch 1, work across 27 (29, 31, 33, 35) sts, turn; leave rem sts unworked.
Shape Armhole
At armhole edge, dec 1 st every row 4 times—23 (25, 27, 29, 31) sts rem.
Work even until piece measures 5 1/2 (6, 6 1/2, 7, 7 1/2)" from Dividing Row, end RS row, turn.
Shape Neck
(WS) Work across 17 (19, 19, 21, 23) sts, turn, leaving rem 6 (6, 8, 8, 8) sts unworked for neck.
At neck edge, dec 1 st every row 4 times—13 (15, 15, 17, 19) sts rem for shoulder.
Work even until piece measures 7 1/2 (8, 8 1/2, 9, 9 1/2)" from Dividing Row.
Fasten off.
BACK
With RS facing, skip 5 (7, 9, 11, 13) sts for underarm; join yarn in next st, ch 1, work across next 57 (61, 65, 69, 73) sts, turn, leaving rem sts unworked for underarm and left Front.
Dec 1 st each side every row 4 times—49 (53, 57, 61, 65) sts rem for shoulders and Back neck.
Work even until piece measures 7 1/2 (8, 8 1/2, 9, 9 1/2)" from Dividing Row.
Fasten off.
LEFT FRONT
With RS facing, skip 5 (7, 9, 11, 13) sts for underarm; join yarn in next st, ch 1, work to end—27 (29, 31, 33, 35) sts for left Front.
At armhole edge, dec 1 st every row 4 times—23 (25, 27, 29, 31) sts rem.
Work even until piece measures 5 1/2, (6, 6 1/2, 7, 7 12)" from Dividing Row, end RS row, turn.
(WS) Slip st across first 6 (6, 8, 8, 8) sts for neck; work to end—17 (19, 19, 21, 23) sts rem.
At neck edge, dec 1 st every row 4 times—13 (15, 15, 17, 19) sts rem for shoulder. Work even armhole measures same as Back to shoulder.
Fasten off.
SLEEVES (Make 2)
Using larger hook and MC, chain 38 (42, 46, 50, 52).
Row 1 (RS): [Sc, dc] in second ch from hook, skip next ch, * [sc, dc] in next ch, skip next ch; repeat from * across, end sc in last ch, turn—37 (41, 45, 49, 51) sts.
Begin St patt B; work even for 4 rows.
Shape Sleeves
Beginning this row, inc 1 st each side every 6 rows 4 times, working inc sts in patt as they become available—45 (49, 53, 57, 59) sts. Work even until piece measures 8" from beg, end with a WS row.
Shape Cap
(RS) Slip st across next 2 (3, 4, 5, 6) sts; dec over next 2 sts (work 2 sts together in patt), work across to last 4 (5, 6, 7, 8) sts, dec over next 2 sts, turn, leaving rem sts unworked—39 (41, 43, 45, 45) sts rem.
Dec 1 st each side every row 12 (12, 14, 16, 16) times—15 (17, 15, 13, 13) sts rem.
Work 1 row even.
Fasten off.
EMBELLISHMENT
Using smaller hook and B, work Slip St Surface Crochet (scrolls), using photo as guide.
Using yarn needle and A, embroider Rosettes (see diagram) along length of Surface Crochet.
FINISHING
Sew shoulder seams. Set in Sleeves, sew Sleeve seams.
Front Edging
With RS facing, using smaller hook, join yarn with sc in lower right Front corner.
Row 1 (RS): Work 70 (73, 76, 79, 82) sc up right Front, 2 sc in neck corner, sc evenly around neck shaping, 2 sc in neck corner, 70 (73, 76, 79, 82) sc down left Front, turn.
Row 2: Ch 1, sc in each sc across, working 2 sc in each neck corner, turn.
Row 3: Ch 1, work 4 (6, 4, 3, 4) sc, [ch 2, skip 2] for buttonhole, work [11 (11, 12, 13, 13) sc, ch 2, skip 2] 5 times, sc to corner, work 2 sc in corner, sc in each remaining st across, working 2 sc in left Front corner, turn.
Row 4: Ch 1, maintaining corner increases, sc in each sc and ch st across, turn.
Row 5: Repeat Row 2; do NOT turn at lower left Front corner; continue across lower edge as follows: work 3 sc in next row of Front band, skip next row, 3 sc in next row; work 3 sc around each skipped ch of beginning-ch across lower edge to right Front band, skip first row of band, work 3 sc in next row, skip next row, work 3 sc in next row.
Fasten off.
Collar
With WS facing, using smaller hook and MC, join yarn in fourth st from corner of Left Front neck.
Row 1: Ch 3 (counts as dc), work 2 dc in same st, skip next st, sc in next st, work [5 dc in next st, skip next st, sc in next st, skip next st] 13 (13, 14, 14, 14) times, work 3 dc in next st, turn.
Row 2: Ch 1, sc in first dc, * skip 2 dc, work 5 dc in next sc, skip 2 dc, sc in next dc; repeat from * across, turn.
Row 3: Ch 3 (counts as dc), work 2 dc in first sc, * skip 2 dc, sc in next dc, skip 2 dc, work 5 dc in next sc; repeat from * across, end 3 dc in last sc, turn.
Row 4: Repeat Row 2.
Fasten off.
Collar Edging
With RS of Collar facing, rejoin MC at base of Collar on Left Front; sc evenly around Collar, working 3 sc in each corner.
Fasten off.
Using yarn needle, weave in all ends.

See this pattern and more in 23 Free Flower Crochet Patterns and Other Girly Crochet Projects.
Your Recently Viewed Projects
Thanks for your comment. Don't forget to share!
RDerby
Nov 17, 2016
What is the gauge for stitch pattern A? I made this for a small and so far the body measured 45 inches long.
Report Inappropriate Comment
Are you sure you would like to report this comment? It will be flagged for our moderators to take action.
Thank you for taking the time to improve the content on our site.