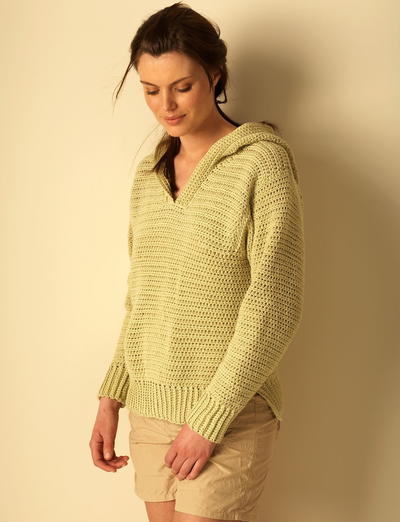
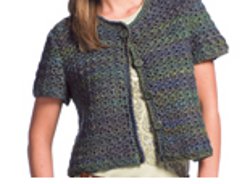
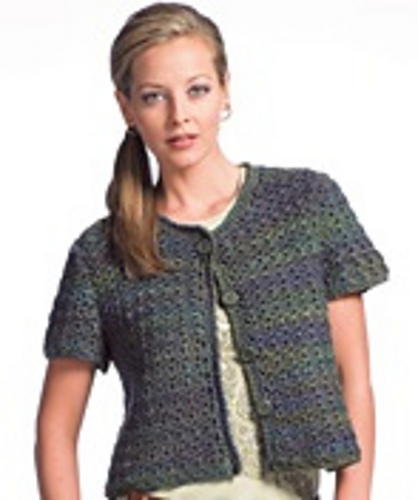
Little Crochet Sweater
If you're looking for a cute and easy jacket pattern to make, check out this design for a Little Crochet Sweater from Coats & Clark, perfect for those cold summer evenings. This is an adorable free crochet sweater patterns project that is great for beginners and will go with everything in your wardrobe.
Materials:
- MODA DEA® "Vision™": 13.5 (15.5, 17, 19) Ounces
- 2950 Forest (OR 4 (5, 5, 6) balls).
- Crochet hooks: 5mm [US H-8] and 6mm [US J-10]
- Yarn needle, 5 buttons, sewing needle and thread.
- Pattern
Size:
Directions are for size Small. Changes for sizes Medium, Large, and 1X are in parentheses.
To Fit Bust: 30-32 (34-36, 38-40, 42-44)".
Finished Bust: 37 (40, 43, 47)".
Gauge:
6 shells = 5"; 12 rows = 5" in Body Pat with larger
hook.
CHECK YOUR GAUGE. Use any size hook to
obtain the gauge.
Instructions:
BODY PAT:
- Foundation Row (Right Side): Sc in 2nd ch from hook, * skip next 2 ch; (dc, ch 2, sc) all in next ch – shell made; rep from * to last ch; sc in last ch; turn.
- Row 1: Ch 3 (counts as dc), * shell in ch-2 sp of next shell; rep from * to last sc; dc in last sc, turn.
- Row 2: Ch 3; * shell in ch-2 sp of next shell – shell over shell made; rep from * to last st; sc in top of ch-3; turn.
- Rep Row 2 for Body Pat.
BACK:
- With larger hook, ch 69 (75, 81, 87). Work in Body Pat over 22 (24, 26, 28) shells until 10 (10, 10, 11)" from beg, end wrong side row.
- Shape Armholes-Row 1: Sl st across first sc and next 2 (2, 2, 3) shells, ch 3, * shell over next shell; rep from * to last 2 (2, 2, 3) shells; sc in sc of next shell; turn and leave rem sts unworked – 18 (20, 22, 22) shells.
- Row 2: Rep Body Pat Row 2.
- Row 3: Sl st across first sc and next shell, ch 3, * shell over next shell; rep from * to last shell; sc in sc of last shell; turn and leave rem sts unworked. Rep Rows 2 and 3 0 (1, 1, 2) times more – 16 (16, 18, 18) shells. Work even until armhole measures 8 (8, 9, 9)" end wrong side row.
- Shape Shoulders-Next 2 Rows: Sl st across first sc and next 2 shells, ch 3, * shell over next shell; rep from * to last 2 shells; sc in sc of next shell; turn and leave rem sts unworked. Fasten off after 2nd row.
LEFT FRONT:
- With larger hook, ch 36 (39, 42, 45). Work in Body Pattern over 11 (12, 13, 14) shells until 10 (10, 10, 11)" from beg, end wrong side row.
- Shape Armhole-Row 1: Sl st across first sc and next 2 (2, 2, 3) shells, ch 3, * shell over next shell; rep from * to last st; sc in top of ch-3; turn.
- Row 2: Rep Body Pat Row 2.
- Row 3: Sl st across first sc and next shell, ch 3, * shell over next shell; rep from * to last st; sc in top of ch-3; turn. Rep Rows 2-3, 0 (1, 1, 2) times more – 8 (8, 9, 9) shells. Work even until armhole measures 4 (4, 5, 5)", end right side row.
- Shape Neck-Row 1: Sl st across first sc and next 2 (2, 3, 3) shells, ch 3, * shell over next shell; rep from * to last st; sc in top of ch-3; turn.
- Row 2: Ch 3, * shell over shell; rep from * to last shell; dc in ch-2 sp of last shell; turn.
- Row 3: Rep Body Pat Row 2.
- Row 4: Rep Row 2 above – 4 shells rem.
- Work even until armhole measures 8 (8, 9, 9)", end wrong side row.
- Shape Shoulder: Sl st across first sc and next 2 shells,
- ch 3, [shell over shell] twice, sc in top of ch-3. Fasten off.
RIGHT FRONT:
Work as for Left Front, reversing all.
SLEEVES:
- With larger hook, ch 48 (48, 54, 54). Work in Body Pat over 15 (15, 17, 17) shells for 2 rows.
- Shape Top-Row 1 (Right Side): Sl st across first sc and next 2 (2, 2, 3) shells, ch 3, * shell over next shell; rep from * to last 2 (2, 2, 3) shells, sc in sc of next shell; turn and leave rem sts unworked.
- Rows 2-4: Work 3 rows even in pat.
- Row 5: Sl st across first sc and next shell, ch 3, * shell over next shell; rep from * to last shell; sc in sc of next shell; turn and leave rem sts unworked.
- Rep Rows 2-5 twice more.
- Next Row: Sl st across first sc and next shell, ch 3, * shell over next shell; rep from * to last shell; sc in sc of next shell; turn and leave rem sts unworked.
- Sizes S and M ONLY: Fasten off.
- Sizes L and 1X ONLY: Work 1 row even in pat. Fasten off shapings.
FINISHING:
- Sew shoulder seams. Mark right front edge for 5 buttonholes, the top 1/2" below neck edge, bottom 1/2" above lower edge and 3 more evenly spaced between.
- Edging-Row 1: With right side facing and smaller hook, join yarn with sl st at corner of lower edge of right front, work sc evenly around to corner of left lower edge, working 3 sc in both corners of neck edge; turn.
- Row 2: Ch 1, [sc in each sc to marker, ch 2, skip next 2 sc] 5 times, sc to end – 5 buttonholes. Fasten off.
- Row 3: With right side facing, join yarn first sc of lower left front; ch 1, work 1 reverse sc in each sc and 2 reverse sc in each ch-2 sp to end. Fasten off.
- Sew sleeve seams; set in sleeves. Sew side seams. Sew on buttons. Weave in ends.
Read NextSand Dunes Jumper
Your Recently Viewed Projects
Thanks for your comment. Don't forget to share!
mathiesonlinda 516 6802
Apr 27, 2016
Hi I'm new to crocheting and trying to complete Little Crochet Sweater, after completing a sleeve it doesn't seem to fit the armhole! Can somebody help please?
Kaylee
Apr 27, 2016
@mathiesonlinda 516 6802 There are a couple reasons this could have happened. You may have missed a few stitches on either piece causing the size difference. It looks like a few of our readers had issues with this pattern, as well. You may want to comment someone below who has finished it to see how they fixed the solution. Additionally, you may have been crocheting with different tension (how tight you pull your stitches) on the two pieces which could also lead to a size difference. Hope that helps! -Kaylee, Editor of FaveCrafts.com
ybh8ful 6780016
Apr 15, 2014
yeah this pattern is written poorly, but I did figure out the # of chains needed - it tells you at the beginning of each part 'back' 'left front' 'right front' etc.... but the problem i have is with the sleeve. is there a typo?? this sleeve does not fit to the other panels correctly. Should it be crocheted for more than 2 rows before you do 'shaping'???
FaveCrafts Editor JL
Apr 16, 2014
Hi there, For specific pattern-related questions, please contact Coats & Clark via their company profile. You can also leave a comment on our Facebook page - perhaps others have run into this problem as well. Thanks!
mathiesonlinda 516 6802
Apr 27, 2016
Hi how did you fix your sleeves? I have the same problem, sleeves are to small! Appreciate some help If you could please
sndbll1026 8431762
Dec 04, 2013
How did anyone make this without the chain count on the first part? I don't get it. Am I missing something?
flyart 3037829
Mar 23, 2014
Start with the back instructions,[With larger hook, ch 36 (39, 42, 45). Work in Body Pattern over 11 ] when it tells you to work in the body pattern it means to follow the body pattern instructions for that specific row or piece for the number of rows it tells you to do, the body pattern is the stitch instructions for the pattern of stitching.
secondome
Mar 27, 2013
This is my first sweater and I feel like I am trying to crack the Devinci code. "Work in body Pat over 24 shells until 10" from beg. end wrong side row. what??? Do I work the shell pattern until it is 10" long? and what is the wrong side row?? please help.
marlene 3247542
Aug 19, 2012
I am confused about the shell stitch; I looked this up to get a better understanding of it and all the shell stitches had at least 2 double crochet stitches in them. Did I read the pattern wrong or does it really have only one?
figlady
Jul 07, 2012
hello, made this sweater in a childs size with a smaller needle and stitches. came out beautiful. but i must have ripped it out a thousand times. haha
figlady
Jun 22, 2012
if someone has a pattern for a childs sweater such as this, would you mind to share and email me. figlady@msn.com...i would appreciate it. or possibly has anyone changed this pattern for a childs. thank you
figlady
Jun 22, 2012
has anyone made a childs sweater out of this, if who would you please share
ginabarrett 685347 7
Apr 22, 2012
Let me first say this is my first attempt at a sweater. I am trying to decipher "Work in Body Pat over 22 (24, 26, 28) shells until 10 (10, 10, 11)" from beg, end wrong side row." I am guessing that, as a size large, I am going to crochet 26 rows of "shell over shell" after the first three foundation rows before getting to the sleeve part, correct?
patriciaserio 4896 581
Mar 08, 2012
The body pat part of this pattern starts out with SC in 2nd Ch from hook. How many ch do I start with for the foundation
clarabird52
Mar 13, 2012
The body pattern shows you what to do after you chain the amount needed for your size....so for size small you will chain 69 then start body pattern in second chain from hook ,, just chain the amount needed for your size...and they are listed. hope this helps
Crafter 14368
Nov 28, 2011
Thia is #3 in the body pattern, what is shell over shell made? Row 2: Ch 3; * shell in ch-2 sp of next shell shell over shell made;
clarabird52
Mar 13, 2012
when pattern calls for shell over shell all you have to do is the shell stitch in the chain 2 of last row...example...shell stitch= dc ch2 sc all in next stitch..shell made...so when you dc ch2 sc in the chain 2 of shell in the last row, you will have a shell over shell I hope this helps
JennyBee1
Oct 20, 2011
@paula4, We suggest you contact the pattern designer directly for help. The designer is specified in the byline. You can also try posting your question on FaveCraft's Facebook wall; here is the link: http://www.facebook.com/FaveCrafts I hope this helps! --Editors of FaveCrafts
paula4
Oct 19, 2011
body pat: i mean where do i start.? it says foundation... how many foundation chains do i make. it does not make sense.
clarabird52
Mar 13, 2012
look at back pattern chain the amount needed for your size then start the body pattern also left frount and right frount just chain for your size
eln629 4456827
Aug 24, 2011
I am having trouble following the instructions for the sleeves. I get to the 5 instruction and can follow that but there is no instructions for 6. Please help me, so I can finish this sweater. If I do just the first 5 instructions it does not fit the rest of the sweater when I try to insert the sleeve in place.
kimemerton 3111307
Aug 18, 2011
Step 2 of the Back section Shpe Armholes - Row 1: Sl sti across first sc and next 3 shells Does that mean slip stitch in first sc and each of the next 2 shells or slip stitch them all together? Thanks! Kim
cms41 1029071
Aug 14, 2011
Aha - I got it! FINALLY! The "body pattern" is simply giving me the pattern of the body of the sweater. The actual beginning of the sweater pattern (ch 69) starts at "Back". then Left Front (ch 36), et cetera. :)
tromboneluvr 36312 75
Aug 05, 2011
The starting chain is under "Back". I have just started this pattern. I couldn't find the correct yarn, but I will let you know how it turns out!
margimill 9990615
Jul 31, 2011
You are not reading the pattern corrrectly.The number of chains required is clearly stated for the back, fronts, and sleeves. The body pattern is the repeat stitches used to establish the crochet pattern as shown.
CascadeLady
Jul 31, 2011
At the begining of this pattern there is no "chain" made. So I do not understand how to start this pattern. Can anyone help me with this? Or am I reading the pattern wrong. Thanks.
Report Inappropriate Comment
Are you sure you would like to report this comment? It will be flagged for our moderators to take action.
Thank you for taking the time to improve the content on our site.