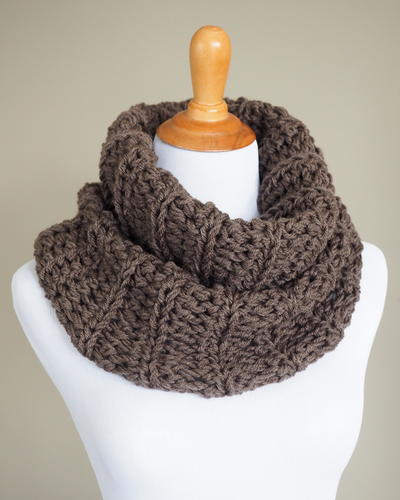
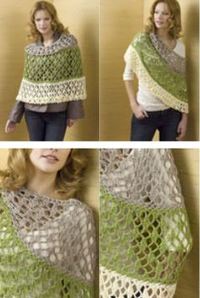
Paradores Infinity Scarf
Wear it around your neck, sling it across one shoulder, or drape it over yourself - Paradores Infinity Scarf is a great scarf-and-poncho-in-one! This free crochet scarf pattern is for fashion lovers only!
.jpg)
MATERIALS
- NaturallyCaron.com Spa (75% Microdenier Acrylic/25% Bamboo;): 2 1/2 oz (A), 3 oz (B), 3 1/2 oz (C) Shown in: #0008 Misty Taupe (A), #0004 Green Sheen (B), #0007 Naturally (C).
- One size US H-8 (5mm) crochet hook, or size to obtain gauge.
- Yarn needle
FINISHED MEASUREMENTS
Scarf measures approximately 34"/86.5cm around top edge, 62"/157.5cm around lower edge, and 23"/58.5cm from top edge to lower edge.
Note: Gathering of row edges when joining panels, and stretch of lace fabric, will cause finished circumferences to vary.
GAUGE
One panel = 7 1/2"/19.5cm wide; In pattern, 2 pattern repeats = 5"/12.5cm.
STITCHES USED
Chain (ch), double crochet (dc), single crochet (sc), slip stitch (sl st)
SPECIAL TERMS
shell: 5 dc in indicated chain or stitch.
sc2tog: Single crochet 2 together—Insert hook in next stitch, yarn over and pull up a loop, (2 loops on hook), insert hook in next stitch, yarn over and pull up a loop, yarn over and draw through all 3 loops on hook.
NOTE
The cowl is made from three panels that are then joined along the long edges and into a large ring.
PANEL A
With A, ch 40.
Row 1 (RS): 2 dc in 4th ch from hook, *sk next 2 ch, sc in next ch, ch 5, sk next 5 ch, sc in next ch, sk next 2 ch, shell in next ch; repeat from * one more time, sk next 2 ch, sc in next ch, ch 5, sk next 5 ch, sc in next ch, sk next 2 ch, 3 dc in last ch, turn—6 sc, 2 half shells, and 2 shells.
Row 2: Ch 1, sc in first st, ch 5, *sc in next ch-5 sp, ch 5, sc in center st of next shell, ch 5; repeat from * one more time, sc in next ch-5 sp, ch 5, sc in top of beginning ch, turn—7 sc, and 6 ch-5 sps.
Row 3: Ch 5 (counts as dc, ch 2), *sc in next ch-5 sp, shell in next sc, sc in next ch-5 sp, ch 5; repeat from * one more time, sc in next ch-5 sp, shell in next sc, sc in next ch-5 sp, ch 2, dc in last st, turn—2 dc, 6 sc, and 3 shells.
Row 4: Ch 1, sc in first st, ch 5, *sc in center st of next shell, ch 5, sc in next ch-5 sp, ch 5; repeat from * one more time, sc in center of next shell, ch 5, sc in 3rd ch of turning ch, turn—7 sc, and 6 ch-5 sps.
Row 5: Ch 3 (counts as dc), 2 dc in first st, sc in next ch-5 sp, *ch 5, sc in next ch-5 sp, shell in next sc, sc in next ch-5 sp; repeat from * one more time, ch 5, sc in next ch-5 sp, 3 dc in last st, turn.
Rows 6–53: Repeat Rows 2–5 twelve more times. Fasten off.
PANEL B
With B, ch 40.
Row 1: With B, repeat Row 1 of panel A.
Rows 2–77: Repeat Rows 2–5 of panel A 19 times. Fasten off.
PANEL C
With C, ch 40.
Row 1: With C, repeat Row 1 of panel A.
Rows 2 - 113: Repeat Rows 2–5 of panel A 28 times.
Rows 114–115: Repeat Rows 2–3 once more. Fasten off.
FINISHING
Blocking
Wet all panels, pat and roll in towel to remove excess water. Gently tug to open stitch pattern. Place on flat surface to dry, easing panel to measurements.
Panel A Edging
Round 1: With RS facing, join A with sc in end of Row 1; working in ends of rows across long side edge, *ch 3, sc in end of next row; repeat from * across to last row, ch 3; working into sts of last row, sc in first st, [ch 3, sc in next sc, ch 3, sc in next ch-5 sp, ch 3, sc in next sc, ch 3, sc in center st of next shell] 2 times, ch 3, sc in next sc, ch 3, sc in next ch-5 sp, ch 3, sc in next sc, ch 3, sc in last st; working in ends of rows across other long side edge, **ch 3, sc in end of next row; repeat from ** across to first row; fold piece in half, and join Row 1 to last row as follows: working in sts of last row and in the free loops of foundation ch, ch 1, sl st in first st of last row, ch 1, sc in free loop of first st of Row 1, [ch 1, sl st in next ch-3 sp of last row, ch 1, sc in free loop of next sc of Row 1, ch 1, sl st in next ch-3 sp of last row, ch 1, sc in next ch-5 sp of foundation ch, ch 1, sl st in next ch-3 sp of last row, ch 1, sc in free loop of next sc of Row 1, ch 1, sl st in next ch-3 sp of last row, ch 1, sc in free loop of next shell of Row 1] 2 times, ch 1, sl st in next ch-3 sp of last row, ch 1, sc in free loop of next sc of Row 1, ch 1, sl st in next ch-3 sp of last row, ch 1, sc in next ch-5 sp, ch 1, sl st in next ch-3 sp of last row, ch 1, sc in free loop of next sc of Row 1, ch 1, sl st in last ch-3 sp of last row, ch 1, sc in free loop of last st of Row 1, ch 1, sl st in last st of last row; join round with sl st in first sc.
Round 2: Working around top edge,(Sl st, ch 1, sc) in next ch-3 sp, ch 1, *sc in next ch-3 sp, ch 1; repeat from * around to seam, sc in seam, ch 1; join round with sl st in first sc. Fasten off.
Panel B Edging and Assembly
Round 1: With RS facing, join B with sc in end of Row 1; working in ends of rows across long side edge, *ch 3, sc in end of next row; repeat from * across to last row, ch 3; working into sts of last row, sc in first st, [ch 3, sc in next sc, ch 3, sc in next ch-5 sp, ch 3, sc in next sc, ch 3, sc in center st of next shell] 2 times, ch 3, sc in next sc, ch 3, sc in next ch-5 sp, ch 3, sc in next sc, ch 3, sc in last st; working in ends of rows across other long side edge, join panel B to lower edge of panel A as follows: matching up to ch-3 sps on Panel A, **sc in end of next row of panel B, ch 1, sl st in next ch-3 sp of panel A, ch 1, sc2tog over ends of next 2 rows of panel B, ch 1, sl st in next ch-3 sp of panel A, ch 1; repeat from * across to join long edges of panel A and panel B; join Row 1 and last row of panel B in same manner as for panel A; join round with sl st in first sc. Fasten off.
Panel C Edging and Assembly
Round 1: With RS facing, join C with sc in end of Row 1; working in ends of rows across long side edge, *ch 3, sc in end of next row; repeat from * across to last row, ch 3; working into sts of last row, sc in 3rd ch of turning ch , [ch 3, sc in next sc, ch 3, sc in center st of next shell, ch 3, sc in next sc, ch 3, sc in next ch-5 sp] 2 times, ch 3, sc in next sc, ch 3, sc in center st of next shell, ch 3, sc in next sc, ch 3, sc in last st; working in ends of rows across other long side edge, join panel C to free edge of panel B in same manner as joining panel B to panel A; join Row 1 and last row of panel C in same manner as for panel B; join round with sl st in first sc.
Round 2: Working around lower edge, (Sl st, ch 1, sc) in next ch-3 sp, ch 1, *sc2tog over next 2 ch-3 sps, ch 1; repeat from * around; join with sl st in first sc. Fasten off.
Using yarn needle, weave in all ends.
Note: For other fantastic and quirky crochet patterns, be sure to check out our collection of 10 Unusual, Unforgettable, and Unique Crochet Patterns!
Your Recently Viewed Projects

Thanks for your comment. Don't forget to share!
princess6860504
Sep 27, 2017
Oh, wow! I see how this one cowl wrap scarf becomes 4 different types of apparel. What a unique and clever idea to be able to combine these all into one piece! Complicated it is NOT. Made with 3 panels which are then joined together, then working up the border...the border, which is quite detailed in instructions but is not difficult to do!
barbraellen5 39512 74
Dec 23, 2014
I found the pdf for this which shows more pictures - https//yarnspirations.s3.amazonaws.com/naturallyc == aron-files/projects/paradores/paradores.pdf Can't wait to try it now.
FaveCrafts Editor JL
Dec 23, 2014
Hello - I added the additional images to the bottom of this post. Hope that helps! - Julia from FaveCrafts
Patricia Gamble Li ght
Feb 20, 2014
Could you please tell me where the patterns are for the other scarfs shown with this one. I love the layered look and would love to make them also. Thank you so much!
bobbylonardo 50143 99
Feb 28, 2014
It's not a "layered look" it's 1 scarf - the instructions explain that. :)
billieconrad 04654 17
Apr 16, 2012
pattern says block to measurements...the only measurements I see are the top and the bottom...what about the center panel?
JennyBee1
Sep 09, 2011
@nytudor31 5461035, There are 3 different options for you to save projects: 1. Click on the button that says "Save Project." This button appears below the project name and to the right. It will be added to the list of "My Craft Projects" (a link in the upper right hand corner of the screen). You will need to set up a free account with the site in order to use this function. 2. Another option would be to right click anywhere on the page and select "Save Page As." This will allow you to save the website to your computer. 3. You can also copy and paste the project into a Word document and save that way. --Editor of FaveCrafts
nytudor31 5461035
Sep 09, 2011
Can you please tell me what I have to do to save patterns to my computer? Thanks.
impchild
Sep 08, 2011
there are more pics on http://naturallycaron.com/projects/paradores/paradores_1.html
shirlragsdale 4467 808
Sep 08, 2011
I would like to see a picture of this worn as a poncho. Seems to me that it would be easier/faster to not join the panels so that you could wear each one individually. But if the picture of the poncho is amazing then I could see why you would put in the extra effort.
Report Inappropriate Comment
Are you sure you would like to report this comment? It will be flagged for our moderators to take action.
Thank you for taking the time to improve the content on our site.