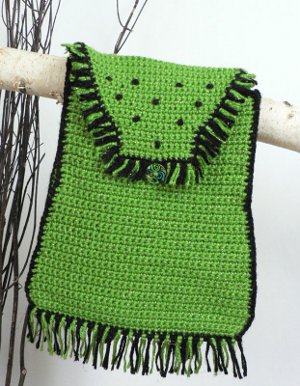
Wicked Lime Green Backpack
Little girls of all ages will love this Wicked Lime Green Backpack! With a design that makes it look like it's straight out of the Emerald City, this cute crochet backpack is also a great gift for Wicked fans! Great for storing all their school supplies, this colorful crochet bag will help insure that they're heading to school in style.
Materials:
- 2 skeins Caron International's Simply Soft Party (99% Acrylic/1% Polyester; 3oz/85g, 171yds/156m) yarn in Spring Sparkle
- 1 skein Caron International's Simply Soft Party (99% Acrylic/1% Polyester; 3oz/85g, 171yds/156m) yarn in Black Sparkle
- One size US G-6 (4.25mm) crochet hook, or size to obtain gauge
- Pins
- One decorative button, 1"/25mm diameter
- Four D-rings, 1"/25mm (for strap adjustability)
- Sewing needle small enough to pass through holes in button, and with eye large enough for yarn
- Yarn needle
Gauge: In pattern, 14 sts and 18 rows = 4"/10cm.
Special Stitch:
- sc2tog: Single crochet 2 together—Insert hook in next stitch, yarn over and draw up a loop, (2 loops on hook), insert hook in next stitch, yarn over and draw up a loop, yarn over and draw through all 3 loops on hook.
Instructions:
Backpack measures approximately 13"/33cm long (not including fringe) x 11"/28cm wide (at lower edge) x 2"/5cm deep
Front
-
Beginning at lower edge, with A, ch 40.
-
Row 1 (RS): Sc in 2nd ch from hook and in each remaining ch across, turn—39 sc.
-
Rows 2–6: Ch 1, sc in each st across, turn.
-
Row 7: Ch 1, sc2tog, sc in each st across to last 2 sc, sc2tog, turn—37 sc.
-
Rows 8–13: Ch 1, sc in each st across, turn.
-
Row 14: Ch 1, sc2tog, sc in each st across to last 2 sc, sc2tog, turn—35 sc.
-
Rows 15–28: Repeat Rows 8–14 twice—31 sc at the end of Row 28.
-
Rows 29–51: Ch 1, sc in each st across, turn.
- Fasten off.
Back
-
Work same as front—31 sc. Do not fasten off.
- Row 52: Ch 1, sc in each st across, turn.
Flap
-
Rows 53–58: Ch 1, sc in each st across, turn. Note: Row 53 is top of flap.
-
Row 59: Ch 1, sc2tog, sc in each st across to last 2 sc, sc2tog, turn—29 sc.
-
Row 60: Ch 1, sc in each st across, turn.
-
Rows 61–70: Repeat last 2 rows 5 times—19 sc at the end for Row 70.
-
Rows 71–73: Repeat Row 59 three times—13 sc at the end of Row 73.
-
Rows 74–78: Ch 1, sc in each st across, turn.
- Fasten off.
Gusset
-
With A, ch 7.
-
Row 1: Sc in 2nd ch from hook and in each remaining ch across, turn—6 sc.
-
Rows 2–127: Ch 1, sc in each sc across, turn.
- Fasten off.
Straps (Make 2)
-
With B, ch 6.
-
Row 1: Sc in 2nd ch from hook and in each remaining ch across, turn—5 sc.
-
Rows 2–91: Ch 1, sc in each sc across, turn.
-
Round 92: Sl st evenly spaced around all edges of strap.
- Fasten off.
Finishing
-
Assembly: Line up one end of gusset with Row 51 of front and Row 52 of back. Pin long edges of gusset to edges of front and back, making sure that the edges are even and other end of gusset lines up on opposite side of both front and back. With front facing you, and working through both thicknesses, join B with sc in top corner of front and gusset, sc evenly along long edge of gusset to join it to front. Fasten off. Repeat to join gusset to back.
-
Flap Trim and Buttonloop: With RS of flap facing you, join B with sc in edge of flap at top of flap, sc in end of each row down side of flap; working in sts of last row, 2 sc in first st (for corner), sc in next 5 sts, (sc, ch 5, sc) in next st (for buttonloop), sc in next 5 sc, 2 sc in last st (for corner); working up other side of flap, sc in end of each row up side. Do not fasten off.
-
Top Trim: Sc evenly spaced across top of gusset, top of front, and across top of other end of gusset; join with sl st in first sc of flap trim. Fasten off.
-
Using yarn needle, weave in all ends.
-
Fringe: Cut strands of A and B, 7"/18cm long. Attach fringes to lower edge of backpack, beginning and ending with a B-colored fringe, as follows: Fold strand in half forming a loop at folded end. With crochet hook, draw loop through edge of backpack, thread ends of strands through loop and pull to tighten and secure. Trim ends to even. Repeat process across edge of flap, beginning and ending at opposite ends of Row 59 and using 2 1/2"/6.5cm lengths. Trim ends to about 1"/2.5cm.
-
With sewing needle and A, sew button to center of front, between Rows 35 and 36 to allow flap to fold over top of gusset properly. With yarn needle and B, using photograph as a guide, embroider 10 French knots on front of flap.
-
With yarn needle and A, whipstitch two D-rings to back, between Rows 3 and 4 and about 1"/2.5cm from one outside edge. Sew two more D-rings to back, between Rows 3 and 4 and about 1"/2.5cm from opposite outside edge. With A, whipstitch straps to Row 51 of back, about 2"/5cm from outside edges.
- Using yarn needle, weave in any remaining ends.
Read NextSummer Granny Bag Pattern
Your Recently Viewed Projects

Thanks for your comment. Don't forget to share!
radmomof3 0278
Feb 09, 2017
This is such a cute bag for a young lady! It's a perfect size to fit all of their fun belongings. I love the color and plan to make this for my daughter's friends birthday. The pattern seems pretty easy to follow. I know this little girl is in to pink and purple with some sparkle. Any suggestions on what yarn to use or preferences?
Report Inappropriate Comment
Are you sure you would like to report this comment? It will be flagged for our moderators to take action.
Thank you for taking the time to improve the content on our site.
![Battenberg Crochet Granny Square Bag Pattern [Free]](http://irepo.primecp.com/2022/08/532101/Battenberg-Bag-02_Category-CategoryPageDefault_ID-4857588.png?v=4857588)