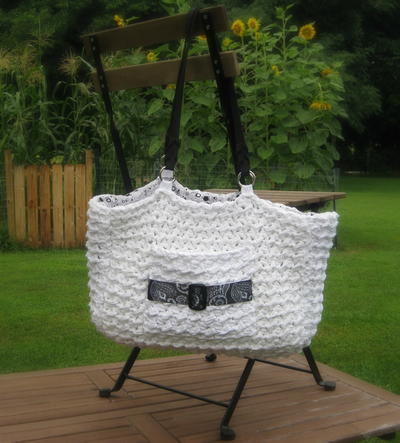
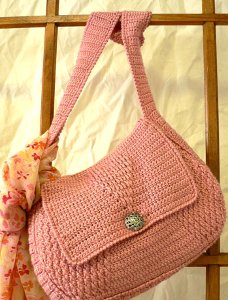
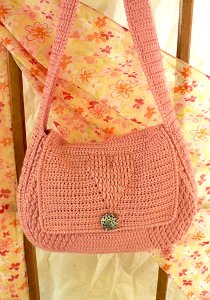
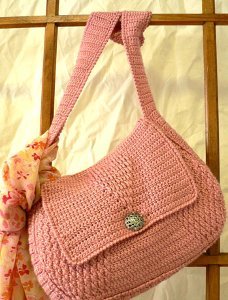
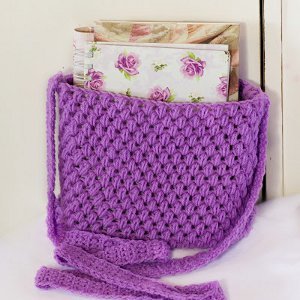
Crochet Handbag
Use this free purse crochet pattern to make your own crochet handbag. This project features a long shoulder strap and a front flap with a magnetic button closure.
Materials:
- One each size US D-3 (3.25mm), or size to obtain gauge.
- 1 magnetic purse closure
- 1 button—large enough to cover purse closure
- Yarn needle
- NaturallyCaron.com Spa (75% microdenier acrylic/25% bamboo; 3 oz/85 g, 251 yds/230 m skein): 6 oz, Shown in: #0001 Rose Bisque

Instructions:
FINISHED MEASUREMENTS:
Purse measures approximately 11"/28 cm wide (at widest) x 7"/18 cm high, excluding strap
GAUGE
In pattern, using US D-3 (3.25mm) hook, 22 stitches and 20 rows = 4"/10cm.
STITCHES USED
Chain (ch), double crochet (dc), half double crochet (hdc), reverse single crochet (rev sc), single crochet (sc), slip stitch (slip st)
SPECIAL TERMS
dc2tog: Double crochet 2 together –[Yarn over, insert hook in next st and draw up a loop, yarn over and draw through 2 loops] twice, yarn over and draw through all 3 loops on hook.
FPdc: Front-post double crochet: (RS)Yarn over, insert hook from right-hand side of stitch to WS of piece, return to RS at left-hand side of stitch indicated, yarn over and draw up loop, complete as dc.
sc2tog: Single crochet 2 together – Insert hook in next stitch, yarn over and draw up a loop, (two loops on hook), insert hook in next stitch, yarn over and draw up a loop, yarn over and draw through all 3 loops on hook.
NOTES
- FPdc are always worked in stitches 2 rows below the current working row. Skip the corresponding stitch(es), in the row into which you would usually work, unless otherwise instructed.
- When instructed to work in stitch 2 rows below. Take care to work in stitch directly below the next stitch into which you would usually work.
- The beginning ch-2 of a row does not count as the first stitch, unless otherwise stated.
- The back and front flap of purse are worked in one piece.
BACK AND FRONT FLAP
Back:
- Chain 50.
- Row 1 (RS): Dc in third ch from hook (beginning ch does not count as st), dc in each remaining ch across, turn—48 dc.
- Row 2 (increase row): Ch 1, 2 sc in first st, sc in each st to last st, 2 sc in last st, turn—50 sts.
Note: Remember to skip the corresponding st in the row into which you would usually work, behind each FPdc, unless otherwise instructed. - Row 3: Ch 2, FPdc around turning ch 2 rows below (in Row 1), skip first st, *dc in next st, FPdc around next dc 2 rows below; repeat from * to last st, dc in last st, turn.
- Rows 4–13: Repeat Rows 2 and 3 five times—60 sts.
- Row 14: Ch 1, sc in each st across, turn.
- Row 15: Ch 1, FPdc around first st 2 rows below, *dc in next st, FPdc around next dc 2 rows below; repeat from * to last st, dc in last st, turn.
- Row 16 (decrease row): Ch 1, sc2tog, sc in each st to last 2 sts, sc2tog, turn—58 sts.
- Row 17: Ch 2, dc in first st, FPdc around next dc 2 rows below, dc in next st, *FPdc around next dc 2 rows below, dc in next st; repeat from * across, FPdc around last st 2 rows below, turn.
- Rows 18–33: Repeat Rows 16 and 17 eight times—42 sts.
- Row 34 (decrease row): Ch 1, working in front loops only, sc2tog, sc in each st to last 2 sts, sc2tog, turn—40 sts. Do not fasten off.
Front Flap:
- Row 35: Ch 2, dc in each st across, turn.
- Row 36: Ch 1, sc in each st across, turn.
- Row 37: Ch 2, dc in each st across, turn.
- Rows 38 and 39: Repeat Rows 36 and 37.
- Row 40: Ch 1, working in front loops only, sc in each st across, turn.
- Row 41: Ch 2, dc in first 19 sts, dc2tog, dc in each remaining st across, turn—39 sts.
- Rows 42 and 43: Repeat Rows 36 and 37.
- Row 44: Repeat Row 36.
- Row 45: Ch 2, hdc in first 14 sts, FPdc around next 4 sts 2 rows below, hdc in next 3 sts, FPdc around next 4 sts 2 rows below, hdc in each remaining st across, turn.
- Row 46: Repeat Row 36.
- Row 47: Ch 2, hdc in first 13 sts, *FPdc around next hdc 2 rows below, FPdc around next 4 FPdc 2 rows below, FPdc around next hdc 2 rows below, hdc in next st; repeat from * once more, hdc in each remaining st across, turn.
- Row 48: Repeat Row 36.
- Row 49: Ch 2, hdc in first 13 sts, *FPdc around next 6 FPdc 2 rows below, FPdc around next hdc 2 rows below, FPdc around next 6 FPdc 2 rows below, hdc in each remaining st across, turn.
- Row 50: Repeat Row 36.
- Row 51: Ch 2, hdc in first 14 sts, FPdc around next 11 FPdc 2 rows below, hdc in each remaining st across, turn.
- Row 52: Repeat Row 36.
- Row 53: Ch 2, hdc in first 15 sts, FPdc around next 9 FPdc 2 rows below, hdc in each remaining st across, turn.
- Row 54: Repeat Row 36.
- Row 55: Ch 2, hdc in first 16 sts, FPdc around next 7 FPdc 2 rows below, hdc in each remaining st across, turn.
- Row 56: Repeat Row 36.
- Row 57: Ch 2, hdc in first 17 sts, FPdc around next 5 FPdc 2 rows below, hdc in each remaining st across, turn.
- Row 58: Repeat Row 36.
- Row 59: Ch 2, hdc in first 18 sts, FPdc around next 3 FPdc 2 rows below, hdc in each remaining st across, turn.
- Row 60: Repeat Row 36.
- Row 61: Ch 2, hdc in first 19 sts, FPdc around next 1 FPdc 2 rows below, hdc in each remaining st across, turn.
- Row 62: Repeat Row 36.
- Row 63: Ch 1, hdc in each st across, turn.
- Row 64: Repeat Row 36. Do not fasten off.
Edging:
Note: Take care to turn at the end of Row 64, so that the edging is worked on the RS of the piece.
Round 1 (RS): Ch 1, work sc evenly spaced around entire piece, working 2 sc in each corner; join with slip st in first sc. Fasten off.
FRONT
- Chain 50.
- Row 1 (RS): Dc in third ch from hook (beginning ch does not count as st), dc in each remaining ch across, turn—48 dc.
- Row 2 (increase row): Ch 1, 2 sc in first st, sc in each st to last st, 2 sc in last st, turn—50 sts.
- Row 3: Ch 2, FPdc around turning ch 2 rows below (in Row 1), skip first st, [dc in next st, FPdc around next dc 2 rows below] 4 times, dc in next 31 sts, FPdc around next dc 2 rows below, [dc in next st, FPdc around next dc 2 rows below] 4 times, dc in last st, turn.
- Row 4: Repeat Row 2—52 sts.
- Row 5: Ch 2, FPdc around turning ch 2 rows below, [dc in next st, FPdc around next dc 2 rows below] 5 times, dc in next 29 sts, FPdc around next dc 2 rows below, [dc in next st, FPdc around next dc 2 rows below] 5 times, dc in last st, turn.
- Row 6: Repeat Row 2—54 sts.
- Row 7: Ch 2, FPdc around turning ch 2 rows below, [dc in next st, FPdc around next dc 2 rows below] 6 times, dc in next 27 sts, FPdc around next dc 2 rows below, [dc in next st, FPdc around next dc 2 rows below] 6 times, dc in last st, turn.
- Row 8: Repeat Row 2—56 sts.
- Row 9: Ch 2, FPdc around turning ch 2 rows below, [dc in next st, FPdc around next dc 2 rows below] 7 times, dc in next 25 sts, FPdc around next dc 2 rows below, [dc in next st, FPdc around next dc 2 rows below] 7 times, dc in last st, turn.
- Row 10: Repeat Row 2—58 sts.
- Row 11: Ch 2, FPdc around turning ch 2 rows below, [dc in next st, FPdc around next dc 2 rows below] 8 times, dc in next 23 sts, FPdc around next dc 2 rows below, [dc in next st, FPdc around next dc 2 rows below] 8 times, dc in last st, turn.
- Row 12: Repeat Row 2—60 sts.
- Row 13: Ch 2, FPdc around turning ch 2 rows below, [dc in next st, FPdc around next dc 2 rows below] 9 times, dc in next 21 sts, FPdc around next dc 2 rows below, [dc in next st, FPdc around next dc 2 rows below] 9 times, dc in last st, turn.
- Row 14: Ch 1, sc in each st across, turn.
- Row 15: Ch 2, dc in first st, [FPdc around next dc 2 rows below, dc in next st] 10 times, dc in next 18 sts, FPdc around next dc 2 rows below, [dc in next st, FPdc around next dc 2 rows below] 10 times, turn.
- Row 16 (decrease row): Ch 1, sc2tog, sc in each st to last 2 sts, sc2tog, turn—58 sts.
- Row 17: Ch 2, dc in first st, FPdc around next dc 2 rows below, dc in next st, [FPdc around next dc 2 rows below, dc in next st] 9 times, dc in next 16 sts, [FPdc around next dc 2 rows below, dc in next st] 10 times, FPdc around last st 2 rows below, turn.
- Row 18: Repeat Row 16—56 sts.
- Row 19: Ch 2, dc in first st, FPdc around next dc 2 rows below, dc in next st, [FPdc around next dc 2 rows below, dc in next st] 9 times, dc in next 14 sts, [FPdc around next dc 2 rows below, dc in next st] 10 times, FPdc around last st 2 rows below, turn.
- Row 20: Repeat Row 16—54 sts.
- Row 21: Ch 2, dc in first st, FPdc around next dc 2 rows below, dc in next st, [FPdc around next dc 2 rows below, dc in next st] 9 times, dc in next 12 sts, [FPdc around next dc 2 rows below, dc in next st] 10 times, FPdc around last st 2 rows below, turn.
- Row 22: Repeat Row 16—52 sts.
- Row 23: Ch 2, dc in first st, FPdc around next dc 2 rows below, dc in next st, [FPdc around next dc 2 rows below, dc in next st] 9 times, dc in next 10 sts, [FPdc around next dc 2 rows below, dc in next st] 10 times, FPdc around last st 2 rows below, turn.
- Row 24: Repeat Row 16—50 sts.
- Row 25: Ch 2, dc in first st, FPdc around next dc 2 rows below, dc in next st, [FPdc around next dc 2 rows below, dc in next st] 9 times, dc in next 8 sts, [FPdc around next dc 2 rows below, dc in next st] 10 times, FPdc around last st 2 rows below, turn.
- Row 26: Repeat Row 16—48 sts.
- Row 27: Ch 2, dc in first st, FPdc around next dc 2 rows below, dc in next st, [FPdc around next dc 2 rows below, dc in next st] 9 times, dc in next 6 sts, [FPdc around next dc 2 rows below, dc in next st] 10 times, FPdc around last st 2 rows below, turn.
- Row 28: Repeat Row 16—46 sts.
- Row 29: Ch 2, dc in first st, FPdc around next dc 2 rows below, dc in next st, [FPdc around next dc 2 rows below, dc in next st] 9 times, dc in next 4 sts, [FPdc around next dc 2 rows below, dc in next st] 10 times, FPdc around last st 2 rows below, turn.
- Row 30: Repeat Row 16—44 sts.
- Row 31: Ch 2, dc in first st, FPdc around next dc 2 rows below, dc in next st, [FPdc around next dc 2 rows below, dc in next st] 9 times, dc in next 2 sts, [FPdc around next dc 2 rows below, dc in next st] 10 times, FPdc around last st 2 rows below, turn.
- Row 32: Repeat Row 16—42 sts.
- Row 33: Ch 2, dc in first st, FPdc around next dc 2 rows below, dc in next st, *FPdc around next dc 2 rows below, dc in next st; repeat from * across, FPdc around last st 2 rows below, turn.
- Row 34: Repeat Row 16—40 sts.
Edging:
Note: Take care to turn at the end of Row 34, so that the edging is worked on the RS of the piece.
Round 1 (RS): Ch 1, work sc evenly spaced around entire piece, working 2 sc in each corner; join with slip st in first sc. Fasten off.
GUSSET AND STRAP
- Chain 10.
- Row 1 (RS): Ch 2, hdc in third ch from hook and in each ch across, turn—8 hdc.
- Row 2: Ch 1, sc in each st across, turn.
- Row 3: Ch 2, hdc in each st across, turn.
- Repeat Rows 2 and 3 until piece measures 52"/132 cm. Fasten off leaving a 7"/18cm tail for sewing. Using yarn needle and tail, sew short ends of gusset and strap together.
Edging:
With RS facing, join yarn with slip st in any st of one edge. Work sc evenly spaced around edge; join with slip st in first sc. Fasten off. Repeat around opposite edge.
FINISHING
- With WS facing, center gusset seam at center lower edge of front, sew edge of gusset and front together sewing through back loops only. Repeat along back.
- With RS facing, working in unseamed free loops, join yarn with sc in top right corner of front, ch 1, work rev sc evenly spaced around to opposite corner; working in both loops along strap edge, work rev sc evenly spaced to top edge of right corner, sl st in st at corner; working in both loops along front purse edge, work rev sc across to opposite corner; join with sl st in corner. Fasten off. Repeat around back, working in both loops along strap edge and front flap edge.
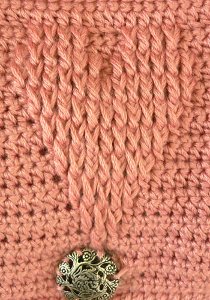
- Center one piece of magnetic purse closure near lower edge of underside of purse flap and attach. Position second piece opposite first piece on front of purse and attach. Sew button to front of purse flap to hide closure.
- Using yarn needle, weave in all ends.
Up Next:
Read NextBuckle Bag Crochet Pattern
Your Recently Viewed Projects
Thanks for your comment. Don't forget to share!
pamelalemaster 988 2700
Jan 08, 2017
well.................surely there's a solution, thank goodness! Cause none of the one's who were gonna write back did LOL........I think I'll take my chances. Thanks for makin the pattern available. My rating is based on Hope. LOL
Member 5071520
Jan 06, 2016
There are definitely errors in this pattern, but with a bit of common sense you can figure it out. I don't see any reason for the 40 stitches at the "end" before the flap, then having to reduce one stitch midway to 39 for the flap pattern. It's not as if one stitch less throughout the pattern would make it look weird. Also, I suggest you make the strap a few stitches wider. I'm making this using plarn and will try to come back with a photo when I'm finished.
Kaylee
Jan 07, 2016
Hi Member 5071520! Thanks so much for letting us know. I am excited to see the final product. If you have any suggestions on how to edit the pattern below, we'd love to update it for other readers. - Kaylee from FaveCrafts.com
Member 3552399
Mar 28, 2015
There are problems with this all throughout the project. I am going to try one more time with my fixes and then I'll come back and let everyone know how it came out.
FaveCrafts Editor JL
Mar 30, 2015
Hi there - This pattern was created by Caron Yarns. If you have a question, your best bet is to contact them via their website or social media pages. Thanks! - Julia from FaveCrafts
totoh82 6703912
Jan 05, 2015
I don't know, i've tried taking this out and re-doing it twice now and this doesn't make any sense. wrong number of stitches after increase and decrease.
mrprn69 1903663
Feb 21, 2011
I have found that the front part of the pattern does not work out right once you start the fdc and dc 31. There are to many stitches left on the end to work correctly.
babygirlblue
Jul 30, 2010
This is Michele Gulley, I just joined this site group. I have printed this pattern, and plan to mak it for my daughter, grand daughter, and daughter in-law, I will let all know how the pattern turns out when finished. Michele Gulley blueroses_4_u@hotmail.com
Report Inappropriate Comment
Are you sure you would like to report this comment? It will be flagged for our moderators to take action.
Thank you for taking the time to improve the content on our site.
![Battenberg Crochet Granny Square Bag Pattern [Free]](http://irepo.primecp.com/2022/08/532101/Battenberg-Bag-02_Category-CategoryPageDefault_ID-4857588.png?v=4857588)