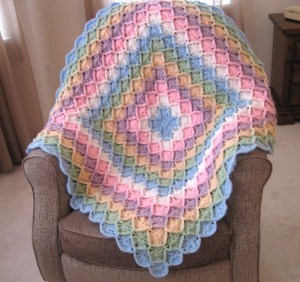
Pajama Friendly Argyle Throw
Cozy up with this free crochet afghan pattern.

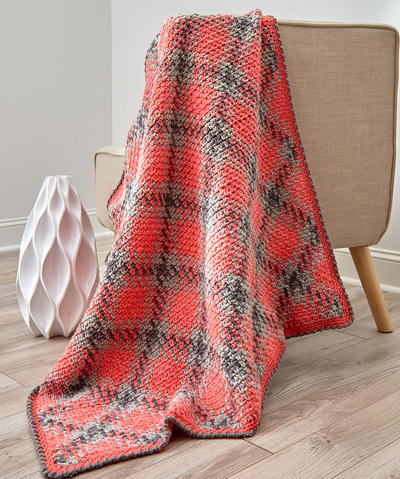
Create a blanket with a stunning look when you whip up this Pajama Friendly Argyle Throw. Through planned color pooling, you can achieve the look of argyle. The effect is absolutely beautiful. If you haven't tried the moss stitch before, it creates a beautiful texture which really compliments this crochet project. This crochet afghan pattern includes sizing for a full afghan and for a smaller throw, which you could gift as a baby blanket. Cozy up! Once you master the color pooling technique, this is the perfect project to work on wearing pajamas and sitting in front of the TV.
NotesDirections are for Blanket-size;
changes for larger Throw-size are in
parentheses.

Crochet HookJ/10 or 6 mm hook
Yarn Weight(4) Medium Weight/Worsted Weight and Aran (16-20 stitches to 4 inches)
Crochet Gauge13 sts (including ch sts) = 4" (10 cm); 13 rows = 4" (10 cm) in Moss Stitch. CHECK YOUR GAUGE. Use any size hook to obtain the gauge given.
Finished SizeBlanket measures 36 x 36" (91.5 x 91.5 cm) (57½ x 72" (146 x 183 cm))
Materials List
- RED HEART® With Love®: 6 (18) skeins 1968 Delightful A, and 1 skein 1401 Pewter B
- RED HEART® Super Saver®: 1 skein 259 Flamingo C
- Susan Bates® Crochet Hook: 6 mm [US J-10]
- Extra hooks in neighboring sizes (see notes)
- Yarn needle
INSTRUCTIONS
NOTES
-
It is highly recommended that you watch Marly Bird’s tutorial videos on planned color pooling before beginning this project.
-
You may have to tighten or loosen some stitches as you go in order to keep the color pooling intact. Keep a variety of hook sizes on hand to help resize your stitches.
-
Different dye lots of the same colorway may change the number of stitches obtained in any given color. Count the number of stitches YOU get to work through one full sequence, as well as in each color section, and maintain that throughout the pattern.
MOSS STITCH
Ch an even number of sts.
-
Row 1: Skip 3 ch, sc in next ch, * ch 1, skip 1 foundation ch, sc in next ch; repeat from * to end, turn.
-
Row 2: Ch 2 (counts as a stitch now and throughout), sc in next ch-1 space, * ch 1, sc in next ch-1 space; repeat from * to end finishing with a sc in last ch-3 space, turn.
-
Row 3: Ch 2 (counts as a stitch now and throughout), sc in next ch-1 space, * ch 1, sc in next ch-1 space; repeat from * to end finishing with a sc in last ch-2 space, turn.
-
Repeat Row 3 only for Moss st.
BLANKET
With A, ch for at least 46 (67½)" (117 (171.5 cm)), with the last loop on hook being the first loop of a new color just after a color change in the yarn.
-
Row 1 (right side): Skip 3 ch (counts as 1 foundation ch, 1 turning ch, and 1st ch st of Row 1), sc in the 4th ch from hook, * ch 1, sc around the foundation ch (instead of going into a ch st); repeat from * until 1 full color sequence has been completed. Count the number of sc made in each individual color in the color sequence. Work 4 (7) more full color sequences, maintaining the same number of sc made in each individual color. Leave remaining ch sts unworked. Undo one st repeat (sc, ch 1), turn.
-
Row 2 (wrong side): Ch 2 (counts as 1 turning ch and 1 ch st of pattern now and throughout), sc in next ch-1 space, * ch 1, sc in next ch-1 space; repeat from * to end finishing with a sc in last ch-3 space, turn.
Note: As you work this row and all remaining rows, you MUST get the correct number of sc in each color in order to maintain the planned color pooling. Change hook sizes, or actual st used, to get the correct color in place. If you use the same number of sts per color that you counted on Row 1, it will work out. -
Row 3 (right side): Ch 2, sc in next ch-1 space, * ch 1, sc in the next ch-1 space; repeat from * to end, finishing with a sc in last ch-2 space, turn.
Note: The color of the sts on this row will shift to the left or right by 1 st from the previous right side row depending on the colorway and if you are right or left handed. It doesn’t matter which direction the stitch shifts as long as it is off-set by 1. -
Row 4 (wrong side): Ch 2, sc in next ch-1 space, * ch 1, sc in the next ch-1 space; repeat from * to end, finishing with a sc in last ch-2 space, turn.
Note: The color of the sts on this row will shift to the left or right by 1 st from the previous wrong side row depending on the colorway and if you are right or left handed. It doesn’t matter which direction the stitch shifts as long as it is off-set by 1. -
Repeat Rows 3 and 4 until 5 (10) full color repeats have been completed lengthwise, ending on a Row 4 (wrong side row).
FINISHING
Squish or stretch the sts on foundation chain to match the width of the rest of the Blanket. You can slide the sts around along the foundation chain, as with an adjustable ring. Unravel unused foundation ch sts and weave in yarn tail to secure foundation.
-
Edging
-
With right side facing and working across foundation edge, join C with slip st in foundation ch st under last sc of Row 1.
-
Round 1 (right side): Ch 2 (counts as 1 turning ch and 1 ch st of pattern), sc once more in same ch, * ch 1, sc in next space between sc of Row 1; repeat from * to ch-3 corner space, (ch 1, sc) 3 times in corner space, rotate Blanket to work along long side edge, (ch 1, sc) in each ch space at edge of every other row to corner sc, (ch 1, sc) twice around corner sc, rotate Blanket to work along top edge, (ch 1, sc) in each ch-1 space to corner ch-2 space, (ch 1, sc) 3 times in corner space, rotate Blanket to work along long side edge, (ch 1, sc) in each ch space at edge of every other row to corner sc, (ch 1, sc) twice around corner sc, ch 1, join with slip st in beginning ch 2. Do not turn.
-
Round 2: Ch 2, sc in next ch-1 space, * ch 1, sc in next ch-1 space; repeat from * around, join with slip st in first ch-2 space. Do not turn.
-
Round 3: Ch 2, sc in next ch-1 space, * ch 1, sc in next ch-1 space; repeat from * to corner space, (ch 1, sc) 3 times in corner space; repeat from * 3 more times, (ch 1, sc) in each remaining space; join with a slip st in beginning ch-2. Fasten off.
-
Round 4: With right side facing, join B with a slip st in any corner space, ch 2, sc in same corner space, * ch 1, sc in next space to the right (working in reverse direction); repeat from * to end of around. Fasten off.
-
Weave in all loose ends.
Abbreviations
- A, B, C
- Color A, Color B, Color C
- ch
- chain
- sc
- single crochet
- st(s)
- stitch (es)
- * or **
- repeat whatever follows the * or ** as indicated
Read NextSeaside Caron Cakes Afghan Pattern
Your Recently Viewed Projects
Thanks for your comment. Don't forget to share!
Delphine Bryant
Oct 03, 2018
So this will be my challenge project for this year. I remember wearing argyle socks as a child and seeing this design brings back very fond memories. I wish my socks would have been this colorful and feminine. Any who, I just think pattern will provide me the challenge I need to grow my skills.
Morehouse17
Sep 29, 2018
OMG! Thanks so much for the link for the color pooling technique. I know I would never have been able to make this with out watching this video before I even started. Truthfully, I have seen the technique in other designs but this is the first one that I was interested in making. Thanks for sharing this pajama friendly argyle throw pattern.
Daughter of Light
Sep 25, 2018
This pajama friendly argyle throw is soooooo attractive! We're just starting into the autumn season here....just a bit of a nip of coolness in the morning air. I soooooo want to do this to wrap up in the morning on the patio so I can sit and read the Scriptures and sip my hot chocolate. I'm not sure about colors but I'm kind of partial to blues and greens. Gorgeous just gorgeous!
Cheryl Y
Nov 11, 2017
Wow what a beautiful blanket this Pajama Friendly Argyle Throw is. I have yet to master the color pooling technique, but I keep trying. This is not a easy technique to do and I tend to get so upset, I give up. I have watched the video a few times now and it does help me some, so I'm going to give it a try one more time. I'm glad to see the written pattern is here on this page and hope with this pattern I can master the color pooling.. Thank you so much for sharing this free crochet pattern.
Report Inappropriate Comment
Are you sure you would like to report this comment? It will be flagged for our moderators to take action.
Thank you for taking the time to improve the content on our site.