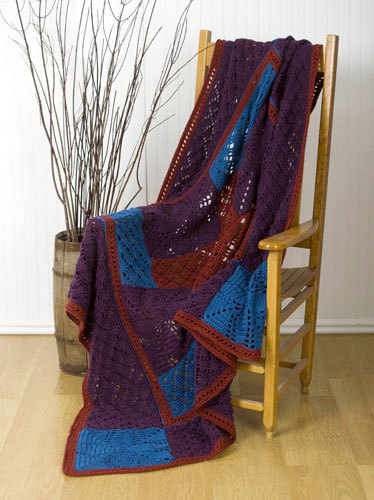
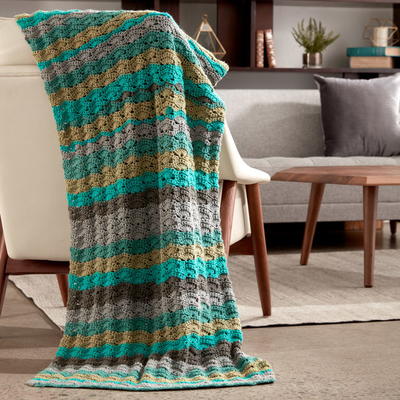
Dublin Afghan
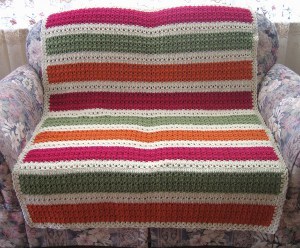
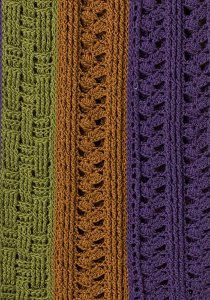
The Dublin afghan gives your home a country feel with its soft stripes and basket weave stitches. Make this easy crochet pattern to liven up your living room.

Materials:
- One size US H-8 (5 mm) crochet hook, or size to obtain gauge.
- Yarn needle
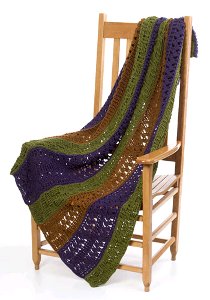
- Naturally Caron.com Country (75% microdenier acrylic/25% merino wool; 3 oz/85 g, 185 yds/169 m skein): 9 oz (A), 15 oz (B), 9 oz (C), Shown in: #0020 Loden Forest (A); #0014 Deep Purple (B); #0019 Vicuna (C)
- Pattern
Instructions:
FINISHED MEASUREMENTS
Throw measures approximately 45"/114 cm wide x 64"/162.5 cm long
GAUGE
In basket weave pattern (as established), using H-8 (5 mm) hook, 12 sts and 7 rows = 4"/10 cm.
In shell pattern, using H-8 (5 mm) hook, post and shell panel = 6 1/2"/16.5cm wide, shell panel = 5 3/4"/14.5 cm wide
STITCHES USED
Chain (ch), double crochet (dc), single crochet (sc)
SPECIAL TERMS
FPtr: Front-post treble crochet: Yarn over twice, insert hook from right-hand side of stitch to WS of piece, return to RS at left-hand side of stitch indicated, yarn over and pull up loop, complete as tr.
BPtr: Back-post treble crochet: Yarn over twice, insert hook from right-hand side of stitch to RS of piece, return to WS at left-hand side of stitch indicated, yarn over and pull up loop, complete as tr.
shell: 5 dc in indicated space.
BASKETWEAVE PANEL (make 4)
- With A, chain 12.
- Row 1: Sc in second ch from hook and in each remaining ch across, turn—11 sc.
- Row 2: Ch 3 (counts as first dc here and throughout), dc in each st across, turn.
- Row 3: Ch 3, FPtr around next 3 sts, BPtr around next 3 sts, FPtr around next 3 sts, dc in last st, turn—2 dc, 6 FPtr, and 3 BPtr.
- Row 4: Ch 3, BPtr around next 3 sts, FPtr around next 3 sts, BPtr around next 3 sts, dc in last st, turn—2 dc, 3 FPtr, and 6 BPtr.
- Rows 5 and 6: Repeat Row 3 twice.
- Row 7: Repeat Row 4.
- Row 8: Repeat Row 3.
- Rows 9–98: Repeat Rows 3–8 fifteen times.
- Rows 99–101: Repeat Rows 3–5.
- Row 102: Ch 1, sc in each st across, turn.
- Row 103: Ch 1, sc in each st across, do not turn.
Side Edging
- Row 1: Pivot to work along side edge, work around posts of last st of each row; sc in end of each sc row, 2 sc in end of each dc row across—203 sc. Fasten off.
- Join A with sc in edge of first row on opposite side edge, repeat Row 1 along opposite side edge. Fasten off.
POST AND SHELL PANEL (make 3)
- With B, chain 24.
- Row 1 (RS): Sc in second ch from hook and in each ch across—23 sc.
- Row 2: Ch 3 (counts as dc here and throughout), dc in next st, skip next 3 sts, shell in next st, ch 2, skip next 3 sts, dc in next 5 sts, skip next 3 sts, shell in next st, ch 2, skip next 3 sts, dc in last 2 sts, turn—9 dc, and 2 shells.
- Row 3: Ch 3, FPtr around next st, shell in first st of next shell, ch 2, skip next 4 sts, dc in next st, FPtr around next 3 sts, dc in next st, shell in first st of next shell, ch 2, skip next 4 sts, FPtr around next st, dc in last st, turn—4 dc, 5 FPtr, and 2 shells.
- Row 4: Ch 3, BPtr around next st, shell in first st of next shell, ch 2, skip next 4 sts, dc in next st, BPtr around next 3 sts, dc in next st, shell in first st of next shell, ch 2, skip next 4 sts, BPtr around next st, dc in last st, turn—4 dc, 5 BPtr, and 2 shells.
- Rows 5–100: Repeat Rows 3 and 4.
- Row 101: Ch 1, sc in first 2 sts, ch 3, sc in center st of next shell, ch 3, skip remaining sts of shell, sc in next 5 sts, ch 3, sc in center st of next shell, skip remaining sts of shell, ch 3, sc in last 2 sts, turn—11 sc, and 4 ch-3 spaces.
- Row 102: Ch 1, sc in first 2 sts, sc in next 3 ch, sc in next st, sc in next 3 ch, sc in next 5 sts, sc in next 3 ch, sc in next st, sc in next 3 ch, sc in last 2 sts, do not turn—23 sc.
Side Edging
Work as for basket weave panel side edging.
SHELL PANEL (make 2)
- With C, chain 18.
- Row 1 (RS): Sc in second ch from hook and in each remaining ch across—17 sc.
- Row 2: Ch 3 (counts as dc here and throughout), dc in next 4 sts, skip next 3 sts, shell in next st, ch 2, skip next 3 sts, dc in next 5 sts, turn—10 dc, and 1 shell.
- Row 3: Ch 3, FPtr around next 3 sts, dc in next st, shell in first st of next shell, ch 2, skip next 4 sts, dc in next st, FPtr around next 3 sts, dc in last st, turn—4 dc, 6 FPtr, and 1 shell.
- Row 4: Ch 3, BPtr around next 3 sts, dc in next st, shell in first st of next shell, ch 2, skip next 4 sts, dc in next st, BPtr around next 3 sts, dc in last st, turn—4 dc, 6 BPtr, and 1 shell.
- Rows 5–100: Repeat Rows 3 and 4.
- Row 101: Ch 1, sc in first 5 sts, ch 3, sc in center st of next shell, ch 3, sc in last 5 sts, turn—11 sc, and 2 ch-3 spaces.
- Row 102: Ch 1, sc in first 5 sts, sc in next 3 ch, sc in next st, sc in next 3 ch, sc in last 5 sts, do not turn—17 sc.
Side Edging
Work as for basket weave panel side edging.
FINISHING
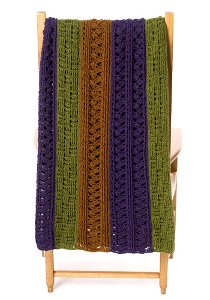
Arrange panels according to assembly diagram. Using yarn needle, whipstitch panels together through back loops only. Using yarn needle, weave in all remaining ends.
Read NextArrow Stitch Crochet Afghan
Your Recently Viewed Projects

Thanks for your comment. Don't forget to share!
pnnytk 2309693
Jan 07, 2017
I am a newby How much yarn do I need? I am used to seeing the number of skeins with the weight. Help?
Editor Dana
Jan 09, 2017
Hi there! Naturally Caron yarns are discontinued, but if you find similar skeins that are about 185 yards each, you'll need: 3 skeins of (A) 5 skeins of (B) 3 skeins of (C) I hope that helps! -Dana, Editor of FaveCrafts
Member 5573793
Nov 15, 2015
The instructions say that the basket weave panel has 103 rows and the other 2 panels have only 102 rows. You need the same number of rows in all panels. I just added a row to the shell panels so that they all had 103 rows. Also, when doing the single crochets along the sides, it would be better if the single crochets where all going in the same direction. Otherwise, you end up whip stitching single crochets that go in opposite directions.
sherliherlien
Apr 06, 2015
What do you need an assembly diagram for? Just look at the picture!
Report Inappropriate Comment
Are you sure you would like to report this comment? It will be flagged for our moderators to take action.
Thank you for taking the time to improve the content on our site.