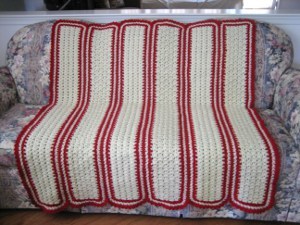
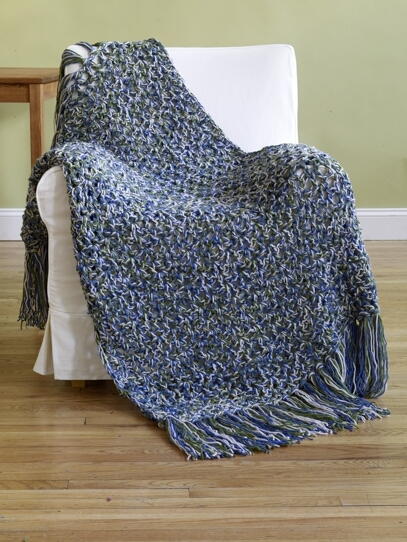
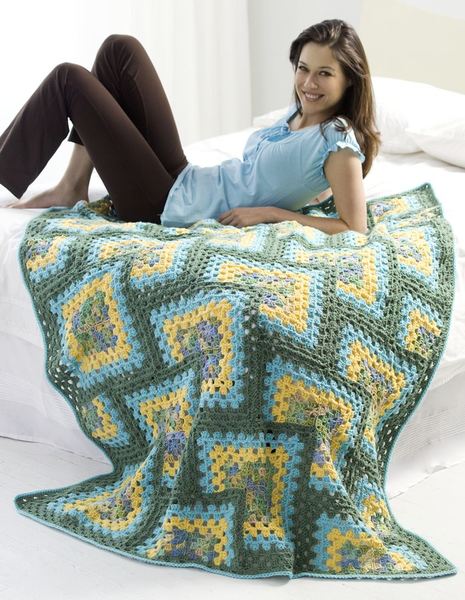
Crochet Granny Afghan
Create a Crochet Granny Afghan and keep it for a warm night next to the fire. Super Saver yarn makes this free crochet afghan pattern nice and warm. This pattern is easy enough for crochet fans of all skill levels and it makes a striking addition to your living room or bedroom. Mix and match colors to suit your style and learn to fine-tune your crochet skills with this artistic and dramatic granny square afghan. If you're looking for afghan crochet patterns that really stand out, look no further than this wonderful project.

Materials:
- 2 skeins Red Heart® "Super Saver®" yarn in Seagrass (A)
- 1 skein Red Heart® "Super Saver®" yarn in Cornmeal (B)
- 2 skeins Red Heart® "Super Saver®" yarn in Aruba Sea (C)
- 3 skeins Red Heart® "Super Saver®" yarn in Light Sage (D)
- 6mm [US J-10] crochet hook
- Yarn needle
- Diagram
Whether you're new to the world of crochet or a bonafide expert, you'll fall in love with one of the patterns feature in 36 Free Crochet Blanket Patterns for Beginners. These patterns are perfect for any occasion, so you can save them for yourself or give them as a gift. Once you discover the easy crochet afghan pattern, you'll want to start right away. Discover your next great crochet project and get started today.
Gauge: Rnds 1-2 = 3" square; each block = 7" square. CHECK YOUR GAUGE. Use any size hook to obtain the gauge.
Notes:
- To Change Color in Dc: Work last dc until 2 loops remain on hook, with new color, yarn over and draw through last 2 loops.
Instructions:
Afghan measures 52½" x 64½".
Block (Make 63)
With A, ch 5; join with a slip st in first ch to form a ring.
Rnd 1: Ch 3, 2 dc in ring, [ch 2, 3 dc in ring] 3 times; hdc in top of ch-3 to join and form last ch-2 space.
Rnd 2: Ch 3, (2 dc, ch 2, 3 dc) all over hdc, [ch 1; (3 dc, ch 2, 3 dc) all in next ch-2 space – corner made] 3 times, ch 1; join with a slip st in top of ch-3. Fasten off A. From this point forward block is worked in rows.
Row 1: With right side facing join B in 2nd ch of any ch-2; ch 3, 2 dc in same place, ch 1, 3 dc in next ch-1 space, ch 1, corner in next ch-2 space, ch 1, 3 dc in next ch-1 space, ch 1, 3 dc in first ch of next ch-2; turn and leave remaining sts unworked.
Row 2: Ch 3, [ch 1, 3 dc in next ch-1 space] twice, ch 1, corner in next ch-2 space, [ch 1, 3 dc in next ch-1 space] twice, ch 1, dc in top of ch-3 changing to C; turn. Fasten off B.
Row 3: Ch 3, 2 dc in first ch-1 space, [ch 1, 3 dc in next ch-1 space] twice, ch 1, corner in next ch-2 space, [ch 1, 3 dc in next ch-1 space] twice, ch 1, 2 dc in next ch-1 space, dc in top of ch-3; turn.
Row 4: Ch 3, [ch 1, 3 dc in next ch-1 space] 3 times, ch 1, corner in next ch-2 space, [ch 1, 3 dc in next ch-1 space] 3 times, ch 1, dc in top of ch-3 changing to D; turn. Fasten off C.
Row 5: Ch 3, 2 dc in first ch-1 space, [ch 1, 3 dc in next ch-1 space] 3 times, ch 1, corner in next ch-2 space, [ch 1, 3 dc in next ch-1 space] 3 times, ch 1, 2 dc in next ch-1 space, dc in top of ch-3; turn.
Row 6: Ch 3, [ch 1, 3 dc in next ch-1 space] 4 times, ch 1, corner in next ch-2 space, [ch 1, 3 dc in next ch-1 space] 4 times, ch 1, dc in top of ch-3. Fasten off.
Following diagram, sew blocks together.
Edging
For Rnd 1, "space" refers to ch-3 OR solitary dc at end of a row OR remaining half of ch-2 corner space OR ch-1 space between 3-dc groups on edges of blocks.
Rnd 1: With right side facing join A at upper right corner; ch 3, (2 dc, ch 2, 3 dc) all in same place, *** [ch 1, 3 dc in next space] 4 times, * ch 1, [2 dc in next space] twice, [ch 1, 3 dc in next space] 4 times **; repeat from * to ** 6 more times for top edge; ch 1, corner in next ch-2 space, [ch 1, 3 dc in next space] 4 times; repeat from * to ** 8 times for first long side †, corner in next ch-2 space; repeat from *** for bottom edge and 2nd side, end at †; join.
Rnd 2: Slip st in next 2 dc, slip st in ch-2 space, ch 3, (2 dc, ch 2, 3 dc) all in same space, * ch 1, 3 dc in next ch-1 space; repeat from * to corner; (3 dc, ch 2, 3 dc) all in ch-2 corner space; repeat from * around; join. Fasten off.
Rnd 3: With right side facing, join C in back loop of any st; ch 1, working in back loops sc in each dc and ch around; join. Fasten off.
Read NextThe FaveCrafts Afghan
Your Recently Viewed Projects
Thanks for your comment. Don't forget to share!
esther218 6241387
Aug 09, 2018
what method do you se to sew the squares together? Swing sewing needle or single crochet?
Editor Dana
Aug 13, 2018
Hi there! I think you can do a standard whip stitch, but our friends at AllFreeCrochetAfghanPatterns have an entire article on different crochet joins: https://www.allfreecrochetafghanpatterns.com/Crochet-Afghan-Tutorials/Crochet-Joins-How-to-Crochet-Two-Pieces-Together I hope that helps!
sueclose 5618937
Apr 25, 2018
I am confused on sewing it together. Can you give me some helpfully hints.
Editor Dana
Apr 26, 2018
Hi there! Our friends at AllFreeCrochetAfghanPatterns have this awesome helpful article on the different crochet joins that includes a video tutorial! I hope this helps! https://www.allfreecrochetafghanpatterns.com/Crochet-Afghan-Tutorials/Crochet-Joins-How-to-Crochet-Two-Pieces-Together
dpitts42462 650373 1
Mar 14, 2015
Can someone tell me where to find the seagrass yarn.. i have looked every where and i cant find it.
FaveCrafts Editor JL
Mar 16, 2015
Hi there, This yarn is available on Amazon. I was also able to find it on Walmart's website and Kmart's website. - Julia from FaveCrafts
bobbylonardo 50143 99
Jun 18, 2014
I am trying to upload 2 images of this afghan and nothing happens. What am I doing wrong? It lets me select the images but there is no Okay button or anything else for that matter.
Melissa Ryan
Jun 19, 2014
Hi bobbylonardo--thanks for your comment. Your images have been approved and uploaded. We're working on fixing the image feature to include a confirmation screen, which we hope to roll out soon. In the meantime, all editors will check and approve these images on a weekly basis...so if you upload other photos, check back in a week or so to see them. Hope that helps!--FaveCrafts Editor
labullen 6299288
May 06, 2014
I love this blanket but can't make out the directions. They are very confusing. I may try something that is written easier. Is there any clarification of these directions? Like everyone else I got lost at round two and there isn't an individual square by itself up close to actually see the pattern. If anyone has an idea please let me know
Melissa Ryan
May 07, 2014
Hi labullen--thanks for your comment. For pattern-related questions, we suggest contacting the designer, in this case Red Heart Yarn. They may have simpler instructions or even photos or videos to help you along the way. And if you're looking for something a little easier, you can search for easy afghans or simple afghans in the search box and see some simple afghan patterns that are easier to understand. Hope that helps! --FaveCrafts editor
Meroli
May 26, 2012
I haven't made this yet, but I plan to. It should turn out beautiful. Thanks for having so many great patterns. I can knit, but crochet goes so much faster; I prefer crochet.
alicebieker 869034 5
Jan 16, 2012
Would love to have the directions for "Tiles Granny Afghan" #WR1848 but I am unable to print it , can you please send the diections by e-mail
countrygirl07 4541 330
Jun 17, 2011
Clever! I love it! I'm going to make this one. Love the color choices too.
CreativityGoddess
Jun 14, 2011
@mcrae2662 8105757 - There are two places for you to access the diagram. Under the "Materials" section there is a link that says "Diagram." When you click on that the diagram should open up. Another link to the diagram can be found in the instructions for "Finishing." Hope this helps! -The editors of FaveCrafts
mcrae2662 8105757
Jun 13, 2011
The free pattern for this pattern states Finishing: Following diagram, sew blocks together------what diagram. It appears from the picture that there are large blocks and 1/2 blocks. This pattern appears complicated and I have not started it because I will not know how to put it together. A diagram to me means a diagram showing where each partial square and 1/2 squares go. I like the picture of the finished afghan and would like to crachet it for my son and dtr-in-law. Thanks.
CreativityGoddess
Jun 13, 2011
@gleneldna 2707250 - The diagram is listed under the "Materials" section. Click on that link and it will open a PDF of the diagram. Hope this helps! -The editors of FaveCrafts
gleneldna 2707250
Jun 12, 2011
I have all the squars made, the pattern said to follow the diagram to sew them together, but there is no diagram. Where do I find the diagram?
horsebabe557
May 01, 2011
So pretty! I've just started making this in a different set of colors (more my taste)- 2 squares down... Can't wait until it's finished! For the people confused: the 7in squares look like one mini square and 3 L shaped stripes on the side. They don't overlap when you arrange them. The diagram helps you figure out how to place them so the 7in squares look like 14in squares that are overlapping. Thanks for the great pattern!
mciloff
Apr 28, 2011
Like I commented earlier, this pattern isn't easy to understand; and so far, no one has mentioned on how easy it is to actually crochet. I am not wasting my time on this pattern.
bmansbridge 790021 2
Apr 12, 2011
Did the squares easily but cannot understand how to put the rug together. A diagram would make it possible. Bev - Australia
edmondsjh 0764124
Apr 12, 2011
I would rather see a picture of the pattern in color. I already know how to make a Granny square--what I need from this pattern is a picture of the squares so that I can count when and where to change colors. One solution would be to make 7" squares, overlap them in the layout, and tack them together--the extra bulk may prove to be cozy--or is that what the instructions are trying to say.?
jhulk3 6221665
Apr 11, 2011
What a very different granny is the Crochet Granny Afghan By: Darla J. Fanton of Red Heart Yarn. I love granny squares for stash busting this one is different! I just may start yet another project... big sigh
peachpit2000 79541 21
Apr 05, 2011
I love this pattern and can't wait to make it. It is going to be my next project.
mciloff
Apr 05, 2011
Out of all the positive comments on this; has anyone recently made this afghan using the pattern as it is exactly written? I cannot make it out and get stuck on Rnd 2! Please advise!! :)
NCgirl
Apr 03, 2011
I vote Crochet! I really like this pattern! It's a very interesting take on the Granny where it looks like they're laid out slightly overlapping each other. Nice to have a different spin on the traditional Granny Square! Going to print this pattern for my files as soon as I'm through with this post!!! :)
Paula B
Apr 03, 2011
Asking me to chose between knit and crochet is like asking to pick between apples and oranges They are both wonderful art forms yes they are art forms and anyone who does them is an artist Many of my knit projects end with crochet finishing As a matter of fact I learned to crochet because one of my early knit patterns called for crochet finishing I have been creating with yarn and thread for the better part of years It is seldom that I am not in the middle of a project or or lol I have knitted dozens of pairs of socks with my friends requesting them for Christmas I have won Blue Ribbons at county fairs I have even developed my own stitch patterns for projects Crochet is faster but tends to be bulkier I think crocheted socks would be uncomfortable but crocheted slippers are great Knitting is more…Read More time consuming but makes a softer more pliable fabric They are very different and choosing either over the other would just not be right Happy Crafting
ohiojo1953
Apr 03, 2011
I don't knit but the patterns shown for knitting are much more sophisticated. Crochet has just as intricate designs as knitting but you didn't post any of them. It's not a balanced comparison. The granny square is one of the first patterns I learned therefore to me one of the simplest. Please show the extent of crochet's capabilities to make this vote fair.
willekeo
Apr 02, 2011
Ah, granny squares... I get that "been there, done that (more than once)" feeling, but this sure is a fresh approach. Like it a lot!
rackster
Apr 02, 2011
I crochet and out of the ones given this one is my favorite. However that one Knit pattern with 3D flowers beat all. I think anyone that does both crafts wouldn't be able to choose tho. Most I know love both = )
Crafter 9759887
Apr 02, 2011
Have to vote for crochet!! This afghan is fantastic never saw one like it...
sunshine76670
Apr 02, 2011
I vote for crochet. You cannot make a granny square in knit. Nothing compares to beautiful crochet!!
Minny
Apr 02, 2011
Love a Granny Square!! So many things you can make with them. I don't knit, so I vote for crochet!
RoseOfSharonDesign s2
Apr 02, 2011
This is my favorite! I crochet and knit and love them both! :o)
Nette
Apr 02, 2011
I love this! Most granny square patterns I've seen don't interest me, but, this I will do. This looks like a quilt you want to snuggle up in.
adelhid
Apr 02, 2011
@clerkathome, I, too wondered why there is only one style of block. When you look at the diagram, see that most blocks are made of three smaller blocks. The full squares are actually four small blocks. Personally, I would like bigger blocks so the project would go faster! Such a pretty pattern, maybe I'll use double yarn and a bigger hook.
clerkathome 617162 8
Mar 10, 2011
I just finished this afghan. However directions weren't clear. she lost me after the second row. I ended up making my own pattern with half blocks and quarter blocks. This ia a beautiful afghan. I couldn't see how she crocheted this in rows?? and left rows unfinished ( to pick up later?) Rose
Crafter 9837076
Feb 03, 2010
I really like it. Cant wait to make it. Ive got to change it to Australian terms, that takes a while, but its worth it.
Crafter 18890
Feb 01, 2010
Looks really beautiful and symmetric. I look forward to trying it out.
Report Inappropriate Comment
Are you sure you would like to report this comment? It will be flagged for our moderators to take action.
Thank you for taking the time to improve the content on our site.