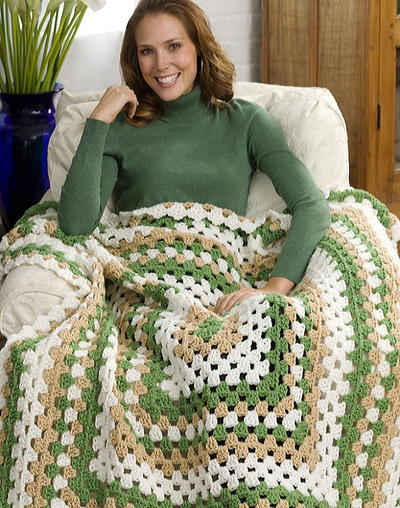
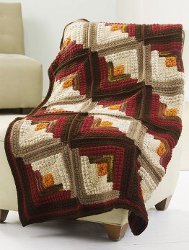
Comfort Throw
This is an intermediate crochet pattern from Red Heart Yarn that you'll love putting together. The deep, dark colors are perfect for the fall and winter season. Follow the key provided and you'll have the perfect throw.

Throw measures 55” x 55”.
Materials:
- RED HEART® “Super Saver®”: 1 Skein each
- 256 Carrot A
- 334 Buff B
- 944 Cherrycola C
- 256 Carrot A
- 2 skeins each
- 792 Sandy Print D
- 376 Burgundy E
- 360 Café F
- 365 Coffee G
- 792 Sandy Print D
- Crochet Hook: 5mm [US H-8].
- Yarn needle.
- GAUGE: Motif = 10 1/4” x 10 1/4”. CHECK YOUR GAUGE. Use any size hook to obtain the gauge.
Pattern
MOTIF (Make 25)
Section 1: With A, ch 2.
Rnd 1 (Right Side): 8 Sc in 2nd ch from hook; join with a slip st in first sc; TURN.
Rnd 2: Ch 1, sc in next sc; * yo and draw up a loop in next sc, yo and draw through 1 loop on hook, [yo and draw through 2 loops] twice – long-dc made; (sc, long-dc) all in same place where first long-dc was made, sc in next sc; repeat from * twice more; (long-dc, sc, long-dc) all in last sc; join in first sc; turn.
Rnd 3: Ch 1, sc in first st, 3 hdc in next st for corner, [sc in next 3 sts, 3 hdc in next st] 3 times, sc in last 2 sts; join.
Fasten off.
Section 2
Row 1: With right side facing, join B with sc in center hdc of any corner; sc in next 5 sts, 3 sc in next hdc, sc in next 6 sts; turn – 15 sc.
Rows 2-5: Ch 1, sc in each st to center sc of corner, 3 sc in next sc, sc in each st to end; turn – 23 sc at end of Row 5. Fasten off.
Section 3
Row 1: With right side facing, join C with sc in end of last row, sc in end of next 4 rows, 5 sc along edge of Section 1 to next corner, 3 sc in corner, 5 sc along edge of Section 1, sc in end of next 5 rows; turn – 23 sc.
Rows 2-5: Repeat Rows 2-5 of Section 2 – 31 sc at end of
Row 5. Fasten off.
Section 4
Row 1: With right side facing, join D and sc in end of next 5 rows, sc in next 11 sc, 3 sc in next sc, sc in next 11 sc, sc in end of next 5 rows; turn – 35 sc.
Row 2: Ch 1, sc in first sc, [long-dc in next sc, sc in next sc] 8 times, (long-dc, sc, long-dc) all in corner sc, sc in next sc, [long-dc in next sc, sc in next sc] 8 times; turn–37 sts.
Row 3: Repeat Row 2 of Section 2 – 39 sc.
Row 4: Repeat Row 2 of Section 4 except work sts in brackets 9 times instead of 8 times – 41 sts.
Row 5: Repeat Row 2 of Section 2 – 43 sts. Fasten off.
Section 5
Row 1: With right side facing, join E and sc in end of next 5 rows, sc in next 15 sc, 3 sc in next sc, sc in next 15 sc, sc in end of next 5 rows; turn – 43 sc.
Row 2: Repeat Row 2 of Section 4 except work sts in brackets 10 times instead of 8 times – 45 sts.
Row 3: Repeat Row 2 of Section 2 – 47 sc.
Row 4: Repeat Row 2 of Section 4 except work sts in brackets 11 times instead of 8 times – 49 sts.
Row 5: Repeat Row 2 of Section 2 – 51 sc. Fasten off.
Section 6
Row 1: With right side facing, join F and sc in end of next 5 rows, sc in next 21 sc, 3 sc in next sc, sc in next 21 sc, sc in end of next 5 rows; turn – 55 sc.
Row 2: Repeat Row 2 of Section 2 – 57 sc.
Row 3: Ch 1, sc in first sc, [ch 1, skip 1 sc, sc in next sc] 13 times, ch 1, skip 1 sc, 3 sc in next sc, [ch 1, skip 1 sc, sc in next sc] 14 times; turn – 59 sts.
Row 4: Ch 1, sc in first sc; (yo, insert hook in sc directly below the ch-1 and draw up a loop to height of row in work,
yo and draw through all 3 loops on hook – long-hdc made; sc in next sc] 14 times, 3 sc in next sc, sc in next sc, [longhdc, sc in next sc] 14 times; turn – 61 sts.
Row 5: Repeat Row 2 of Section 2 – 63 sc. Fasten off.
Section 7
Row 1: With right side facing, join G and sc in end of next 5 rows, sc in next 25 sts, 3 sc in next st, sc in next 25 sts, sc in end of next 5 rows; turn – 63 sc.
Row 2: Repeat Row 2 of Section 2 – 65 sc.
Row 3: Ch 1, sc in first sc, [ch 1, skip 1 sc, sc in next sc] 15 times, ch 1, skip 1 sc, 3 sc in next sc, [ch 1, skip 1 sc, sc in next sc] 16 times; turn – 67 sts.
Row 4: Ch 1, sc in first sc, [long-hdc, sc in next sc] 16 times, 3 sc in next sc, sc in next sc, [long-hdc, sc in next sc] 16 times; turn – 69 sts.
Row 5: Repeat Row 2 of Section 2 – 71 sc. Fasten off.
FINISHING
Sew motifs together following diagram.
Border
Rnd 1: With right side facing, join E in any sc; ch 1, sc around working 3 sc in each corner; join. There should be an odd number of sc between each center corner sc.
Rnd 2: Ch 1, sc in each sc around and work 3 sc in center corner sc; join. Fasten off.
Rnd 3: With right side facing, join G in any corner; ch 1, 2 sc in corner sc, * ch 1, skip next sc, sc in next sc; repeat from * to next corner; ch 1, skip next sc **, 3 sc in center corner sc; repeat from * around, end at **; work 1 more sc in same sc as first 2 sc; join.
Rnd 4: Ch 1, ** 3 sc in center corner sc, * sc in next sc, long-hdc; repeat from * to next corner; sc in next sc; repeat from ** around; join.
Rnd 5: Ch 1, sc in each st around and work 3 sc in center corner sc; join. Fasten off. Weave in ends.
Read NextAfghan with Sleeves Crochet Pattern
Your Recently Viewed Projects
Thanks for your comment. Don't forget to share!
jabernat
Aug 28, 2013
As an experienced crocheter, I would try different ways to sew them together, first one being (using the same color yarn at each juncture) crochet them together. If this leaves too much of a ridge, just use the whip stitch. When Red Heart specifies the pattern for an experienced crocheter, they don't feel the need to give instructions for common techniques. Also in answer to the other question everyone seems to ask, there is a link called "pattern" under the Gauge. It will take you to the Red Heart website for this pattern.
Crafter 6589011
Apr 13, 2013
The question from tjernigan 1218430 on July, 2012 has still not been answered. What method is used to sew the squares together and was the color of the thread changed as the color of the squares changed? When you click on the "Pattern" link at the bottom of the materials list all you get is the pattern and the diagram. There is no explanation for the question asked. Still waiting, April, 2013.
tjernigan 1218430
Jul 15, 2012
What method was used to sew the squares together? Was the color of the thread changed as the color of the squares changed or was one color used throughout?
Peskawa
Aug 03, 2011
Click on the link "Pattern" right after the "materials" section of the instructions. This will get you a PDF file that includes the graph for putting together.
rrose 8632960
Aug 03, 2011
It says to follow the diagram in order to put the squares together where is the diagram? I do think this is a beautiful throw and plan on making soon. Thank you!
Report Inappropriate Comment
Are you sure you would like to report this comment? It will be flagged for our moderators to take action.
Thank you for taking the time to improve the content on our site.