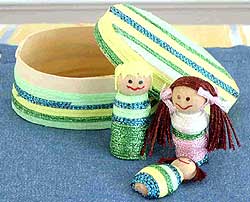
Worry Wood Dolls
Kids can create a family of wood worry dolls with heavy braid and a matching box for their home. Tape makes wrapping the dolls with metallic threads easy. For some more neat kids crafts be sure you check this out!
Materials:
- Kreinik 1/8” Ribbon in 052F, 053F, 092
- Kreinik #32 Braid 080C, 339, 008
- Wood turnings from a craft store, 1” to 1 1/2” high (for this project Wood Shoppe
- Turnings by Crafts, Etc were used #165563 Boy, #065555 Girl, and #371831 Bumble
- Bee)
- Small oval wooden box (unfinished) or small oval paper mache box
- Treasure Tape, 1-inch roll, and 1/4-inch roll
- Fine Point Permanent markers for facial features (we used red, brown, blue and green)
- Scissors
Instructions:
- To make clothing on the worry dolls, begin at the neckline and lay a thin line of 1/4” Treasure Tape around the woodturning. Peel off the red liner and lay braid or ribbon of your choice around the neckline by wrapping it and lightly pressing it onto the tape. Change colors of thread to make stripes. Continue wrapping to the bottom of the wood turning.
- Lay pieces of Treasure Tape on the top of each ‘head’. Remove red liner to expose the sticky part. Cut lengths of braid or ribbon for hair and lay on the taped head. For the boy and baby, cut lengths approximately 1-inch. For the girl, cut lengths 4 inches long. For the girl, pull strands together near the side of her face and tie with 1/8” Ribbon to make pony tails.
- Use fine point permanent markers to draw eyes and mouth on dolls.
- To decorate the box, begin at the bottom edge, and lay the larger roll of Treasure Tape all the way around the box. Do not put tape around the top of the box where the lid will hang over. Remove the red liner to expose sticky tape. Lay braid and ribbon around sides of box in stripes, covering the tape. For the lid, lay Treasure Tape to cover the whole lid. Remove red liner to expose sticky tape. Decorate with the braid and ribbon. Do the same around the side of the lid.
Read NextTin Can Piggy Bank
Your Recently Viewed Projects

Thanks for your comment. Don't forget to share!
Report Inappropriate Comment
Are you sure you would like to report this comment? It will be flagged for our moderators to take action.
Thank you for taking the time to improve the content on our site.