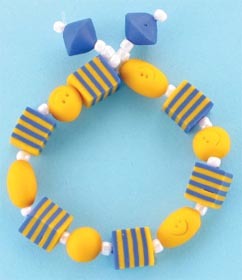
Smiley Face Beaded Bracelet
A cheerful cord bracelet is fitting for a grade school teacher or a young student who helped make the smile beads. Kids will also love exchanging these as friendship bracelets.

Materials:
- AMACO® Pasta Machine
- AMACO® PolyRoller™
- AMACO® Tri-Bead Roller™
- FIMO® Soft Polymer Clay — Sunflower (#16), Brilliant Blue (#33)
- AMACO® Polymer Clay & Craft Oven (or home oven)
- AMACO® Professional Bead Baking Rack With Pins (or scrap FIMO® polymer clay) to suspend beads while baking
- FIMO® Tool Set — Angled Plastic Cutting Knife
- Disposable Plastic Drinking Straw
- Oven Thermometer
- Index Cards or Card Stock
- Hot Pad
- 18 Gauge Craft or Floral Wire
- Wire Cutters
- Toothpick
- White Size “E” Beads
- 12" Length Stretch Bracelet Cord
- Scissors
- Glue
- Optional:
- AMACO® PolyBlade
Instructions:
-
Preheat oven to 265ºF (130ºC). Knead Sunflower clay to condition. Follow instructions included with AMACO® Tri-Bead Roller™ to make three round and three oval shaped beads.
-
Make eyes in each bead by pressing the toothpick into clay to indent. Refer to diagram shown here to cut one end of drinking straw; creating a “U” shape. (Shown at the end of the instructions.) Press this end of straw into clay beads below eyes to create smiles.
-
Condition Brilliant Blue FIMO® Soft. Use AMACO® Tri-bead Roller™ to create two blue bicone beads.
-
Use AMACO® Pasta Machine set on thickest setting (or PolyRoller™) to roll a sheet of first Sunflower, then Brilliant Blue FIMO® Soft, gradually reducing thickness to setting #5 on pasta machine (less than 1/16" thick when rolling sheets by hand.)
-
Stack the two sheets on top of the other then roll lightly with PolyRoller™ to join. Cut the new layered sheets in half, stack and roll again. Repeat once more, creating four total layers of the two colors.
-
Use angled cutting knife found in FIMO® Tool Set (or PolyBlade with adult supervision) to cut 6 square shaped beads.
-
Use wire cutters to cut 4" lengths of 18 gauge wire. Insert wire through beads to create hole for stringing onto bracelet later. Enlarge hole slightly using toothpick, making it large enough for stretch cord to pass through easily once baked. Carefully slide beads back onto wire.
-
With clay beads on wire, place wire ends onto the AMACO® Bead Baking Rack to suspend beads during baking. If Bead Baking Rack is not available, use scrap FIMO® polymer clay (or kitchen grade aluminum foil) to make two small rope-like logs, approximately the size of your finger. Place logs onto an index card or piece of card stock, press wire onto top of logs so beads are suspended between the logs.
-
Bake for 30 minutes in AMACO® Polymer Clay & Craft Oven (or home oven). Remove from oven with hot pad and let cool. Remove beads from wire.
-
Refer to photo to string beads onto a 12" length of stretch bracelet cord, sizing over all length to fit your wrist. Tie stretch cord ends using an over hand knot, leaving an extra length of cord at both ends.
- For dangling portion of bracelet, add 5-6 White “E” beads, Brilliant Blue bicone bead and another “E” bead to each end. Bring cord end back around “E” bead at end and tie a square knot between the “E” and bicone bead. Add a dot of glue to knot to hold. Cut excess cord.

NOTE: Adult supervision is recommended when using an oven, the PolyBlade or the bead piercing pins with the Professional Bead Baking Rack.
Read NextTin Can Piggy Bank