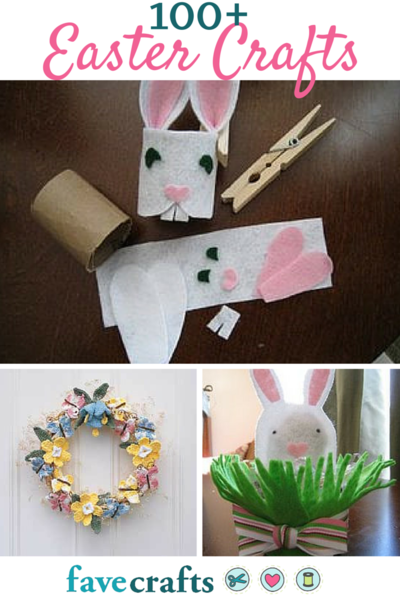
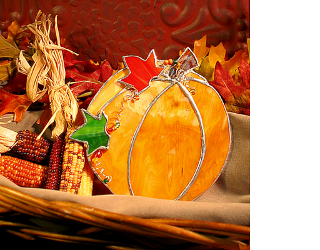
Stained Glass Pumpkin Sun Catcher
This stained glass pumpkin sun catcher from Diamond Tech is a more advanced crafting project, but it is definitely worth the time and effort! This colorful sun catcher is perfect to welcome in the fall season.
Materials:
- Stained Glass #G359 Red/Orange/Cream
- Stained Glass #G327 Emerald Green
- Stained Glass #G1086 Peaches/Cream
- Pumpkin Pattern [PDF]
- Homosote Board
- Wire 20 gauge silver
- Soldering Iron
- Glass Beads
- Metal Push Pins
- Flux
- Paint Brush (to apply flux)
- 60/40 Vinegar/Water Solution
- Soft Cloth
- Fan
- Liquid Soap
- Fid or a pencil or popsicle stick can be substituted
- Regular Scissors
- Exacto™ or craft knife
- Foil Shears (optional)
- Glass Cutter
- Grinder or Scythe Stone
Preparations:
Before you begin, find a place to work that has great ventilation where you can open a window and use a fan. An area safe from children and pets is recommended. The less you move an unfinished project, the less likely you are to have damage.
Directions:
- Make 2 copies of your pattern [PDF]. Cut one out with foil shears or cut out along the inside edges of the pattern lines with regular scissors. Mark each pattern piece with one simple arrow indicating direction you want the glass grain to run. Glass direction/grain will either be in the form of the color or texture, if used correctly it will enhance your panel.
- Layout your pattern pieces on glass, trace around them using a permanent marker. Note: If using the textured side of the glass in your design, turn pattern piece over and trace, cut on the smooth side of the glass. When scoring glass, cut on the inside of the drawn line.
- Clean each piece of glass thoroughly with vinegar solution and a clean cloth. Foil will not stick properly if your glass is dirty or oily. Using a marker, number each piece of glass to correspond with the numbers on the uncut pattern.
- Using a glass cutter, cut out your pieces. You can use a grinder or a scythe stone to shape and remove sharp sections from your pieces.
- The foil is what makes the solder adhere to the glass. Start with ¼” (1.5ml thick) copper foil. Peel back 3”- 4” of backing from the foil. Center the edge of your glass piece on the sticky side of the foil. Always “start” your foil on the inside edge of the glass where it will touch the next piece and be out of sight once it is soldered. Wrap the entire outer edges of the glass with foil and overlap the ends ¼”.
- Use a fid (if you don’t have a fid, a pencil or popsicle stick can be substituted) and burnish (rub) the surface of the foil to the edge of the glass. Press firmly, however too much pressure may cause the foil to tear.
- Gently push down the foil on the corners and sides of the glass. DON’T slide your fingers along the foil, it can cut you. Again burnish down the foil to the glass. Your foil must be secured to your glass completely and smoothly to make the solder effectively hold to your glass pieces.
- Use an Exacto™ knife (or sharp blade of any kind) to trim any excess foil, creating a uniform edge along the face of the glass. Use a fire resistant surface on which to solder. A homosote board works well and can be purchased at your local building supply store.
- Plug in your soldering iron. WARNING: No drinking, eating or smoking while handling lead solder! Pregnant or nursing woman should avoid all lead solder. Open window and turn on fan when soldering.
- Using the second copy of your pattern for reference, arrange foil wrapped glass pieces on your work surface. Place METAL push pins around the perimeter of your project. This will hold your pieces in place while you solder. Tack your joints together with a bit of flux and a small dot of solder, where pieces touch. This will hold your projects shape while you run your solder lines. Remove push pins.
- Apply a small amount of flux with a brush to your foiled seams. Apply only to areas you will be able to work in 10 minutes. Solder will not properly adhere to glass without foil and flux.
- Pull out about 9 inches of solder from the spool, do not cut.
- Place the hot soldering iron tip on the seam you want to solder. Use the narrow edge as opposed to the flat edge, as this helps to raise the solder bead. Now that the tip is on the foil, place the solder from the spool about ½” up from the end of the tip. Gently push the solder into the tip, as you move the tip along the seam. Let up on the amount of solder when you come to the end of the seam. Now wipe your tip and put the iron back into the iron stand.
- Do not leave the soldering iron in one place too long; this can crack the glass or the solder can “melt through”. This means the solder will liquefy and fall through the foil seam between the glass.
- Solder the front, back and sides of your project, wherever foil is exposed. Then do a final solder bead. This is a skill you will acquire over time. All seams and outer areas should have a raised bead.
- If you can’t complete your project, remember to clean it with your cloth and vinegar solution, then put plastic wrap over the project. This will keep the foil from “aging” and that makes for easier soldering when you’re ready.
- When you have completed the soldering, let cool completely and spray a cloth with your vinegar solution and wipe the flux off of the project. Clean your finished project with liquid soap and water, rinse thoroughly and dry.
- Embellish your pumpkin with curled wire and beads.
Read Next26 DIY Fall Wreaths for Front Door