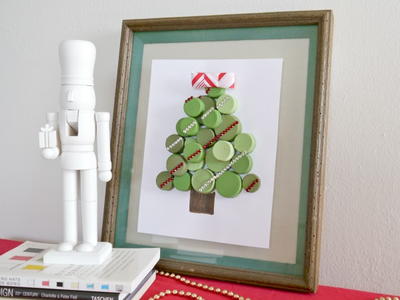
PVC Pipe Christmas Tree

"In a just a couple of days, using mainly PVC pipe, you can create a unique DIY Christmas tree that can either be hung up or lean against a wall. This alternative Christmas tree is ideal for smaller living rooms or dens. Other materials include spray paint, Christmas ornaments and plywood."
Estimated Cost$31+
Time to CompleteWeekend project
Main MaterialRecycled Materials

Materials List
- -inch x 4ft x 6ft Plywood - Oak Plywood or Birch Plywood
- White Paint
- Paintbrush
- Paint Pail/Tray for diluting
- Miter box saw/pipe cutter
- A Variety of PVC Pipes - 1 to 4.5 inches in Diameter
- Painter's Tape
- Gold Metallic Spray Paint
- 3 Tubes of Five-Minute Epoxy Adhesive
- Popsicle Sticks
- Tree Trunk Stencil
- Variety of Christmas Ornaments
- Heavy Mirror Hanging Brackets for about 50lbs (optional)
Instructions
-
Pour the white paint into the pail and slowly pour a small amount of water to dilute.
-
Using the paint brush and white diluted paint, paint one side of the plywood to create a white washed effect. Allow wood to dry completely.
-
After the white paint is completely dry, use the painter's tape to create a tree layout on the wood. The base should measure around 3 feet and each side should measure around 5 feet. You can play around with the tape to achieve the shape you would like.
-
Safely using the miter saw, cut the PVC pipes of 1 to 4.5 inches in diameter. These should be in a variety of lengths/heights ranging from 2 to 3.5 inches.
-
Place the cut pieces of PVC pipe within the perimeter of the tape to create a tree layout. Create the entire layout to make sure that you have enough pipe pieces. Try to avoid placing to many of the same sized pieces near each other.
-
Paint all of the cut PVC pipe pieces using the gold metallic spray paint. Make sure to paint the outside and inside of the pieces. Allow the pieces to fully dry.
-
Once the pieces are dry, recreate the entire tree layout on the plywood.
-
Mix a quarter size amount of the epoxy glue.
-
For each piece of pipe, spread the epoxy glue on the bottom side and place on the plywood. Press down on each piece to ensure it sticks. Repeat this same process for each piece of cut pipe. Mix more epoxy glue as necessary. Allow glue to dry overnight.
-
Measure out the size of the tree trunk as you would like it to appear. Find a tree trunk stencil print out and print.
-
Tape the tree trunk stencil using the painter's tape. Using the same gold metallic spray paint, paint through the tree trunk stencil. Allow to dry and remove stencil paper.
-
Remove painter's tape used to create tree layout.
-
Next, hang up the piece of plywood with your attached tree or lean against a wall of your choice.
-
Place Christmas ornaments inside of the pipe pieces.Try to disperse different sizes and colors of ornaments throughout.
-
Sit back and enjoy your unique, handmade Christmas tree craft!
Up Next:
Read NextGiant Wooden Christmas Star
Your Recently Viewed Projects
Thanks for your comment. Don't forget to share!
lcarr
Nov 15, 2018
This is a really interesting project. My first thought when seeing it were that you could use this to make a really unique advent calendar. You could have 25 of the rings larger than the rest and scatter them about as they are in the picture. Number the larger rings one through twenty five, and put a small treat in each one.
Report Inappropriate Comment
Are you sure you would like to report this comment? It will be flagged for our moderators to take action.
Thank you for taking the time to improve the content on our site.