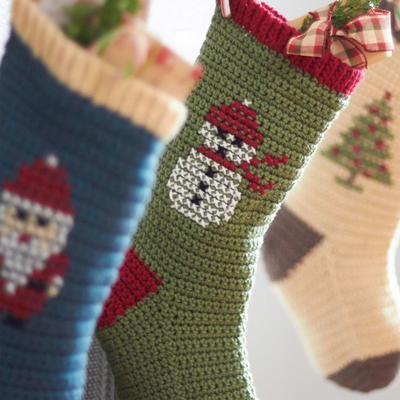
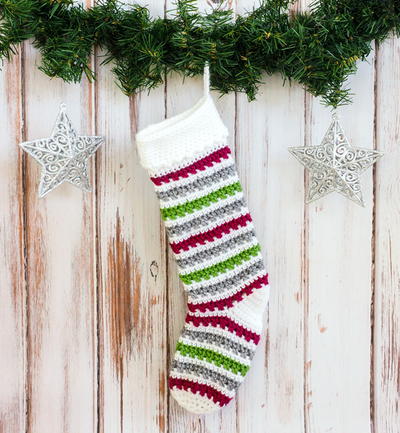
Striped Christmas Stockings
Liven up your mantel with these bright and cheery knit Christmas stockings. Great for boys and girls alike, these Striped Christmas Stockings make wonderful Christmas gifts come Christmas morning. You could also knit up one of these stockings and fill it with delicious homemade treats that you can present to friends and neighbors. This is one gift that will keep on giving for years to come!

Materials:
- One set (4) 5mm [US 8] double pointed knitting needles
- 4mm [US G-6] crochet hook
- Yarn needle
- Stitch marker
Green Cuff Stocking
- 1 skein Red Heart® Super Saver yarn in Paddy Green (A)
- 1 skein Red Heart® Super Saver yarn in Soft White (B)
- 1 skein Red Heart® Super Saver yarn in Cherry Red (C)
Blue Cuff Stocking
- 1 skein Red Heart® Super Saver yarn in Dark Sage (D)
- 1 skein Red Heart® Super Saver yarn in Soft White (C)
- 1 skein Red Heart® Super Saver yarn in Ranch Red (B)
- 1 skein Red Heart® Super Saver yarn in Soft Navy (A)
ABBREVIATIONS:
A B C D = color A, B C, D;
ch = chain;
dec = decrease;
dpn(s) = double pointed needle(s);
k = knit;
kwise = knitwise;
mm = millimeters;
p = purl;
pm = place marker;
pwise = purlwise;
rnd(s) = round(s);
st(s) = stitch(es);
St st = Stockinette st;
[ ] = work directions in brackets the number of times specified;
* or ** = repeat whatever follows the * or ** as indicated.
Gauge: 18 sts = 4”; 24 rows = 4” in Stockinette stitch. CHECK YOUR GAUGE. Use any size needles to obtain the gauge.
Instructions:
Stocking is 18" long.
Stripe Pattern
- Green Cuff Stocking: (3 colors, green cuff): 4 rnds A, 4 rnds B, 4 rnds C.
- Blue Cuff Stocking: (4 colors, blue cuff): 3 rnds A, 3 rnds B, 3 rnds C, 3 rnds D.
Stocking
With
A, cast on 54 sts, dividing sts evenly over 3 dpns.
Join, pm for beginning of rnd, being careful not to twist sts.
Begin Stripe Pattern
Working in St st (knit every rnd), repeat Stripe Pattern for desired color version for 60 rnds. Cut all colors except A.
Divide for Heel
Slip first 13 sts from first needle, and last 12 sts from last needle of rnd onto a free needle–25 sts. Divide remaining 29 sts onto 2 needles for instep.
Heel
25 heel sts are now worked back and forth in rows as follows: With Right Side facing, attach A and work 14 rows in St st, ending with a Wrong Side row.
Shape Heel
Row 1 (right side): K16, k2tog, k1; turn.
Row 2: Slip 1 pwise, p8, p2tog, p1; turn.
Row 3: Slip 1 kwise, k9, k2tog, k1; turn.
Row 4: Slip 1 pwise, p10, p2tog, p1; turn.
Row 5: Slip 1 kwise, k11, k2tog, k1; turn.
Row 6: Slip 1 pwise, p12, p2tog, p1; turn.
Row 7: Slip 1 kwise, k13, k2tog, k1; turn.
Row 8: Slip 1 pwise p14, p2tog, p1; turn.
Row 9: K across remaining 17 sts. Cut yarn.
Divide for Gusset
With same needle, pick up and k 8 sts along edge of heel flap; with second needle, k across 29 instep sts; with third needle pick up and k 8 sts along other edge of heel flap, then with same needle, k 8 sts from first needle. Needle 1 has 17 sts, needle 2 has 29 sts, needle 3 has 16 sts–62 sts.
Shape Foot
Join, pm for beginning of rnd being careful not to twist sts, and keeping continuity of stripe pattern, shape foot as follow:
Rnd 1 (dec): Needle 1: k15, k2tog; Needle 2: k2tog, k25, k2tog; Needle 3: k2tog, k14.
Rnd 2: K even around.
Rnd 3 (dec): Needle 1: k to last 2 sts, k2tog; Needle 2: k27; Needle 3: k2tog, k to end.
Rep rnds 2 and 3 once more. Needle 1 has 14 sts, needle 2 has 27 sts, needle 3 has 13 sts–54 sts. Work even for 27 rnds. Cut all colors except A.
Toe
Rnd 1: With A, k 1 rnd even in St st.
Rnd 2 (dec): Needle 1: k across to last 2 sts, k2tog,
Needle 2: k2tog, k across to last 2 sts, k2tog; Needle 3: k2 tog, k to end. Repeat Rnds 1 and 2, 7 times more. Needle 1 has 7 sts, needle 2 has 13 sts, needle 3 has 6 sts–26 sts. With needle 3, k across needle 1. 13 sts now on 2 needles. Cut A leaving 24” tail.
Cuff
Turn stocking inside out. With wrong side of stocking facing, beginning at center back with A, pick up and k57 sts evenly spaced around top of stocking, dividing sts evenly over 3 dpns.
Beginning with a knit rnd, work in Garter st (knit 1 rnd, purl 1 rnd) for 5 rnds.
Begin Charted Pattern
Notes:
For both versions, use Soft White for color B. Pattern can be worked following written instructions or reading chart.
Read all rows of chart from right to left.
Rnd 1: With A, k4; *with B, k1; with A, k5; repeat from * to last 5 sts, with B, k1; with A, k4.
Rnd 2: With A, k3; *with B, k3; with A, k3; repeat from * around.
Rnd 3: Repeat Rnd 1. Cut B.
Rnds 4–13: With A, knit.
Rows 14-16: Repeat Rnds 1-3. Cut B.
Beginning with a knit rnd, work in Garter st for 3 rnds.
Bind off as if to purl. Turn stocking right side out.
Finishing
Graft toe sts together. Fold cuff over stocking. With right side facing and crochet hook, attach B at back; sl st in each st around; ch 12 for hanging loop, sl st to first sl st. Fasten off. Weave in yarn ends.
Grafting
- Insert the yarn needle as if to purl in the first stitch of the front needle. Pull the yarn through, leaving the stitch on the needle.
- Insert the yarn needle as if to knit into the first stitch of the back needle. Pull the yarn through, leaving the stitch on the needle.
- Insert the yarn needle as if to knit in the first stitch of the front needle (the same stitch as before) and slide this stitch off the needle. Insert the yarn needle into the next stitch on the front needle as if to purl, but leave the stitch on the needle.
- Insert the yarn needle as if to purl in the next stitch on the back needle, and slide this stitch off the needle. Insert the yarn needle in next stitch on back needle as if to knit. Pull the yarn through, but leave this stitch on the needle.
Continue repeating steps 3 and 4 until all stitches are grafted, pulling carefully as you work. When last stitch is worked, weave in remaining end.

Up Next:
Crochet Christmas Stockings: 14 Free Patterns


Thanks for your comment. Don't forget to share!
soccerbake
Nov 30, 2010
This pattern notes that it is a "crochet pattern for Christmas", but the pattern is for knitting. Is there a conversion to crochet? It looks like it would be very interesting to make, but I am not a knitter.
Report Inappropriate Comment
Are you sure you would like to report this comment? It will be flagged for our moderators to take action.
Thank you for taking the time to improve the content on our site.


![Striped Christmas Stocking Pattern [Knit and Crochet Versions]](http://irepo.primecp.com/2019/08/421962/Striped-Stocking-Crochet_Large400_ID-3353163.jpg?v=3353163)