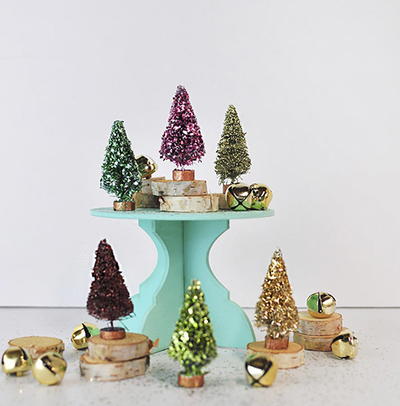
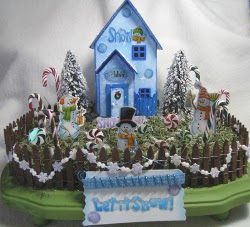
"Let it Snow" Centerpiece
Who doesn't love homemade Christmas crafts? This "Let it Snow" Centerpiece from Lisa Rojas looks great on a kitchen table and is sure to brighten everyone's spirits.
Materials:
- #656836 Sizzix Scoreboard Pro Die-House 3D by Eileen Hull
- Sizzix Big Shot Pro cutting machine
- Sizzix 12”x12” matboard- white
- 8 ¾”H x 11 ½”W wood base
- 4- Small wood candle cups
- Light Green acrylic paint
- Zip Dry Paper Glue by Beacon Adhesives
- Hot glue gun
- Green Spanish moss
- Faux snow
- Miniature trees
- Pattern paper
- Vivid! Dye inkpad-Corn Flower blue by Clearsnap
- Christmas Epoxy stickers by Recollections
- Candy canes and peppermint candy stickers by EK Success
- Toothpicks
- White card stock
- Small sign
- Snowflake garland
- Small wooden fence
- Small white bead
- Small Square Styrofoam
- Exacto knife
- Scissors
Instructions:
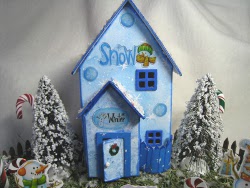
- Place matboard into the Sizzix Big Shot Pro die cutting machine with the Sizzix Scoreboards Pro House Die and cut out. Adhere pattern paper to each piece of the house using Zip Dry Paper Glue. Add color to the windows with Corn Flower inkpad. Assemble house according to the manufacturer’s instructions. Set aside.
- Paint wood base and candle cups with green acrylic paint. Let dry. Adhere candle cups to the base bottom with glue gun. Adhere Styrofoam and Spanish moss to the base with glue gun.
- Cut toothpicks in half and stick them to the back of the stickers. Lay stickers on white card stock. Once stickers are adhered to the card stock, cut stickers out with scissors. NOTE- I backed the stickers with card stock because I used Epoxy stickers, which are clear.
- Adhere toothpicks to candy canes and peppermint candies with glue gun. Add stickers to house. Adhere house to the base with glue gun. Next, glue trees, snowmen, candy canes and peppermints to the base. Glue fence around the base. Add garland around the fence.
- Adhere “Let it Snow” sticker and snowflake stickers to the sign. Adhere the sign to the fence. Sprinkle faux snow all around the base.
Read NextCheery Pinecone DIY Firestarters
Your Recently Viewed Projects

Thanks for your comment. Don't forget to share!
The Designing Peng uin
Dec 18, 2016
This could easily be made from bits of old Christmas decorations and thrift shop finds - and the kids would love to share in the making
Weberme
Aug 08, 2016
This Let it snow centerpiece is beautiful and it will look so perfect for the Christmas season setting on the mantel or the center of a table. I am going to start searching the thrift shops and dollar stores for things I can use on mine. This is the time of year that they will be putting these things out. I think I will also maybe add a fairy to mine to make it a little fairy village decorating for Christmas.
mulberrygalprinces s
Jul 06, 2016
While it is absolutely gorgeous, it's a tad out of my budget. When I added up the visit to make it did shock me. I tend to like to make decorations out of recycled items or things from the dollar store.i am thinking thus is more suited to those that are into scrap booking because they will have most of the materials. Thank you for sharing, it truly is beautiful.
Report Inappropriate Comment
Are you sure you would like to report this comment? It will be flagged for our moderators to take action.
Thank you for taking the time to improve the content on our site.