Driftwood Christmas Tree Craft
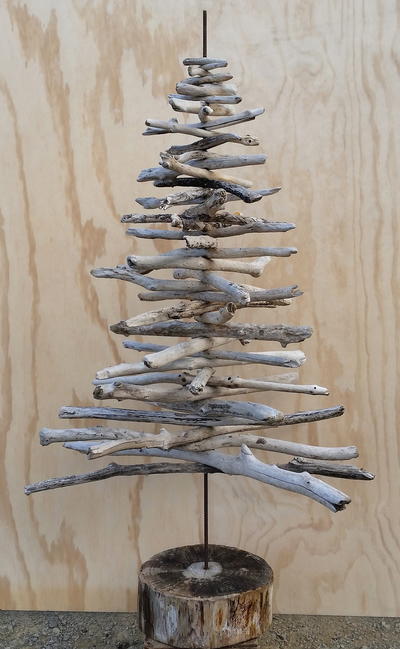
Just because Christmastime is here does not mean you have to transform your style into tinsel and glitter. These are plenty of Christmas craft ideas out there, ensuring that no matter your aesthetic you can find the DIY Christmas décor for you. Fans of nature-filled rooms and the rustic look are going to go wild for the Driftwood Christmas Tree Craft. This wood craft idea shows you how to transform pieces of driftwood into unique Christmas tree crafts unlike anything you have ever seen. You can keep this DIY craft plain and rustic or add just a hint of glam by stringing it with white lights.
Estimated CostUnder $10
Time to CompleteWeekend project
Main MaterialWood

Materials List
- 40 pieces of driftwood + a few extras
- 1x small nail
- Drill
- 20cm wide slice of log
- 2 meter length of reinforcing rod
Instructions
-
Collect driftwood. This is definitely the fun part, because you get to go to the beach to collect the driftwood! Hopefully its a beautiful day so you get to have some fun in the sun while your there. When it comes to choosing the pieces of driftwood, pick pieces that are as straight as possible and make sure no two pieces are the same length. Chose the widest piece of driftwood first, mine was 1.15metre, this will form the bottom branch. Then collect successively shorter and shorter pieces until you get to the shortest piece, mine was 15cm, which will then be the top branch. I laid mine out on the beach so I could eye up how it was going to look and to make sure I had the right amount of driftwood and they were the correct lengths. Grab a few extra pieces just in case some break during the drilling process, especially the smaller sizes.
-
Drilling holes in the driftwood. Once I dragged all my driftwood home I then moved onto drilling the holes in the center of each piece. Use a drill-bit the same size or slightly larger as the reinforcing rod, this way they will easy slide down the rod when it comes to assembling the tree. I broke a few pieces while doing this step, especially the smaller ones, so this is where the few extra pieces come in handy.
-
Drill hole in the log. Drill a hole in the center of the slice of log 3/4 of the way through, using a drill-bit slightly smaller than the reinforcing rod. Slide the reinforcing rod into the hole. You may need to use a hammer to gently tap it in. Make sure it fits snuggly.
-
Drill hole in reinforcing rod. Measure 30cm up the reinforcing rod from the base and drill a small hole through the rod. Place the nail through the hole and use a hammer to bend the nail so it is parallel with the reinforcing rod. This will hold the driftwood up and create space for the trunk. It will not be seen as long as the nail is small enough.
-
Assemble the tree, Now the fun part! Slide the driftwood pieces down the reinforcing rod starting from the longest to the shortest. Arrange the driftwood branches so they are pointing in various directions to resemble a real tree and your done!
Read NextElegant DIY Nativity Wreath
Your Recently Viewed Projects
Marilyn B
Nov 11, 2017
This is quite a clever idea and looks really great! You could keep it plain and simple as shown, or, for a bit of whimsy you could make a little garland of braided fabric, or metallic cord and drape that around the twigs. You could also hang mini ornaments from it. Or even add a small strand of battery operated LED rice lights and a star at the top. So pretty and classy too!
Bronze Hazel
Feb 02, 2017
This is stunning and definitely not just for Christmas. I think it would make a beautiful decoration all year round. It's such a clever idea to turn branches and twigs back into a tree. It would also be very easy to vary the size of the tree to suit different spaces.
Report Inappropriate Comment
Are you sure you would like to report this comment? It will be flagged for our moderators to take action.
Thank you for taking the time to improve the content on our site.


