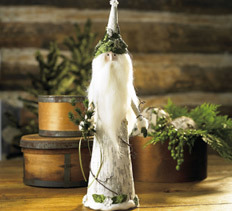
Wooded Santa
Create this beautiful wooded Santa to add to your fabulous collection of Christmas crafts. All you need are some craft foam shapes, birch bark, clay and a few other materials. This is a great project for those who are looking for more of a rustic theme to their Christmas decor, and this Santa can easily transform your home into a folk artsy winter wonderland. Place this Santa on your dining room table as a centerpiece or let him sit on your windowsill to send warm wishes to those who pass by. One thing's for sure, you're sure to love the warm feeling this cute nature-inspired Santa gives your home this holiday season.

Materials:
- Craft foam shapes*: 12" cone, 2 1/2" egg
- Birch bark –about two 8" x 10"
- Two 3/8" x 5" wooden dowels
- Acrylic roller
- White wool roving
- Cream colored slub yarn
- Beige oven bake clay*
- 12 sprays of three velvet leaves
- Green mini spray
- Brown floral tape
- White flowers
- Craft wire
- Extra-long straight pins
- Tacky white craft glue
- Optional: Thin grapevine
- Black permanent marker
- Parchment-covered baking sheet
- Craft knife
- Foil
- Hot glue gun & glue sticks
- Pencil
- Serrated kitchen knife
- Wire cutter
Tips for Working with Birch Bark
- Use birch bark that is thin enough to bend easily.
- If needed, peel a thin layer from a thicker piece of birch bark. To do so, lay white side of bark face down and work from back. Gently peel back a corner of the bark until you can grasp it firmly. Pull back of bark away while holding the thin, white bark down firmly with the other hand.
- To prevent tearing, pull the back down at right angles to the horizontal striations on bark.
- If you hit a knot in the bark and it feels like the bark will rip, stop and use a craft knife to gently cut through problem area.
Instructions:
Finished size: 15 1/2" tall Santa
- Preparation. Use serrated kitchen knife to cut top 1" off the craft foam cone. Hot glue narrow end of 2 1/2" egg to top of cone.
- Make face. Roll a small piece of beige clay into an egg shape. Use roller to flatten clay to 1/8" thick. For nose, gently smooth a tiny ball of clay onto center of shape. Press clay onto front of craft foam egg so that the clay fits snugly. Remove clay and place over a similar sized ball of foil so that clay retains its shape during baking. Place on parchment-covered baking sheet and follow manufacturer’s directions for baking clay. When cool, use hot glue to attach to the center of craft foam egg. For eyes, use black marker to draw on two dots.
- Cover cone with birch bark. Use hot glue and extra long straight pins to wrap a thin piece of birch bark around cone. If unable to cover whole cone, leave any exposed areas at back. Cut off excess bark around bottom of cone. Cut a piece of bark to cover any exposed areas at back. Hot glue in place.
- Make arms. Cut a piece of bark about 2" x 4" to cover each wooden dowel arm. Glue birch bark around dowel, leaving about 1" of wood showing at top of dowel. Temporarily wrap some craft wire tightly around bark to hold in place until glue dries. To attach arms to cone, use tip of craft knife to cut a hole through bark about 3/4" down from neck to fit each dowel. When arms are dry, push uncovered end of dowel through hole in birch bark and up into foam inside. Press dowels down so arms hang at a slight angle to body.
- Make hat & hair. Roll a scrap of birch bark into a cone-shaped hat, glue closed, and trim away excess bark at bottom so hat fits on top of Santa head. For hair, gently pull tufts of natural wool roving that are about 4" long. Use white craft glue and pins to attach wool around head. Glue more wool on for beard. Gently roll wool between fingertips at end of beard to give it a slightly curled shape. To make mustache, roll a 2" tuft gently between fingertips. Glue to ace directly under nose.
- Hot glue and pin hat onto Santa. Glue a row of velvet leaves around base of hat. Glue on several more rows of leaves around those. Glue on bits of lichen from birch bark and a few artificial flowers as shown.
- Make trim & hands. Hot glue a row of slubbed yarn around base of Santa and around ends of arms. Glue velvet leaves and flowers around base of Santa, if you want.
- To make hands, glue velvet leaves back to back. When glue is dry cut leaves into mitten shapes and glue to ends of dowels. Glue on a bunch of artificial greens to one hand, if you want.
- Finish. Optional: Wind grapevine around Santa body and arms, if you want. To make your own vine, cut 12" to 18" lengths of craft wire. Wrap wire tightly with brown floral tape. Make extra tendrils by rolling a piece of brown floral tape between fingers. Wrap end of tendril around thicker wire to attach, and then wrap tendril around a pencil to curl. Glue one end of vine up under beard and gently wrap around cone. Pin end to secure and glue a leaf over vine to hide.

Read NextCrochet Reindeer